Quick Summary
Hosting a webinar comes down to five steps:
- Plan: Choose one goal and a topic that gives your audience something useful.
- Set up: Decide between live, simulated live, or on-demand with chat, then choose your software and build a registration page.
- Prepare and promote: Start promoting about a month ahead, assign responsibilities, and rehearse the presentation.
- Present: Use chat, polls, and questions to involve attendees, and give them a clear next step.
- Follow up: Email attendees and no-shows within 24 hours, then review registration, attendance, and conversion rates.
Keep one-time events live. Sessions you deliver repeatedly can run on demand with chat, so people can attend when it works for them.
Step 1: Plan your webinar
Before rushing in to host a presentation, it’s important to first plan out your webinar strategy. The sections below will go over webinar goals and topics plus give you a downloadable checklist template that you can use to plan upcoming webinars!
Set clear webinar goals
Setting webinar goals is the first step you need to take since it will inform most of your downstream decision-making. Without clarity on why you’re hosting a webinar, it will be difficult to strategize on how to host your webinar.
There are multiple reasons why people host webinars such as:
- Onboarding and training. Webinars are often used to onboard users and train customers, especially in the SaaS world. Customer success teams often host the same webinar over and over again only to answer a familiar combination of frequently asked questions each session.
- Driving sales/conversions. Webinar funnels can be used to generate revenue by reaching multiple prospects at once (compared to 1-on-1 sales calls). Once conversions start coming in reliably, most hosts transition towards an automated webinar funnel to eliminate the need for live webinars.
- Generating qualified leads. Webinars can also be used to generate leads by hooking cold website visitors in and educating them on the product/service a company sells. Similarly, webinars could be used as a mechanism for disqualifying leads by explaining who the product/service isn’t for.
- Increasing brand awareness. Not all webinars are geared toward generating leads or making sales. Others simply seek to generate interest, build an audience, and increase brand awareness. These webinars usually consist of free workshops, thought leadership, or a panel discussion.
The goal you choose determines what you’ll measure afterward. For customer training, look at attendance and how much people watch. For a sales webinar, track the number of attendees who take the next step. We’ll cover these metrics in Step 5.
Choose a webinar topic that aligns with your goals
Once you’ve set your goal, you’ll want to select a webinar topic that ties into that goal while still providing value for those who attend the presentation. Those spreading awareness usually default to the topics of broadest appeal while conversion-focused webinars opt for product-led topics.
Follow a webinar planning template
If you’re overwhelmed by the amount of things that go into planning your webinar then you can have a look at our Ultimate Webinar Checklist for an eight-week timeline of the webinar planning process, plus a free downloadable checklist that you can use to ensure you don’t miss anything!
Step 2: Set up your webinar
With your goal and topic decided, choose how people will attend. That determines the software, the schedule, and the registration page you’ll need.
Decide how you’ll host it
Choose the format based on whether people need to hear from a presenter at a particular time and whether the session will be repeated.
A live webinar gives attendees the chance to speak with the presenter while the event is happening. Simulated live plays a prepared video at scheduled times, while the team may be available to answer questions. On-demand with chat lets people choose their own time and ask your team questions as they watch.
Live | Simulated live | On-demand with chat | |
Who needs to present? | A presenter delivers the session | The video plays automatically | The video plays automatically |
When can people join? | At the scheduled event time | At scheduled replay times | On demand or at recurring times in their time zone |
How are questions answered? | The presenter or event team answers during the session | Someone may need to be present to monitor questions | Your team replies through chat, right away or later by email |
Best for | Launches, guest talks, and current discussions | Replaying an event at set times | Repeated demos, onboarding, and customer training |
Check what your chosen simulated-live software requires for questions. One event producer described running unattended simulated-live sessions where chat was disabled, questions were collected separately, and staff answered by email afterward.
That arrangement works if you’re clear about when people will hear back. If answering questions is central to your webinar, check how attendees reach a person before choosing a format.
Put the webinars you repeat on demand
Live works best when the event happens once and the conversation needs everyone there at the same time: a product launch, an interview where attendees can question a named guest, or a discussion of this week’s news.
The webinars you repeat are different. The same introductory session every week, a monthly product webinar or a lead-generation webinar you run each quarter doesn’t need a presenter every time. Presenting it live limits attendance to people who are free at that hour, takes time away from other work, and the quality depends on how prepared the presenter is that day.
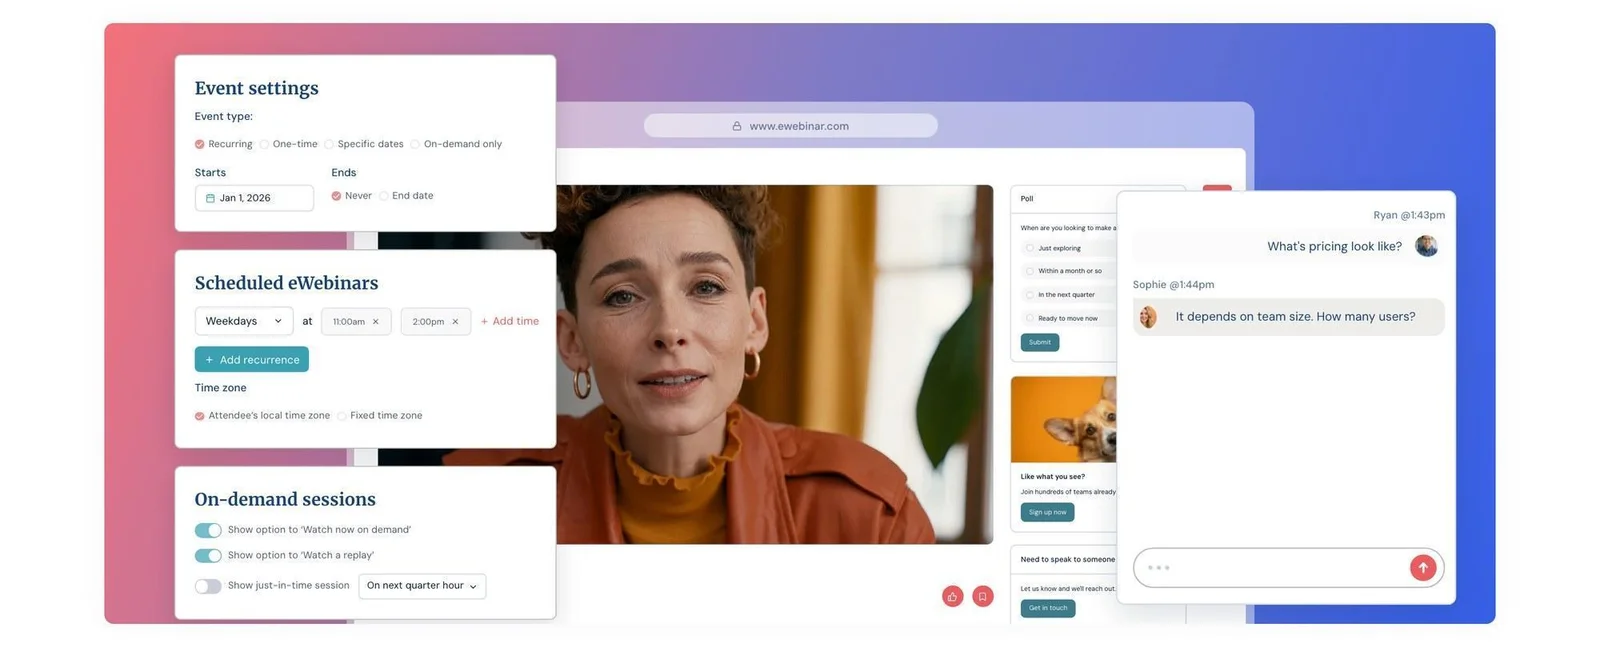
eWebinar is on-demand webinar software with chat. You record your best version of a webinar once, then make it available on demand or on a recurring schedule. Attendees choose when to join, polls and questions appear at the same points for every viewer, and attendees can ask questions in chat. Your team replies right away, or later by email if no one’s around. Registration captures who’s attending, and per-attendee data shows what each person watched, how they answered and where they engaged, so your follow-up can be more relevant.
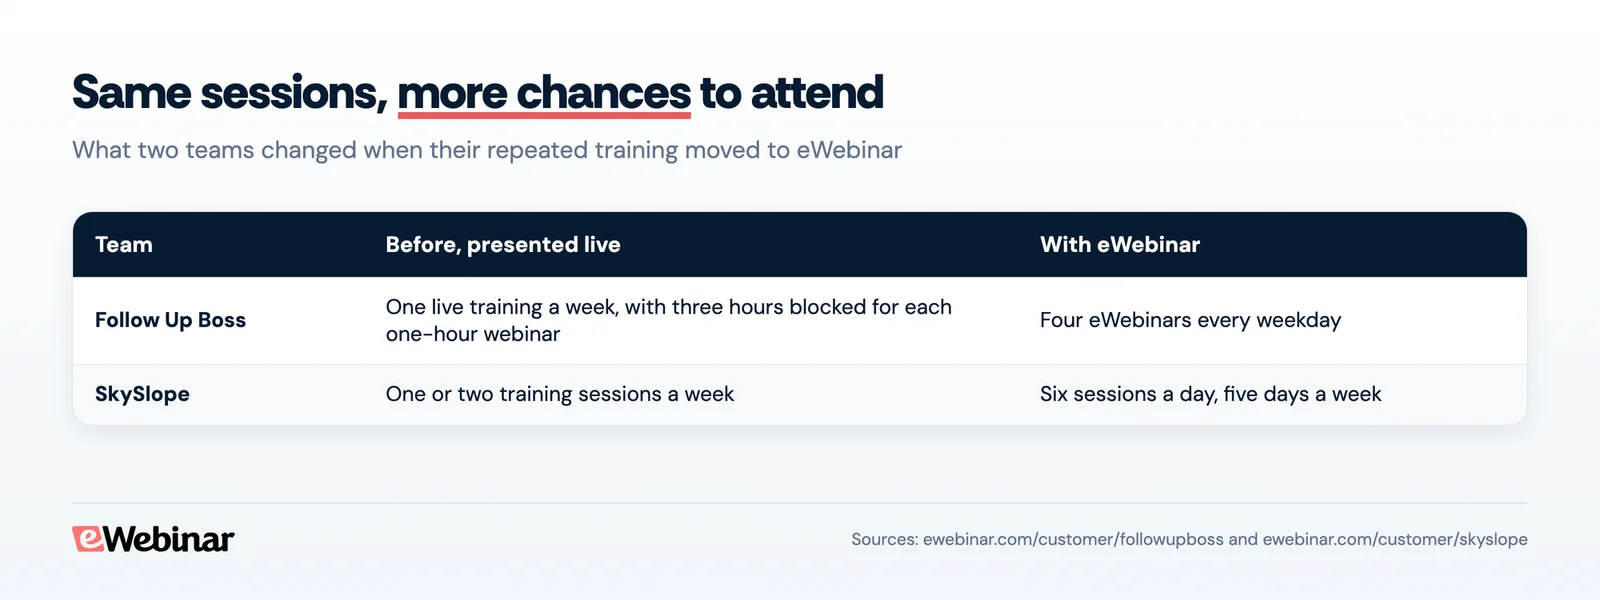
Follow Up Boss went from offering one live webinar a week to four eWebinars each weekday on different topics. SkySlope expanded from one or two weekly webinars to six a day, five days a week.
We run our own product demo the same way. Between March and August 2026, it delivered 505 hours of demos to 1,065 prospects, with no salesperson on the call.
Start with one webinar you deliver repeatedly with little change, and keep your launches, guest interviews and time-sensitive discussions live. You don’t have to choose between live and automated. You just need the right tool for each job.
Choose the right webinar software
Not every webinar platform is created equal and the software you should use also depends on your webinar format (i.e. whether the webinar is live or automated). The argument between webinar formats can wait but compiled below is a list of live and pre-recorded webinar platforms.
If you’re wondering how we chose these platforms then read our Best Webinar Platforms guide!
Note: The common assumption that live webinars are always better than automated webinars doesn't hold up against modern webinar automation capabilities. Read our article on pre-recorded webinars to learn more about their use cases and benefits — or watch our demo to see for yourself!
Best live webinar platforms
- ClickMeeting
- Livestorm
- BigMarker
- Zoom
- GoToWebinar
Best pre-recorded webinar platforms
- eWebinar
- Demio
- EasyWebinar
- WebinarGeek
- EverWebinar
Pricing and capacity
If you cater to a large audience then you'll want to be sure the webinar solution you choose has reasonable bulk pricing and sufficient capacity to accommodate your attendees.Automated webinar platforms are less prone to capacity issues since not all attendees will be watching concurrently.
Live webinar software is also more susceptible to technical issues since the presentation needs to function on both ends. In the same vein, it tends to get more expensive as you scale up due to the server costs of live-streaming a presentation to thousands of attendees simultaneously.
Give your webinar an attention-grabbing name
Webinar titles play a large role in how many signups you’ll be able to get.
There are a few best practices to keep in mind when writing your webinar title such as knowing your audience, including a number, highlighting benefits, and inserting the right keywords for SEO (assuming the webinar will be used as a long-term asset).
Here are proven templates you can use to create enticing webinar titles:
- How to [Do Something Good] in [Time Frame] Without [Doing Something Bad]
- [Number] Little Known Ways to [Do Something Good]
- [Topic] Trends Changing the Way We [Do Something]
- The New Trend in [Topic] that [Well-Known Expert] Swears By
- [Topic] 101: How to [Do a Basic Thing]
- [Number] Ways to [Do Something Good] in [Current Year]
Start by adapting these templates to your topic and then gradually iterate to optimize over time.
Write your script using a proven formula
How in-depth your script should be will vary from one webinar host to another. Some prefer reading a full script verbatim while others prefer to set off with just a few bullet points. Regardless of which approach you take, it’s important to follow a proven formula when structuring your script.
One example would be the five-stage product demo structure that we use in our own on-demand demo:
- Introduction. Take a minute (but no longer) to introduce yourself and outline what the presentation will cover. This helps you set expectations and get attendees into a listening headspace before proceeding with the rest of the presentation.
- Backstory. Explain the problem, your unsuccessful attempts at solving it, and how that experience drove you to create a unique solution in the form of your product. This helps you empathize with your audience, agitate their pain points, and establish your firsthand experience in one fell swoop.
- Competition. Dive deeper into the specifics of the problem and explain how other solutions on the market fall short of solving it. This gives you an organic opportunity to highlight the unique value that your product provides while shedding light on the market gap that justifies its existence.
- Solution. Now that the audience knows what the problem is, why it’s so hard to solve, and how your experiences led you to build a solution, it’s finally time to introduce your product. For an impactful entrance, showcase four standout features and finish with a fifth unique benefit.
- CTA. The point of using a proven presentation structure is to warm attendees up for the call to action at the end. We’ll show you how to use an effective call to action that converts attendees into customers in the section on how to host your webinar!
You can find tons of presentation structures online for various types of webinars. To see more examples, browse our webinar examples!
Find the optimal webinar length for you
First off, it’s worth noting that there’s no such thing as a one-size-fits-all “optimal” webinar length since the runtime of your webinars will depend on your goals and use case. Common sense will serve you better than hard and fast rules over what the minimum/maximum webinar length is.
This means that your webinar should be as long as it needs to be but not a second longer. Use as much time as you need to tell your audience what they need to hear then get to your call to action while you still have their attention. A universal best length simply doesn’t exist.
For a one-hour educational webinar that includes discussion, you could divide the time this way:
- Intro: one minute
- Core presentation: ~45 minutes
- Question and answer: 10-15 minutes
Schedule your webinar for maximum attendance
Once you know how long your webinar is going to be, it's time to figure out when it should happen. Studies show that the best time to host a webinar is on Wednesday and Thursday at 11 AM or 2 PM. While these timeslots do yield marginally better results on average, there’s no true best time and day to host a webinar.
People are usually less busy during the middle of their week/day, this isn't universal — which makes it impossible to reach everyone with a single session. This leaves you with a choice between automation or stepping into thewebinar hell of hosting presentations repeatedly at odd hours
In addition to saving you from hosting the same webinar over and over again, automation also increases attendance by making it as convenient as possible for people to attend. On eWebinar, on-demand sessions average 83% attendance, compared with 30 to 40% for an average live session.
Build a high-converting landing page
Once you’ve chosen the dates or enabled on-demand access, build the registration page around what attendees will learn. Give them the topic, the expected outcome, and the available times before asking them to sign up. While the exact language you use will vary depending on the target audience, there are certain tenets that can be applied universally.
Here are a few best practices for creating a high-converting webinar landing page:
- Captivating headline. The headline of your landing page will have the largest impact on the registration rate since it’s what hooks visitors in before they bounce. It must clearly convey the topic, highlight the benefits of attending, and create a sense of urgency. Example: How to 2x Organic Traffic With On-Page SEO [Registration Ends Soon]”
- Outcome-focused description. Elaborate on the specific benefits and outcomes that attendees will be able to achieve by attending your webinar. In practice, this could look like a bullet list with three ways that a registrant’s life will get better and/or become easier after attending the webinar.
- Credibility-reinforcing speaker bio(s). You need to establish the credibility of the host and any guest speakers who will be participating in the presentation. Include their role, company, years of experience, and any suffixes such as CPA or PhD.
Tip: You can look at our curated list of webinar landing page examples for inspiration!
There are three more best practices to follow when designing the webinar registration form itself:
- Ensure the registration form or button is visible above the fold so visitors can register without scrolling down.
- Use contrasting colors for the registration button and/or form background to help it stand out.
- Integrate the registration form with your CRM platform of choice to sync registrant data.
Step 3: Prepare and promote
Creating your webinar is a huge milestone but it’s also just the start of the journey. Now you need people to sign up and a team ready to deliver the session. The sections below will show you how to promote your webinar and prepare for the presentation.
Promote your webinar across multiple channels
Webinar promotion is one of the most important steps of the process since it will determine how many registrants you ultimately get.
Give a one-time webinar at least a month of promotion, particularly if you’re trying to reach people who haven’t attended one of your events before.
Send your first invitation when registration opens, share the topic through your usual channels over the following weeks, and send reminders as the date approaches. Leave time for a final reminder 24 to 48 hours before the event, when registrants may have forgotten what they signed up for.
While the exact strategies you use may differ based on your target audience, there are a few go-to channels that most webinar hosts rely on to promote webinars.
Popular webinar marketing channels:
- Social media. Facebook and LinkedIn are the best options but other social media channels are also worth considering. The drawback is you’ll need to post regularly to get organic traction whereas paid ads should only be used on established webinars with proven results.
- Email marketing. Email marketing is a powerful promotion tool for hosts with an existing audience. Sending a webinar invitation to your newsletter subscribers can generate early signups. You could also invite attendees from previous webinars using the email they originally used to register.
- Cross-promotion. If you don’t have your own audience, you could leverage the reach of your guest speakers. The downside is that cross-promotion campaigns usually take time to organize so you’d need to coordinate with your co-presenters ahead of time.
- Customer invitations. For onboarding and product training, ask customer success managers to invite the people they work with. Tracy Shouldice, Director of Customer Success at Trend Micro, reported a 38% open rate for webinar invitations sent by CSMs, compared with 1% to 2% for similar marketing emails. An invitation from someone the customer already knows gives the session a more personal introduction.
- Organic search. Organic content is best used to promote an on-demand webinar that serves as an evergreen asset rather than a one-time event because it can take a while for new articles to rank. Alternatively, consider inserting registration widgets in existing posts that already get traffic.
Prepare a supporting slide deck
Slide decks are a handy visual aid that helps you get your point across to the audience. There are a few slide deck best practices to follow like only covering one idea per slide, framing text in the center of each slide, and using QR codes instead of links so attendees can scan to get the URL.
Tip: As an alternative to slide decks and other presentation materials, you could also opt for using a whiteboard to illustrate your talking points in real time.
Get the right webinar equipment
Having the right webinar equipment will improve the audio quality and visual clarity of your presentation.
Here’s our recommended setup for the budget-conscious webinar host:
- Webcam. The Logitech C922 Pro costs $119.99 on Logitech’s US store and records at 1080p and 30 frames per second. It has autofocus and automatic light correction. Check the camera preview during your rehearsal to make sure the image is clear.
- Microphone. The Yeti Nano costs $119.99 on Logitech G’s US store. It’s a USB condenser microphone, so you can use it without a separate audio interface. Clear audio deserves particular attention because people need to understand every word, especially when you’re explaining a product or teaching a process. Test the sound before the event.
- Camera setup. Set up your camera before the dry run and keep the same position during the event. Check the preview to make sure the audience can see what you intend to show, whether that’s you speaking to the camera or a shared presentation.
Remember, no one is expecting Hollywood production quality on your webinars. As long as you have the software and hardware to provide a seamless presentation then the audience really won’t care that the webinar isn’t in 8K resolution or capturing audio through a $10,000 Sony C-800G microphone.
Conduct a dry run
It’s incredibly important to test your setup in anticipation of each upcoming webinar. This will help you identify potential problems that could occur during the presentation and nip anything you find in the bud before going live.
Run a full rehearsal at least 24 hours before the event, using the same computer, microphone, camera, and software you’ll use on the day. Have someone join as an attendee so you can check what they see and hear, rather than relying on your own presenter view.
Also test what happens if the presenter disconnects. In one event producer’s account, an offsite venue lost internet for three minutes during a webinar. A backup presenter watching from another location was able to keep the event going. Assigning that person before the event gives you a practical fallback when the connection fails.
What to check during your test webinar:
- Video. Confirm if the webinar software is detecting your webcam and displaying the video in the correct resolution. While you’re at it, this is a good opportunity to see if your lighting setup and green screen (if you have one) are optimally positioned.
- Audio. Check whether the audio is clear and properly synced with the video feed. Record a short test, play it back, and check that the microphone is selected correctly and isn’t muted.
- Internet. Running an internet speed test on the day of the webinar is always a good idea. The higher your video resolution, the faster your internet will need to be to keep up. For a live webinar, have a backup presenter ready in case the speaker loses their connection.
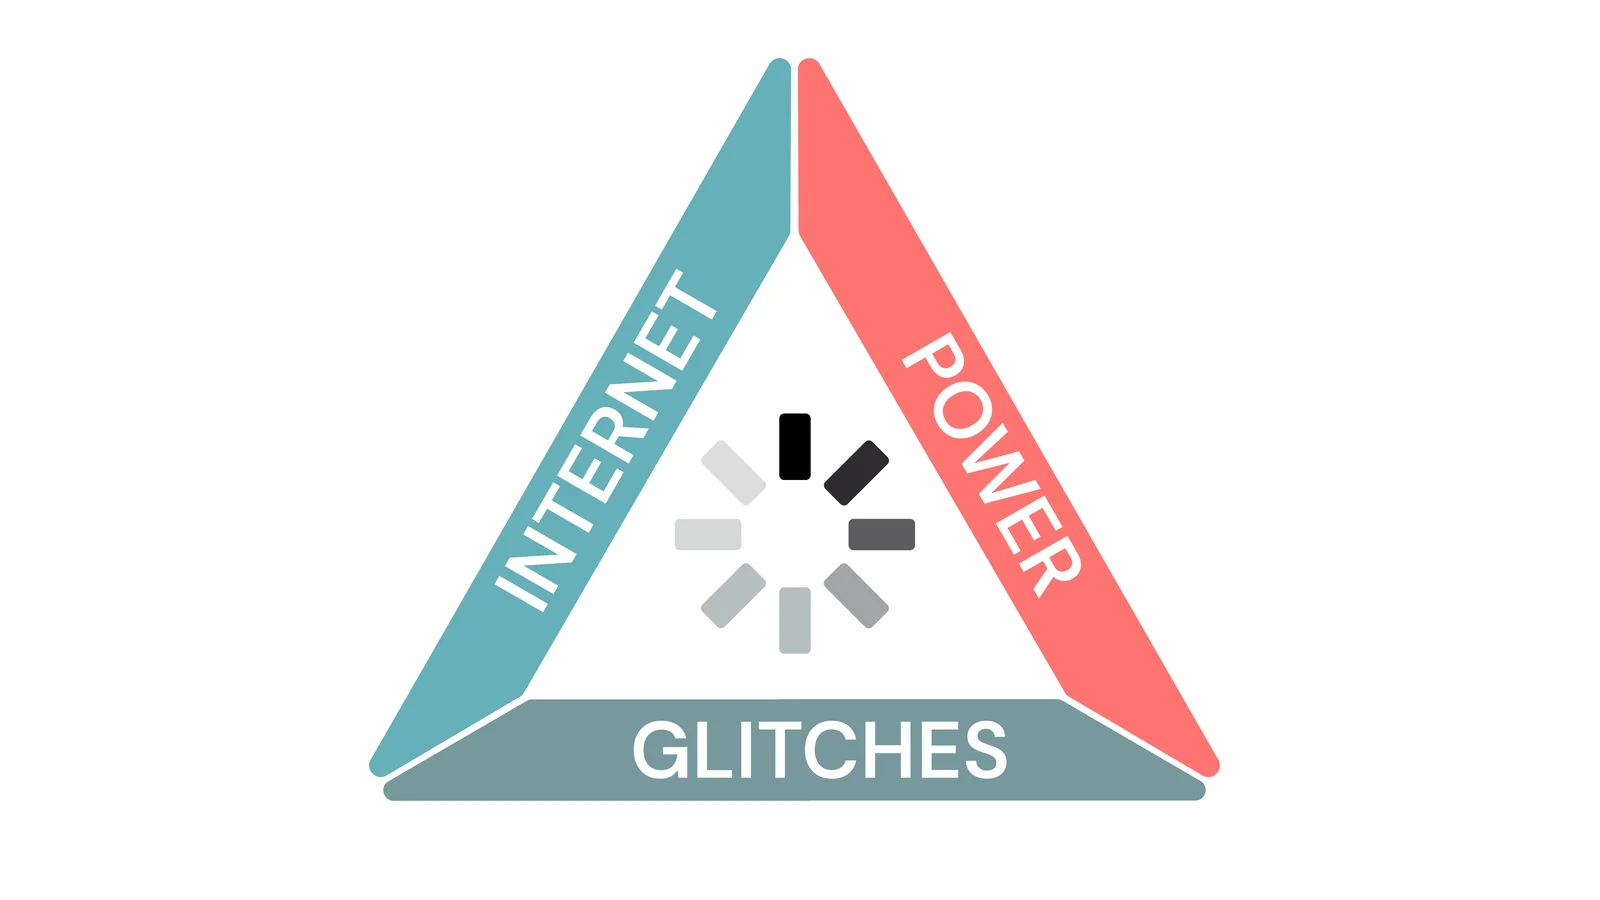
A live presenter can still lose the session to webinar latency, a power cut, or an internet outage. A video uploaded in advance removes the risk of the presenter’s connection interrupting playback, although attendees still need a steady connection to watch.
These three risks are so prominent that we refer to them as the Triangle of Technical Difficulties:
Decide who hosts, presents and moderates
The host runs the webinar: they open the session, introduce speakers, keep time, manage the controls and lead the Q&A. On a small team, the host is often also the presenter, which is why it helps to hand the other jobs to someone else.
Running a live webinar becomes harder when the person presenting also has to watch incoming questions, switch slides, and troubleshoot problems. Divide those jobs before the rehearsal.
Give one person responsibility for the session controls, including starting the presentation, switching speakers, and launching polls. Let speakers concentrate on their presentations, while another team member watches chat and incoming questions and passes anything important to the right person.
Plus, put the presentation order, names, timings, slide changes, and technical cues into a one-page run of show. Share it with everyone before rehearsal, including the backup presenter, so each person knows what to do if something goes wrong and moderating chat and questions is one person’s clear job.
Use a day-of-webinar checklist
The preceding sections should cover the most important parts of your webinar preparation. That being said, it’s still possible to overlook something or have a task slip your mind on the big day. To help you avoid that, we’ve created a free downloadable webinar checklist along with a full article going over each step!
Step 4: Run the session
Once attendees join, your job is to deliver the presentation clearly, make room for questions, and help people take the next step. The interactions you planned earlier should support what you’re teaching rather than interrupt it.
Open the session
Start on time and welcome people as they join. Cover the housekeeping next: how to ask questions, how long the session will run, and whether attendees will get the recording. Then share the agenda so people know what’s coming, and introduce each speaker by name and role before handing over.
Engage your audience by interacting with them
A group can attend a webinar without taking part in it.
Give people specific opportunities to respond as the session progresses. At Sendoso, the team running monthly customer sessions uses polls, chat, and reactions alongside practical product demonstrations. These give attendees something to do while they learn, and the team can see which topics prompt responses.
Leverage chat
Questions often come up while someone is looking at a particular screen or hearing an explanation. Chat gives attendees a way to ask at that point, while the detail is fresh, without interrupting the whole presentation.
Furthermore, engaged attendees who feel heard are more likely to digest the information and/or convert upon hearing your call to action. Despite chatting with attendees being non-negotiable, a surprising number of platforms get it wrong.
Certain platforms let you chat with attendees live during the presentation but don’t provide any ways to reach out to them after the webinar ends. Conversely, older automated webinar platforms rely solely on email contact forms and don’t even have a chatbox (or use a simulated chatbox with fake messages).
Note: In addition to the loss of trust that occurs when attendees realize that messages they’re seeing aren’t from other humans, any messages from real attendees go into the void instead of your inbox.
Make sure someone is responsible for incoming questions, and check what happens when that person isn’t available. For an on-demand webinar, attendees need a way to leave a question and receive an answer later, rather than losing the conversation when the video ends.

With eWebinar’s chat, your team can answer from a computer, phone, or Slack while someone is watching. If nobody replies within the time you’ve set, an automatic message lets the attendee know. Your team can answer afterward, and the reply reaches the attendee by email.
Incorporate interactions
Beyond chatting with attendees (which can be hard to do constantly without interrupting the flow of the presentation or losing your train of thought), adding interactive elements is another way to keep the audience engaged.
This could include:
- Polls to let attendees cast their votes
- Quizzes to test the audience on what they learned
- Special offer popups that can only be claimed during the webinar
Those are just a few examples and the interactions available to you will vary based on which webinar hosting platform you’re using. For instance, eWebinar has 25+ interactions that you can insert at any point of your presentation by dragging the playhead across your webinar timeline:
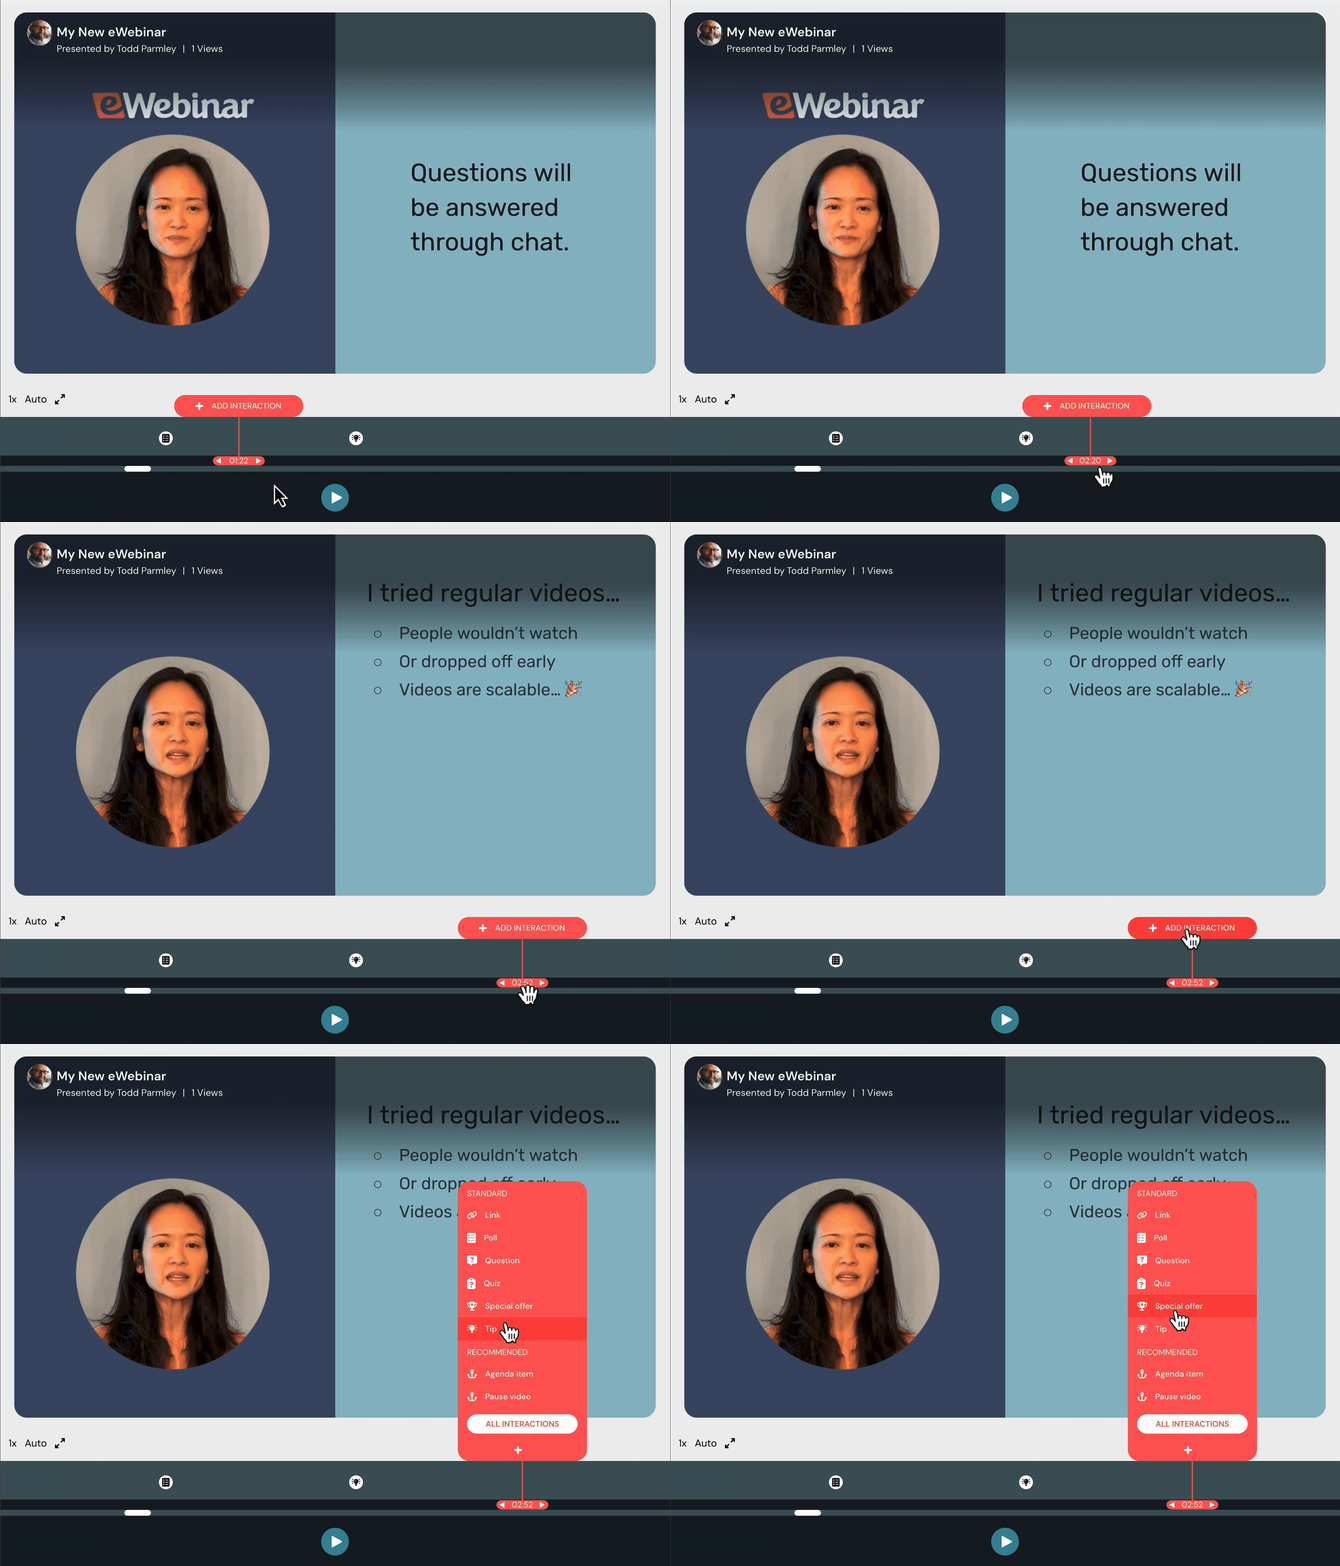
Plan a poll, quiz, or question every three to five minutes, wherever it fits naturally into the topic. Ask about something the attendee has just learned, or use a poll response to understand which part of the product they want to explore.
With an on-demand session, you set these interactions in advance, so every viewer sees each one at the same point in the video. You can make your webinar interactive without someone needing to launch the polls during every session.
Collaborate using whiteboards
A collaborative whiteboard lets attendees draw, label, or work through a problem together while a trainer guides them.
It works especially well when you want everyone to practice a process rather than watch a demonstration. This is particularly effective during instructional “workshop” webinars in order to help attendees learn by doing.
Check whether your webinar software has a built-in whiteboard before setting up a separate workspace. If it doesn’t, you can use Miro, Lucidspark, or FigJam. Test whether attendees need an account or special permissions to contribute before the workshop starts.
If your platform has one, you can use a built-in whiteboard during the webinar itself, which saves attendees from opening another tool.

Handle problems during the session
Something will eventually go wrong: a speaker’s audio drops, slides won’t share, or a guest loses their connection. Stay calm and tell attendees in chat what’s happening. Let the backup presenter you assigned take over, or move to questions while the issue is fixed, so attendees aren’t left watching a frozen screen.
Drive your audience to a clear call to action
If you’re hosting webinars with the goal of generating sales then the webinar CTA is where all your efforts to this point will pay off, if you execute it properly. As far as which words you should use, there are a few factors that need to come together:
- Action-oriented. Experimenting with various action-oriented words will make attendees more likely to follow through to the next step after hearing your call to action. PartnerStack increased its homepage conversion rate from 6.66% to 14.09% after changing the wording of its CTA from “Book a Demo” to “Get Started”. The clearer action gave visitors a way to move forward without first committing to a sales conversation. Note: PartnerStack’s Director of Demand Gen, Joe Kevens, hypothesized that the reason for the uptick in conversions was that the old CTA made it sound like PartnerStack was trying to make a sale whereas the new version expressed a neutral interest to solve their problem.
- Value proposition. No matter how actionable your language is, attendees won’t bite unless you have a clear value proposition. You need to focus on the benefits (whether financial, convenient, or time-saving) that attendees can reap by taking the next step and what the outcome will look like.
- Urgency & scarcity. Urgency is used for limited-time offers while scarcity is used for limited-supply offers. We’d generally advise against creating arbitrary deadlines or artificially limiting supply because false urgency/scarcity could damage your credibility as a host.
- Discounts/incentives. Offering special discounts or incentive giveaways during the webinar (and in follow-up emails) can help you convert attendees who are on the fence about moving forward. However, use these tactics sparingly so the offer remains meaningful and the presentation doesn’t become a series of sales pitches.
When you bring up the CTA is just as important as what you say.
While the exact point of your CTA will vary depending on the webinar topic, structure, and format, the rule of thumb is that you should spend 80% of your presentation providing value to attendees and use the remaining fifth to pitch them on taking the next step.
It’s important to realize that CTAs are a must-have for all webinars, not just those that aim to generate sales. If attendees have spent the past half-hour watching an onboarding or training webinar, the least you can do is lead them to the next step or prompt them to test a feature.
Tip: When designing CTA buttons, it’s best to use complementary colors to help them stand out.
Hold a Q&A segment at the end
While it’s normal for conversion-focused webinars to end after the call to action, other webinars used for thought leadership or onboarding/training tend to have the host stay on for a question-and-answer segment.
In most cases, there are three types of messages you’ll receive during a Q&A segment:
- Questions. Questions usually revolve around the information you may have glossed over or neglected to cover altogether. As you identify the most common attendee questions, work on revising your webinar script so that future presentations can address these points proactively.
- Objections. If you’re hosting a sales webinar then there may be lingering objections that you failed to overcome during the presentation itself. Uncovering these objections before the webinar ends may be your best chance at converting leads now rather than via follow-up emails.
- Feedback. Lastly, collecting feedback while the presentation is fresh in the minds of your audience is always a good idea. Not all attendees will volunteer their feedback so be sure to prompt the audience by asking them about their experience or requesting suggestions.
For a live session, leave time to answer questions at the end, but have a plan for the ones you can’t get to. One webinar producer on a community discussion about unattended sessions described collecting the questions immediately after the event so the customer’s team could email answers over the next day or two.
For an on-demand session, questions arrive whenever people attend. Your team can answer through chat when available, then follow up by email later if nobody was around when the question came in.
Private chat also lets attendees ask about their own situation without speaking in front of everyone. That’s useful for customer training, where someone may want help with their account or a particular feature.
To see the eWebinar chat in action, play the on-demand demo embedded above!
Step 5: Follow up after your webinar
The job isn’t done when the webinar ends. Whether it’s qualified leads who didn’t convert or SaaS users who need further guidance, following up with attendees after the webinar presentation is crucial. The sections below will go over follow-up emails, post-webinar surveys, and webinar analytics!
Send follow-up emails
Send your follow-up emails within 24 hours, while the presentation is still fresh. Prepare separate messages for attendees and people who registered but missed the event, because they need different things from you.
For sales webinars, respond sooner when someone shows strong interest, and refer to the questions they asked or the comments they left in chat. That gives the follow-up a reason beyond thanking them for attending.
For customer training, use the same principle. If someone asked how to configure a feature, send the instructions they need. If they didn’t attend, help them find another session. In the latter case, you’ll want to include a link to the webinar replay so they can watch the presentation at their convenience.
Ideally, you should have a different webinar follow-up email for each segment:
- Registrants who didn’t attend
- Attendees who showed up but left early
- Attendees who watched the entire presentation
This gives you the opportunity to personalize the content of your follow-up email depending on how much of the presentation (if at all) attendees ended up watching. Even if someone finished the presentation, it’s still helpful to summarize the key takeaways and repeat your call to action.
Take a post-webinar survey
Including a post-webinar survey in your follow-up email lets you collect direct feedback from attendees and use those insights to improve future webinars. Even if you already asked for feedback during a Q&A segment, it’s worth asking again in case they were uncomfortable sharing or have additional thoughts.
Three post-webinar survey questions you should ask are:
- How would you rate this webinar?
- Were your expectations met?
- What needs to be improved?
The first question provides a quantitative measure of how well the webinar was received, the second determines whether the presentation fulfilled the registration intent, and the third prompts specific feedback on what you can do better next time.
Measure your success with webinar analytics
Last but certainly not least, look at your webinar analytics to see performance data and identify areas to improve upon. These actionable insights will drive your webinar strategy moving forward and help you continuously improve upon past results.
The three most important webinar metrics to review are:
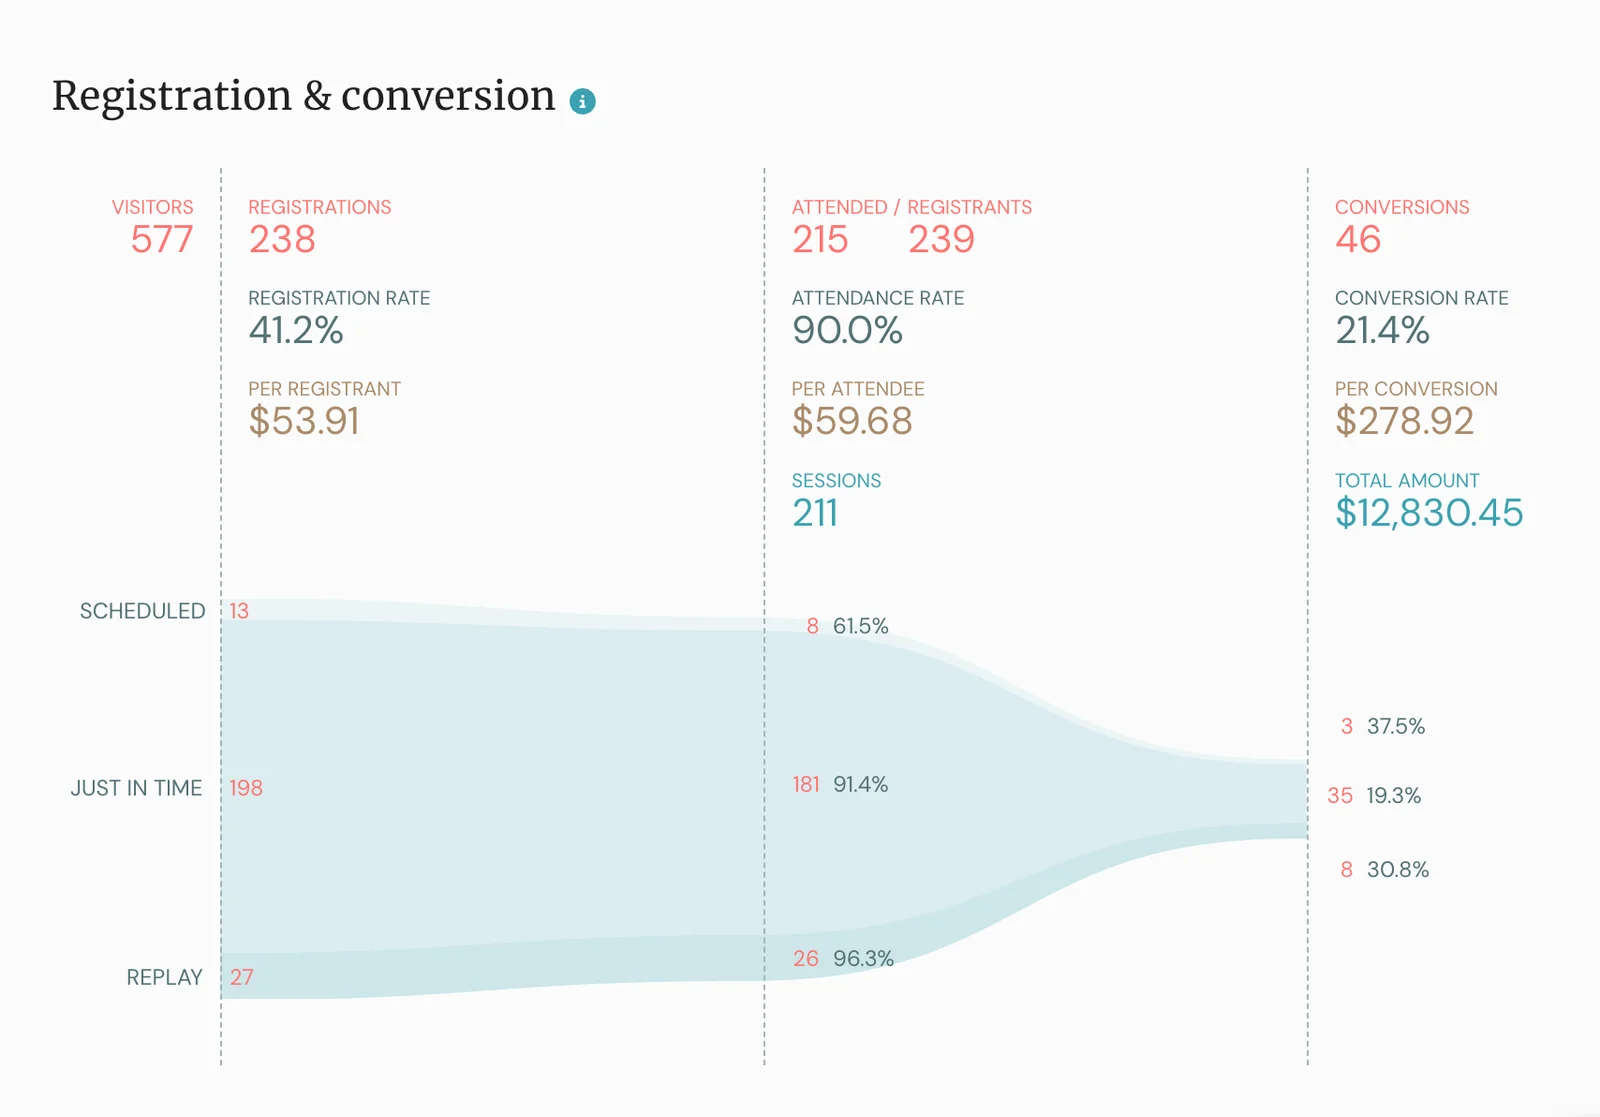
- Registration rate. The registration rate is the percentage of landing page visitors who registered for the webinar. Assuming your webinar landing page is already converting decently, it may be more worthwhile to calculate the total number of registrants and focus on webinar promotion.
- Attendance rate. Attendance rate is the percentage of registrants who join the presentation. Divide the number who attended by the number who registered, then multiply by 100. If 30 people attend out of 100 registrants, your attendance rate is 30%.
For recurring customer training, look at attendance across all available sessions rather than judging a single event. Your webinar scheduling and benefits will have the largest impact on attendance. You can also look at the average watch time to see how long webinar attendees are staying.
- Conversion rate. The conversion rate is the percentage of attendees who turn into customers. This is only applicable for sales webinars where the goal is to sell a product/service or acquire trial users. You can look at the total revenue generated to visualize conversions as a dollar figure.
eWebinar’s funnel analytics help you figure out which metric is bottlenecking your webinar performance:
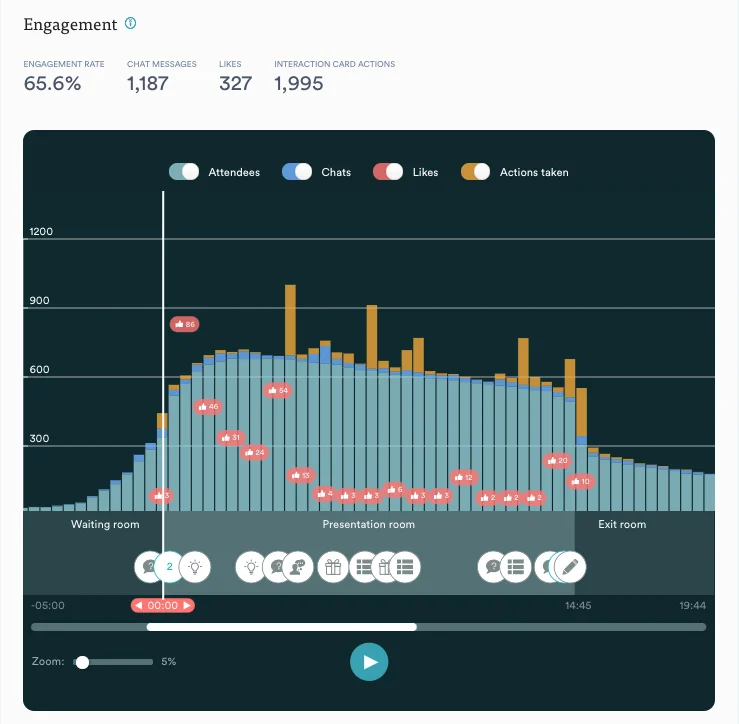
We also provide engagement analytics so hosts can optimize the presentation itself:
Host more sessions without growing your team
The more people who can attend your webinars, the more opportunities you have to educate customers, demonstrate your product, and turn interested prospects into customers.
Keep live for launches, guests, and conversations that need everyone present, and put the demos and training you repeat every week on demand, so every registrant gets a time that works and someone to answer their questions.
You can see how that works in our on-demand demo, which runs on eWebinar itself. If the format fits your business, explore our plans and free 14-day trial to create your first session.
Frequently Asked Questions
Do you have to be live to host a webinar?
No. You can host a webinar live, use a scheduled replay, or make it available on demand with chat.
For sessions you deliver repeatedly, on-demand lets people attend without waiting for the next live date. At Proposify, the support team uploaded training videos it already had, added polls, and made that training available 24/7. One-time presentations and conversations that depend on everyone being together still belong live.
Is a webinar the same as a Zoom meeting?
No. A video meeting is designed for conversation between participants, while a webinar is designed for a presenter or panel to speak to an audience.
The distinction also affects what you pay for. A professional meeting license doesn’t necessarily include dedicated webinar features. One organizer discovered this when asking about webinar access on an existing paid meeting account. The webinar product required a separate license.
How much does it cost to host a webinar?
Live webinar software usually charges by how many attendees you need, so the price rises as your audience grows. eWebinar starts at $99/month and includes a free 14-day trial.
Equipment is a separate expense. A Logitech C922 Pro webcam is listed at $119.99, and a Yeti Nano microphone costs $119.99. You may already have equipment that works, so test it before buying more, and budget for the other costs of running a webinar.
Can you host a webinar for free?
Yes. You can give a presentation using free video-meeting software, although you may not get dedicated webinar registration, attendee controls, or reporting.
Some free meeting accounts support up to 100 participants with a 40-minute limit. That can be enough to test your topic with a small audience. For larger sessions or repeated customer training, check what a dedicated webinar product provides. eWebinar has a free 14-day trial.
Do I need a webcam to host a webinar?
No. If you’re presenting slides or demonstrating software, you can narrate the presentation without appearing on camera. A clear microphone is more important, because attendees need to hear every explanation.
For a webinar where people need to see the speaker, a webcam helps. Start with equipment you already have, test the picture and sound with another person before the session, and compare webinar equipment options only if something falls short.
Curious to see how eWebinar can help run your demos, onboarding, and training sessions on autopilot?
Watch a one-minute explainer video for a quick overview of the eWebinar platform. Or, better yet, join our on-demand demo to learn more!