DOWNLOAD OUR ULTIMATE WEBINAR CHECKLIST NOW →
Orchestrating a successful webinar is difficult because you need to:
-
Pick the right topic, time, and date for your target audience
-
Find a webinar platform that meets your unique software needs
-
Promote your webinar, drive registrations, and get people to attend
-
Day-of-webinar checklist to go through in the hours before your event
-
Collect post-webinar feedback and review data to improve future webinars
The number of steps can feel overwhelming and make it easy for some tasks to slip through the cracks. That's why we've created this comprehensive webinar checklist that will walk you through the webinar planning process and make sure you don't miss anything.
NOTE: When discussing the strategies covered in this checklist, we sometimes use our webinar platform, eWebinar, as an example when explaining how to implement them. These strategies, however, can be applied using other software.
eWebinar is an on-demand webinar platform that turns pre-recorded video into an interactive webinar that can easily outperform a live webinar if the content is well-suited for automation. To see eWebinar in action, join our on-demand demo. We use our product to demo our product!
Let's dive in!
Pre-webinar planning checklist
Most (good) live webinars are planned at least a couple of months in advance — so let's use that as the starting point for your planning process!
8 weeks before your webinar
Select your webinar topic
First and foremost, you'll need to decide what your webinar is going to be about. The webinar content should be based on the goals of your business and the needs of your target audience. You want to align the two as closely as possible but, when in doubt, lean towards the needs of your audience.
Most experts recommend that you prioritize offering value for 80% of the webinar so that attendees will be more likely to convert once they reach the CTA at the end — or even before that!
Once you've chosen the main topic you'll be covering, the next step is to outline the subtopics that you'll go over during the presentation. You can conduct market research or feedback surveys to identify your audience's pain points and select subtopics based on that.
Set a time and date
When deciding when to host your event, you should ensure you're giving yourself enough time to plan, create, and promote your webinar. Our research has shown that midweek-midday webinars have the highest attendance rates.
Specifically, the data shows that:
-
The best day of the week to host a live webinar is either Wednesday or Thursday.
-
The best time of day to host a live webinar is either 11 AM or 2 PM in the time zone that will accommodate the majority of your audience
Note: The truth is you will never be able to accommodate everyone’s schedule. The only way around that obstacle is to use a pre-recorded webinar platform, like eWebinar, that lets you offer your webinars at the convenience of your target audience without sacrificing a superior attendee experience.
This data should make logical sense too since people are often busiest early in the morning, late in the afternoon, and at the beginning/end of their workweek. Most people don't want to use up precious weekend time attending webinars either (unless it's on a topic they're genuinely interested in or it’s a B2C webinar).
To learn more, read our full guide on The Best Time and Day to Host a Webinar!
Decide on the format
There are multiple webinar formats you could use depending on your goals, topic, and audience:
-
Sales webinars. Sales webinars are online presentations created to sell a product or service to and convert attendees into customers. You'll find that they often start by agitating the pain points, introducing the solution, and then putting a CTA at the end of the webinar.
-
Training/onboarding. Webinars can also be used to offer training or customer onboarding.
-
Thought leadership. Thought leadership webinars often include industry experts as guest speakers, panel discussions on advanced topics, and extended Q&A sessions at the end to answer the audience's questions.
-
Deminars. Deminars are demo webinars (hence the name) where you show attendees how your product or service works. They're similar to sales webinars but double as a customer education asset by offering an informative overview of what the product/service is and how to use it.
These are just a few examples of webinar formats you can use for your presentation.
Note: All the formats listed above (with the exception of thought leadership) are ideal candidates for webinar automation since you'll likely find yourself giving the same presentation over and over again.
Choose a webinar platform
There are a few must-have features you need to look for when choosing a live webinar platform:
-
Live chat capabilities. Two-way communication between the host and attendees lies at the core of the webinar experience. As such, you should ensure that the platform you choose lets you message attendees both during and after the webinar.
-
Registration forms. Seamless registration flows are crucial to ensure that you get enough people to sign up for your webinar. Ideally, you’d use a webinar platform with a combination of built-in registration functionality and third-party landing page integrations.
-
Presentation tools. Audience engagement capabilities like whiteboards, slideshows, and file handouts will make the attendee experience more interactive — while also helping to get your point(s) across.
-
Polls and surveys. In a similar vein, being able to poll and survey attendees during the webinar will enable audience participation while giving you the opportunity to gather valuable insights from attendees.
-
Webinar analytics. You should be able to see viewership data (viewer count or engagement rate) during the webinar and performance data (attendance rates and conversion rates) after the webinar.
-
Email sequences. The ability to email those who sign up for your webinar will help you remind them to attend in the days leading up to the event, gather feedback after the fact, and nurture leads who attended your webinar.
The features above focus on live webinar platforms. However, if your presentation is conducive to automation, your webinars will actually perform better. Because automated webinars can be made available on-demand, you’ll be able to accommodate more attendees with this approach.
5 weeks before your webinar
With your webinar topic, schedule, format, and platform all decided it's time to move onto the creation phase — ideally more than a month before the event date.
Create a webinar landing page
With your webinar built, it's time to build the webinar registration page that people will land on. Be sure to streamline the registration process and remove any unnecessary form fields. A name and email address are all you really need — so why increase friction with additional questions?
A few best practices your webinar landing page should adhere to include:
-
An enticing headline that explains the topic and benefits of the webinar while creating urgency.
-
Bullet list description of the topics you'll cover, solutions you'll offer, and/or problems being solved.
-
Host/guest speaker bios that establish the credibility of those presenting the webinar.
-
Social proof like testimonials, case studies, and brands you work with.
-
Scheduling details such as the time, date, and where to watch.
-
High-contrast CTA button that visitors can use to register.
Beyond the six best practices above, you should also make sure that your landing page displays properly on mobile devices to avoid losing out on leads who come across your webinar on their smartphones.
Note: If you're running a paid webinar then one last step you'll need to complete is setting up the payment collection process. Most webinar platforms don't have this feature built into their software so you'll likely need to set up third-party payment processors like PayPal or Eventbrite.
Finally, you can optimize your page by A/B testing different elements like headlines, lists, bios, and CTAs. This can help you improve landing page conversion rates and therefore get more registrants for your webinar.
To learn more, read our full guide on How to Create a High-Converting Webinar Landing Page or have a look at our 28 Webinar Landing Page Examples!
Prepare email sequences
Now that people have a way to register for your webinar, it's time to write email sequences.
You’ll need four types of email for each webinar:
-
Webinar invitation emails. Invitation emails can be sent to your mailing list if you’re promoting your webinar to an existing audience.
-
Registration confirmations. Registration confirmation emails let people know that their registration was successful and give them a chance to add the event to their calendar.
-
Registrant reminder emails. Reminder sequences help increase attendance by ensuring that webinar registrants don’t forget about the event they signed up for.
-
Post-webinar follow-up emails. Reaching out to attendees after the webinar ends will help you gather feedback, nurture leads, and/or drive conversions.
After you’ve written all the emails, you’ll want to schedule them:
-
Invitations: Send after your registration page is set up (2-3 weeks before the event).
-
Confirmations: Send immediately after someone signs up for the webinar.
-
Reminders: Schedule to send to attendees one day before, one hour before, and five minutes before the webinar starts.
-
Follow-ups: Schedule to send right after the webinar ends.
Note: If you're using automated webinar software then you'll only need to write these email sequences once and then have them automatically sent to all future registrants. If you're using our webinar platform, eWebinar, you won't even need to write them since we include emails in all our templates.
To learn more, read our full guide on How to Write Webinar Follow-Up Emails That Get Results!
3 weeks before your webinar
Once you get to the three-week mark, your focus should be on reminding people who've registered, promoting your webinar to those who don't know about it yet, and drafting any necessary slides.
Promote your webinar
It's to let as many people as possible know about the upcoming event. This means promoting your webinar through paid, organic, and/or earned media. The methods you use will ultimately depend on your webinar goals and promotion budget.
There are a few ways you can promote your webinar such as:
-
Publishing organic content on your blog or social media channels
-
Cross-promoting with partners in your space to maximize reach*
-
Mentioning the upcoming event in online communities
-
Influencer marketing to leverage existing audiences
-
Running paid ads (if it's within your budget)
*Because cross-promotion takes longer to coordinate, you’ll want to plan ahead when using this promotion method.
Of course, the exact approach you choose will depend on your webinar topic, goals, and format. There’s no one-size-fits-all solution so just canvas the available options and see which channel suits you best.
To learn more, read our full guide on 25 Ways to Promote An On-Demand Evergreen Webinar!
Posting on social media
While you should be regularly promoting your upcoming webinar in the weeks leading up to it, it's still essential to post on your social media account on the day of the event itself. This will give you a chance to reach last-minute registrants and remind those who have already signed up for the webinar.
Make sure to include a webinar hashtag to facilitate social sharing and, with any luck, get some viral traffic to your registration page. You could even use Alex Hormozi's Whisper-Tease-Shout method to gradually ramp up your social promotion in the leadup to the webinar:
-
Whisper to your audience that a webinar is in the works a few months ahead of time
-
Tease the benefits in the weeks leading up to the scheduled webinar
-
Shout out a countdown in the final days before your webinar
This builds curiosity, interest, and anticipation — in that order.
Use a proven presentation structure
To make your webinar flow smoothly, it's a good idea to use a proven presentation structure.
One example is our five-stage on-demand demo structure:
-
Set the agenda
-
Tell your story
-
Address the competition
-
Reveal the solution
-
Ask for the close
As a rule of thumb, you should spend no longer than a minute outlining the agenda, spend 80% of the presentation providing value around the core webinar topic, and then save your CTA for the final fifth of the webinar.
To learn more, read our full guide on How to Craft High-Converting Webinar CTAs!
Write your presentation script
Once you’ve chosen your preferred presentation structure (it doesn’t have to be ours), you’ll need to write the actual script that you’ll read through during the presentation. This can be verbatim, bullet points, or somewhere in between depending on your preferences.
If you’re having guest speakers or running a panel discussion then you won’t really be writing a script but more so a list of questions to ask. As such, make sure to share the question list with speakers ahead of time so they can come prepared and offer feedback on what else to include.
Draft webinar slides
Not all webinars use slide decks. Some prefer whiteboards, popup graphics, or video-only presentations. If you do plan on using a slide deck, this is the time to create webinar slides. By now, you should have all the necessary details ready while still having enough time to prepare the slide deck.
2 weeks before your webinar
In the final two weeks before your webinar, you should gather feedback from those who have committed to attending and finalize any notes or slides for whoever will be presenting.
Conduct a pre-webinar survey
To ensure your webinar's success, you should gather feedback from the webinar registrants you've accumulated thus far. The answers to the questions below will help you identify attendee pain points, find out what their goals are, and which promotion channels you should double down on.
There are three main questions you should include in your pre-webinar survey:
-
Why is the webinar topic important to you?
-
Why did you sign up for this webinar?
-
How did you hear about the webinar?
To learn more, read our full guide on Best Webinar Survey Questions to Ask Before, During, and After!
Prepare notes for webinar presenters
Whether the presentation has a single webinar host or includes multiple guest speakers, preparing notes will ensure that every key point is covered before the session ends. You can even insert additional points based on the responses to your pre-webinar survey to fill any gaps in the presentation.
Upload webinar deck
Lastly, it's time to upload the webinar slide deck that you finalized the previous week. We recommend doing this after the registrant survey and speaker notes in case they uncover any last-minute tweaks that need to be made to the slide deck.
1 week before your webinar
With only seven days to go before the webinar presentation, there are a few final checks you need to perform to ensure everything is working properly and ready to go by the scheduled date.
Check-in with guest speakers
If your webinar will include presentations from guest speakers then check in with them a week in advance to make sure they're ready to proceed as scheduled. If anyone on the presentation team backs out, this should still leave you with sufficient time to find a replacement.
Review the number of registrants
If only a handful of people have signed up for your webinar thus far then you may need to consider rescheduling it so you have more time to promote the event. On the other hand, if you're close to your registrant goal then one last big promotional push could be all it takes to get over the bar.
Day-of-webinar checklist
After the past two months of planning and preparation, the day has finally come to host your webinar. It's time to send out a final reminder, post on your socials, and prepare for technical difficulties.
Run a rehearsal webinar
Perform a "dry run" before the webinar to test your hardware and software while getting a chance to practice the presentation itself. This doesn't guarantee that everything will go smoothly — something can always go wrong during live webinars — but it reduces the odds of unwanted surprises.
Send a reminder email
The first thing you should do on the day of the event is send out a reminder email to everyone who's registered for the webinar. If your webinar management platform supports automated reminder sequences then this step may take care of itself.
A good example would be our platform, eWebinar, which lets you automate reminder messages through email, SMS, and WhatsApp. You'll even be able to choose how many days, hours, or minutes before the webinar you want each reminder notification to go out to registrants.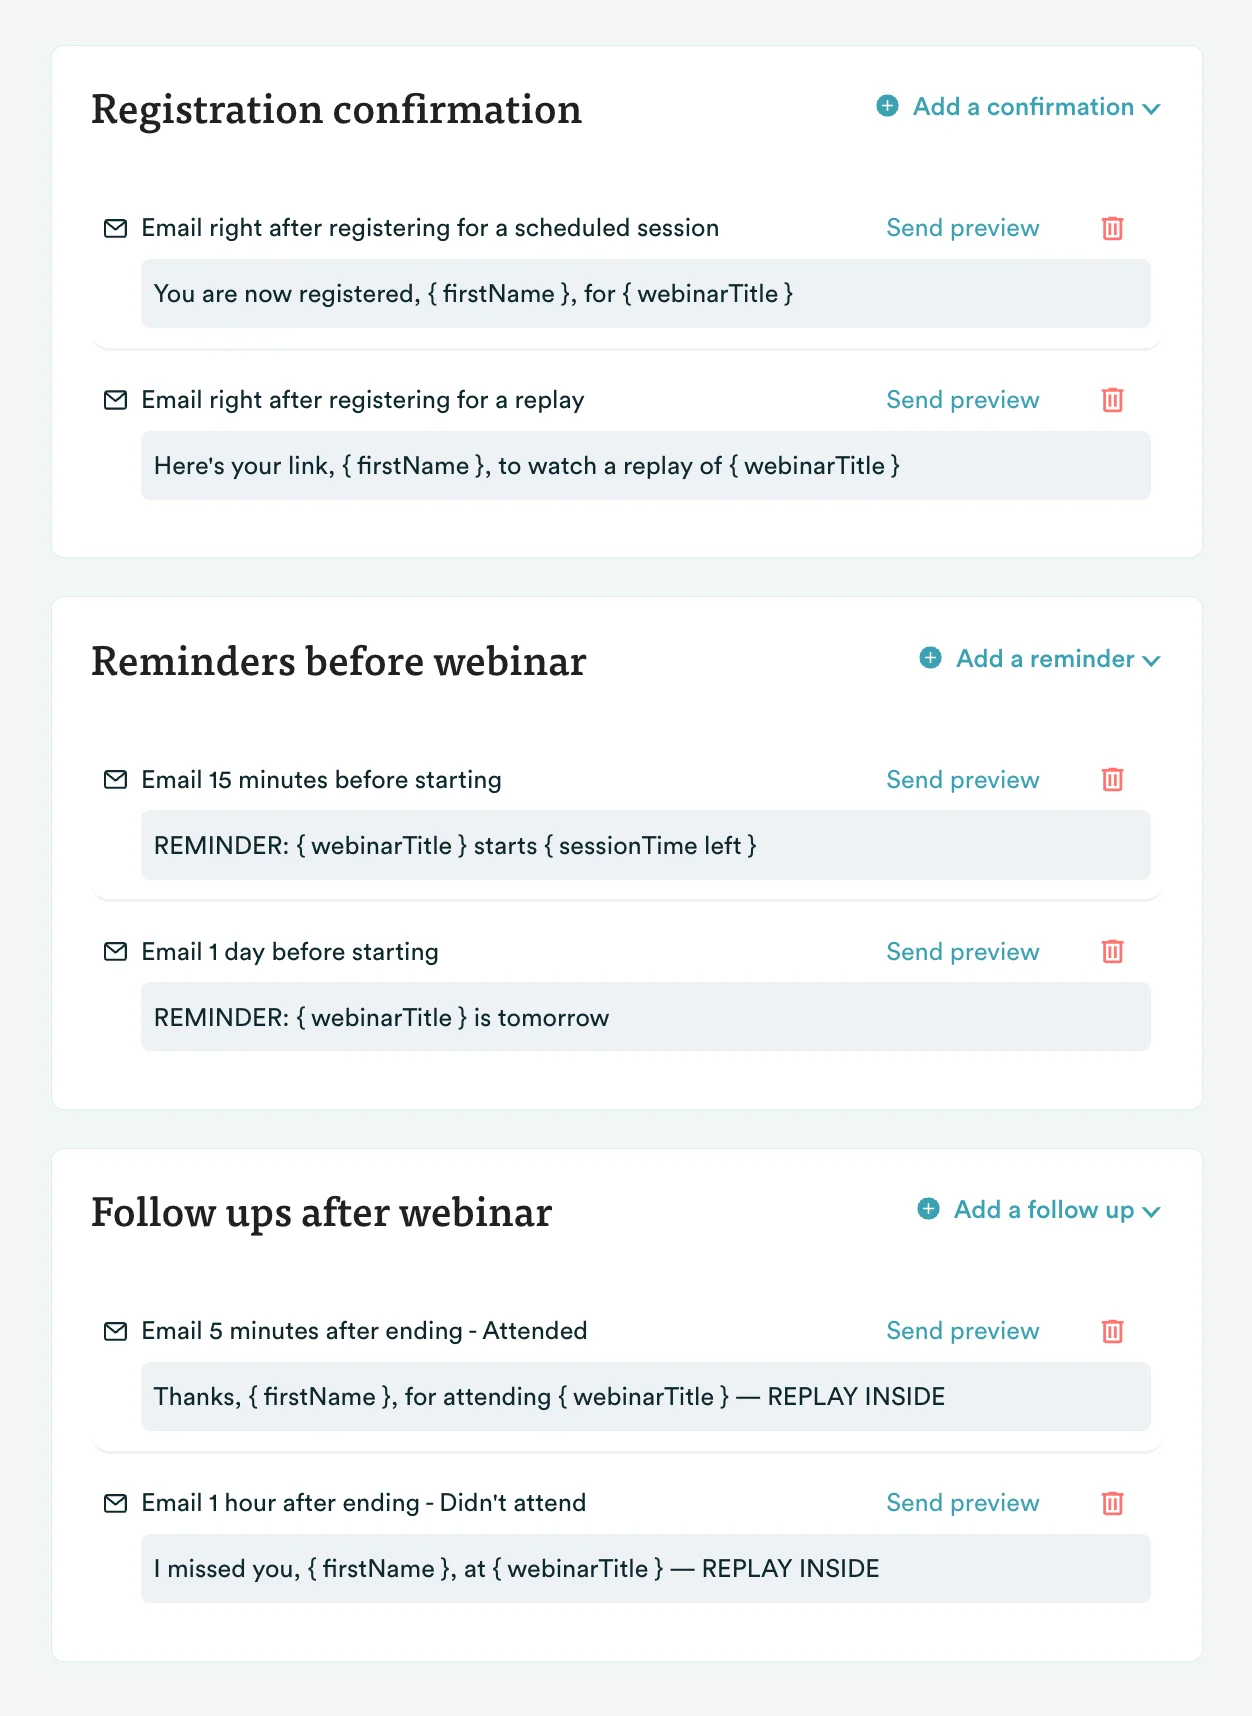
Learn more about our auto-reminders here!
Minimize technical difficulties
Like with any live event, technical difficulties are bound to come up during your webinar presentation.
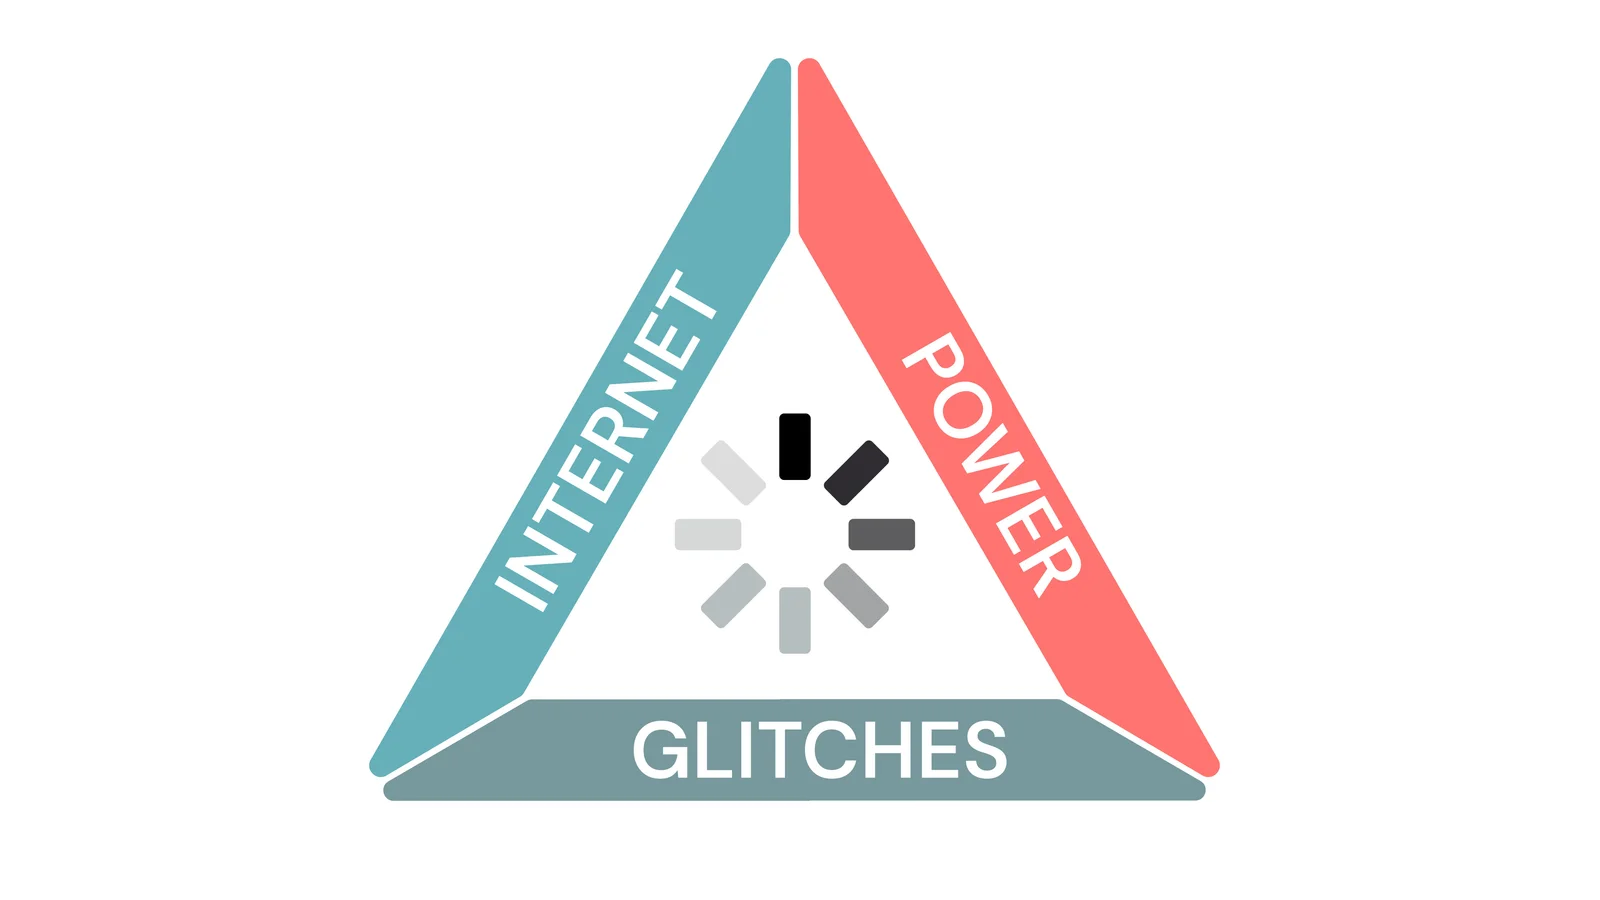
A power outage, slow internet, software glitch, or hardware malfunction could bring your webinar to a screeching halt. We at eWebinar call these live presentation challenges the Triangle of Technical Difficulties:
On the day of your webinar, the main technical checks you need to do are:
-
Test your microphone audio
-
Run an internet speed test
-
See if your camera is working
-
Double-check your lighting
There are some preventive measures you could also take like getting a wired internet connection, buying an uninterruptible power supply, and praying to the technical difficulty deities that your hardware/software doesn't bug out during the presentation.
However, the only surefire way to eliminate webinar latency and solve other technical difficulties for good is to automate your webinar. By pre-recording your webinar, you remove yourself as the single point of failure and ensure that the presentation will keep going even if your power or internet goes out.
To learn more, read our full guide on How to Create an Automated Webinar!
Post-webinar checklist
The job isn't finished when the presentation ends, you still need to:
-
Send follow-up emails to those who attended but didn't convert (i.e. perform the next desired action) during the session
-
Conduct a post-webinar survey to get feedback from those who attended and find out what you can improve on in the future
Let's take a brief look at these last couple of steps!
Send a follow-up email sequence
Your post-webinar email campaign will help you capture leads that didn't convert during the presentation itself. Not every attendee will be ready to take the next step by the end of your webinar, so reaching out to them after the fact is an absolute must.
When sending follow-up emails, be sure to segment your recipients based on their attendance status:
-
No-shows. First off, you'll want to email those who registered for the webinar but didn't show up on the day. You can send them a webinar replay link to give them another opportunity to watch the presentation and include a few bullet points of what they missed out on.
-
Left early. When following up with those who left the presentation early, include a few snippets from later in the webinar and invite them to watch the remainder of the session — through a replay link to the webinar recording — so they can see what they missed.
-
Finished. Anyone who watched the entire webinar presentation is bound to be a high-likelihood lead. You can begin your follow-up email to them by briefly reminding them of the most valuable topics covered during the webinar and asking them what's stopping them from moving forward.
To learn more, read our full guide on How to Write Webinar Follow-Up Emails That Get Results!
Conduct a post-webinar survey
In addition to following up with attendees after the presentation, you should also conduct a post-webinar feedback survey. This will help you gather feedback from those who attended your webinar and figure out what you could improve on.
There are three main questions you should include in your post-webinar survey:
-
How would you rate this webinar?
-
Were your expectations met?
-
What needs to be improved?
You could even cross-reference responses to your post-webinar survey with the pre-webinar feedback survey you sent out before the webinar to see if the presentation lived up to the audience's expectations.
To learn more, read our full guide on Best Webinar Survey Questions to Ask Before, During, and After!
Analyze the results
Last but not least, have a look at your webinar analytics and key performance indicators (KPIs) to help you improve future presentations.
The five core metrics you should look at are:
-
Registration rate
-
Attendance rate
-
Average watch time
-
Engagement rate
-
Conversion rate
If you're using eWebinar to run your webinars then you'll be able to use our funnel dashboard to see the total number of registrants, attendees, and conversions — as well as the drop-off rates between each stage of your webinar funnel: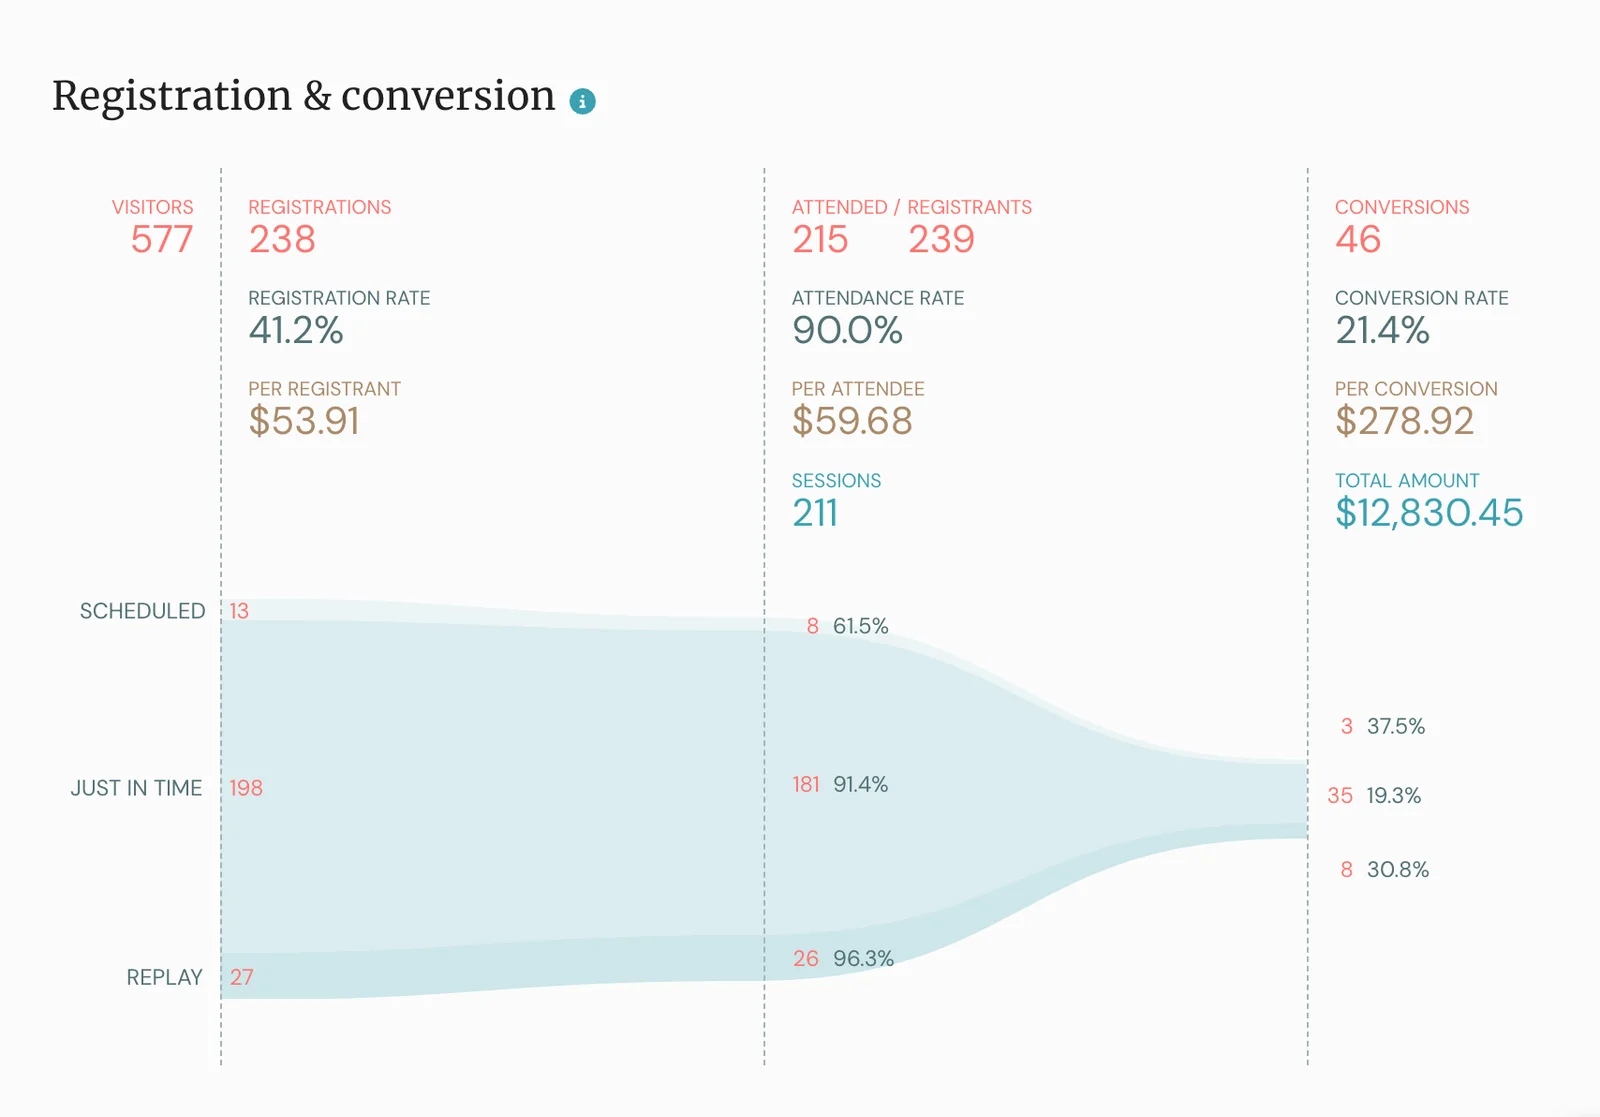
You can also see where the watch time and audience engagement drop as the webinar progresses: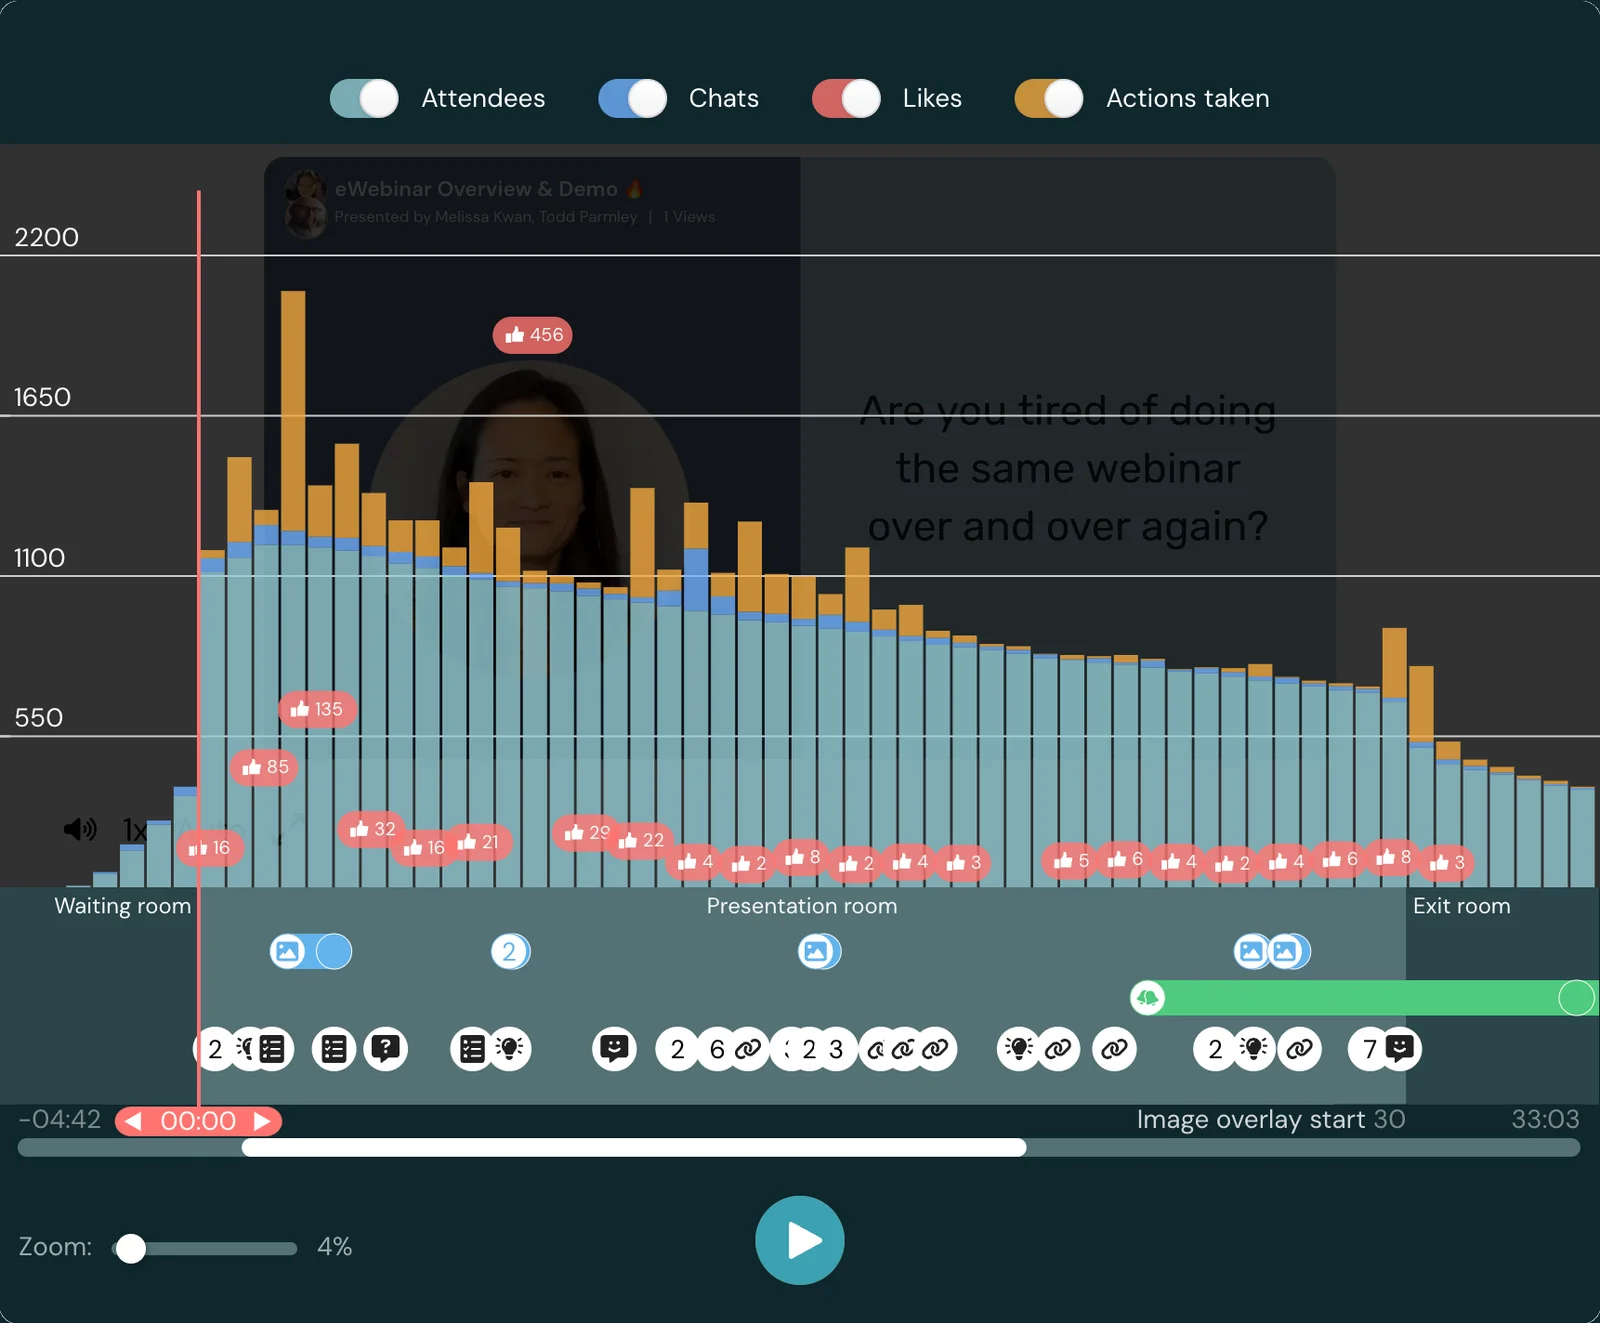 If you'd like to experience our automated webinar platform firsthand then watch our demo!
Conclusion
This webinar checklist will help you cross off all the essential elements and put them together to ensure your webinar's success. If you've followed all the steps and created a killer webinar, the next step is to automate it so you can scale your reach to thousands of people around the world!
That's exactly what our webinar platform, eWebinar, was designed to do. If you want to reach more leads in less time with higher conversion rates while saving time then there's simply no better platform out there.