An on-demand webinar is a pre-recorded webinar that registrants can watch immediately rather than selecting a scheduled time to attend.
Well-executed on-demand webinars (AKA evergreen webinars) are beneficial because:
- Your team is no longer bogged down hosting repetitive webinars all the time, like for demos, onboarding, and lead generation.
- Attendance rates increase because prospects can join at a time that is convenient for them rather than having to wait for a time that works for your team.
- Conversion rates increase because prospects can attend the webinar when their pain point and interest are strongest.
- Provided you use the best on-demand webinar software — like our product, eWebinar — you don’t have to sacrifice direct communication and engagement with attendees, which make webinars powerful.
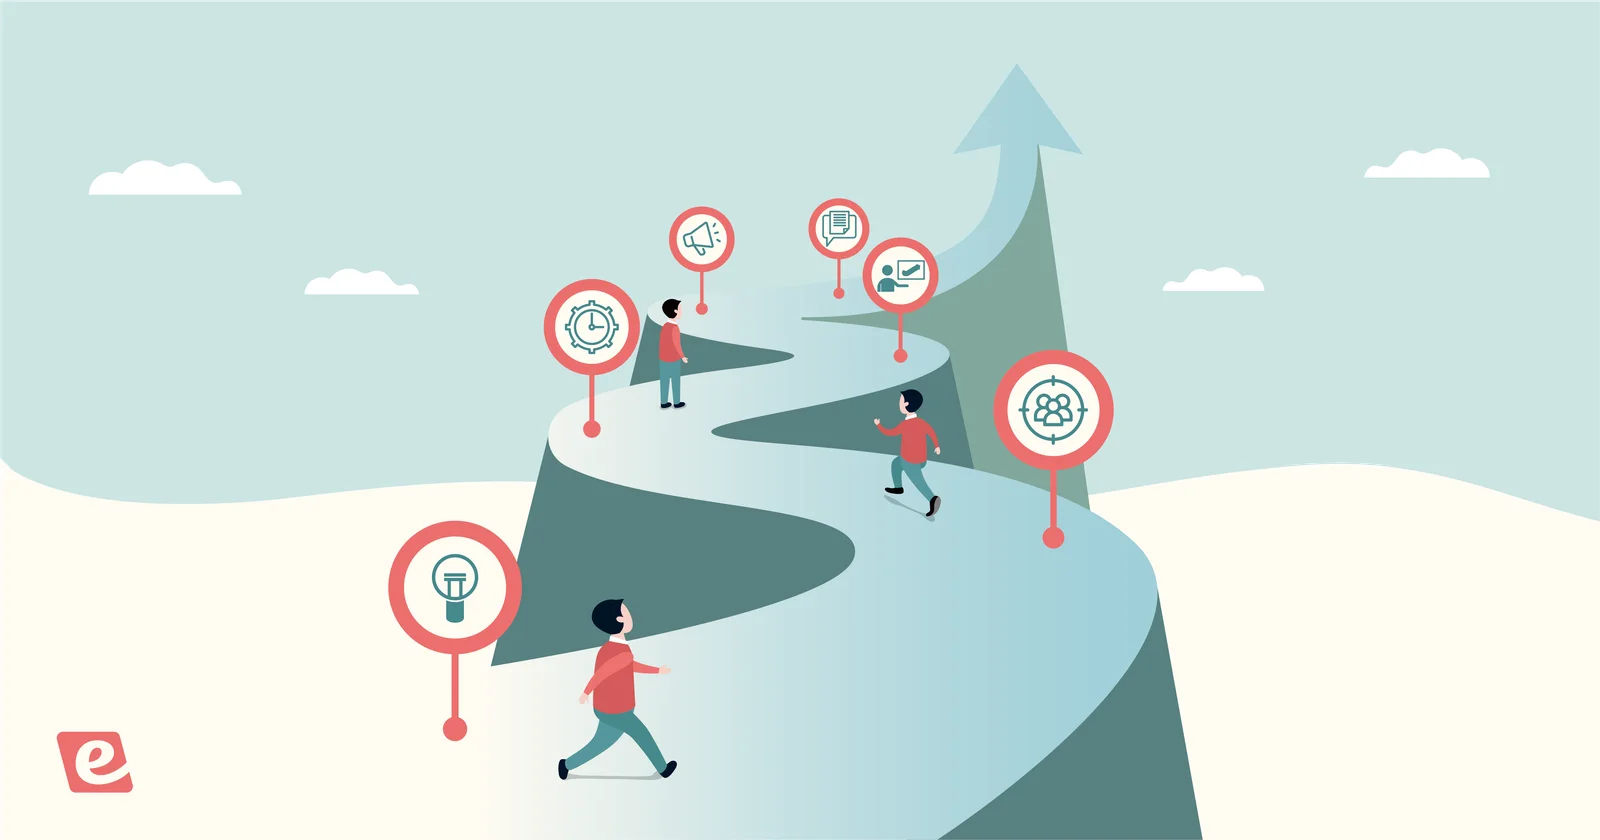
This guide will walk you through the step-by-step workflow of creating a high-converting on-demand webinar. Let's jump into it!
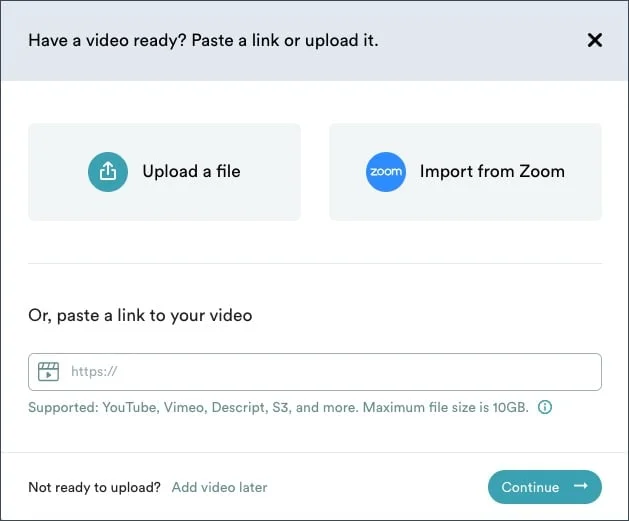
Step #1: Upload a Video
The first step in creating an on-demand webinar is to add a video, since every on-demand webinar is built around a pre-recorded video. This could be a video you created specifically for this purpose or a webinar recording.
If you're using eWebinar, we let users upload a file, import a cloud recording from Zoom, or paste in a link (such as YouTube, Vimeo, etc.)
 We host all of your videos inside our platform, which means:
- If you're paying for Cloud storage in Zoom, you can delete the videos after.
- If you add a video via a pasted link, you won't have the video platform's branding appear (i.e. YouTube).
If you haven't recorded your video yet and need help with your webinar content, you can start by checking out our free webinar scripts, specifically designed for evergreen content. We also offer a host of free webinar templates (complete with email cadences, landing page copy, slide decks, a variety of interactions, and more) to make it easy for anyone to create on-demand content like this.
Step #2: Set Your Webinar’s Availability
If you're looking to do on-demand webinars, we’ll assume your goal is to make your webinars as accessible as possible to potential attendees at any time, 24/7.
If that is the case, it is important to note that making your webinars on-demand is not enough. While this might sound counterintuitive — on-demand means at any time! — there are other options to consider when setting the availability of your webinar. They fall into three categories:
We’ll go through these three feature sets in more detail but, ultimately, it’s about maximizing registrants’ choice. If you make your webinars available around the clock in different ways, you'll be able to increase your attendance and, therefore, conversion rates.
‘On demand’ Options
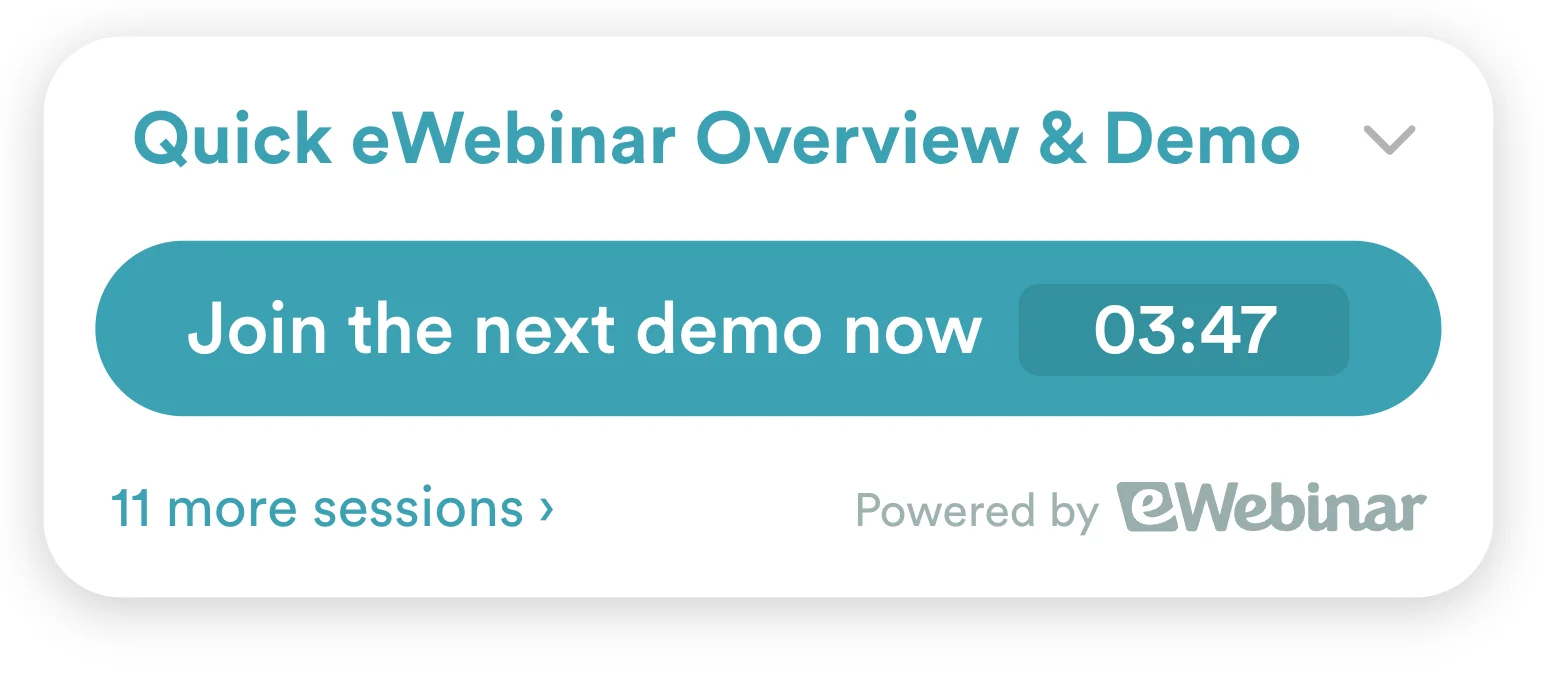
At eWebinar, we have a feature called a just-in-time session, which means that when people land on your registration page, it is always “just in time” for them to join your webinar. (Cute, right?)
The first option you will see when you enable just-in-time sessions is to make it so people can watch your webinar on demand.
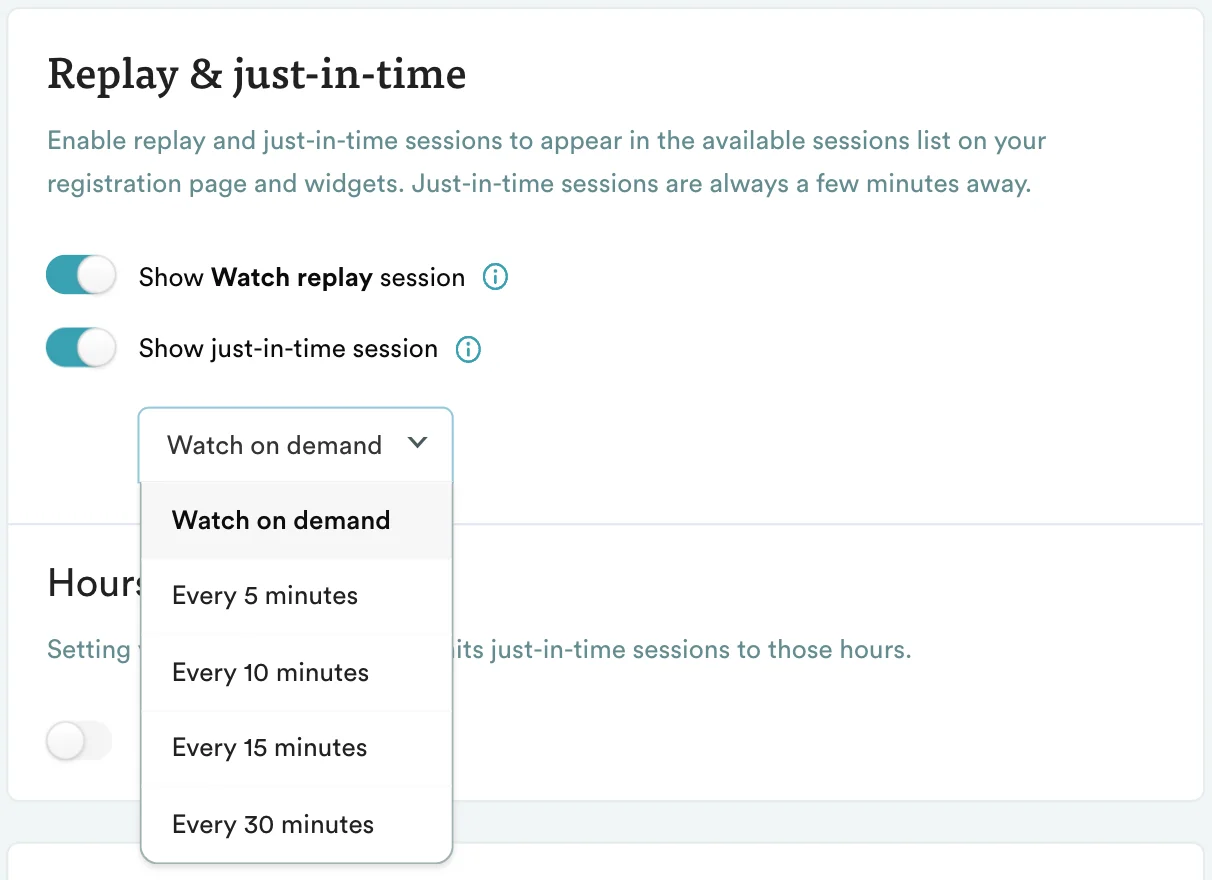
If you choose this option, when prospects register for an on-demand session, their webinar will not begin until they click a link to join it, even if they wait 20 minutes to do so. Hence, on demand.
Alternatively, you can choose for your just-in-time sessions to happen as frequently as every 5 or 10 minutes. (This is generally what we do for our own webinars.)
If you choose this option, when someone lands on your registration page, a session will always be starting within 5 or 10 minutes of their arrival. For example, if you have just-in-time set to 5 minutes and a customer lands on your registration page at 2:02pm, the next available session they see will start at 2:05pm.
Registrants may need to wait a few minutes, yes, but the webinar is effectively available on demand and the buffer of a few extra minutes serves a couple of important functions.
First, a countdown clock creates urgency for people to register now.
It also signals to them that your presentation will work like a traditional webinar in the sense that it has a particular start time, webinar attendees won’t be able to pause the video, and they must stay for the duration if they want to see it all.
This shift in mindset is why the average watch time of webinars is generally so much higher than that of regular long-form videos. People commit their time — often up to an hour! — to hear what you have to say in a webinar. In a video, people bounce the second they get bored or they skip ahead over critical points.
The extra few minutes our just-in-time feature can provide gives your attendees a breath to make that mental shift, settle in, and give you their full attention.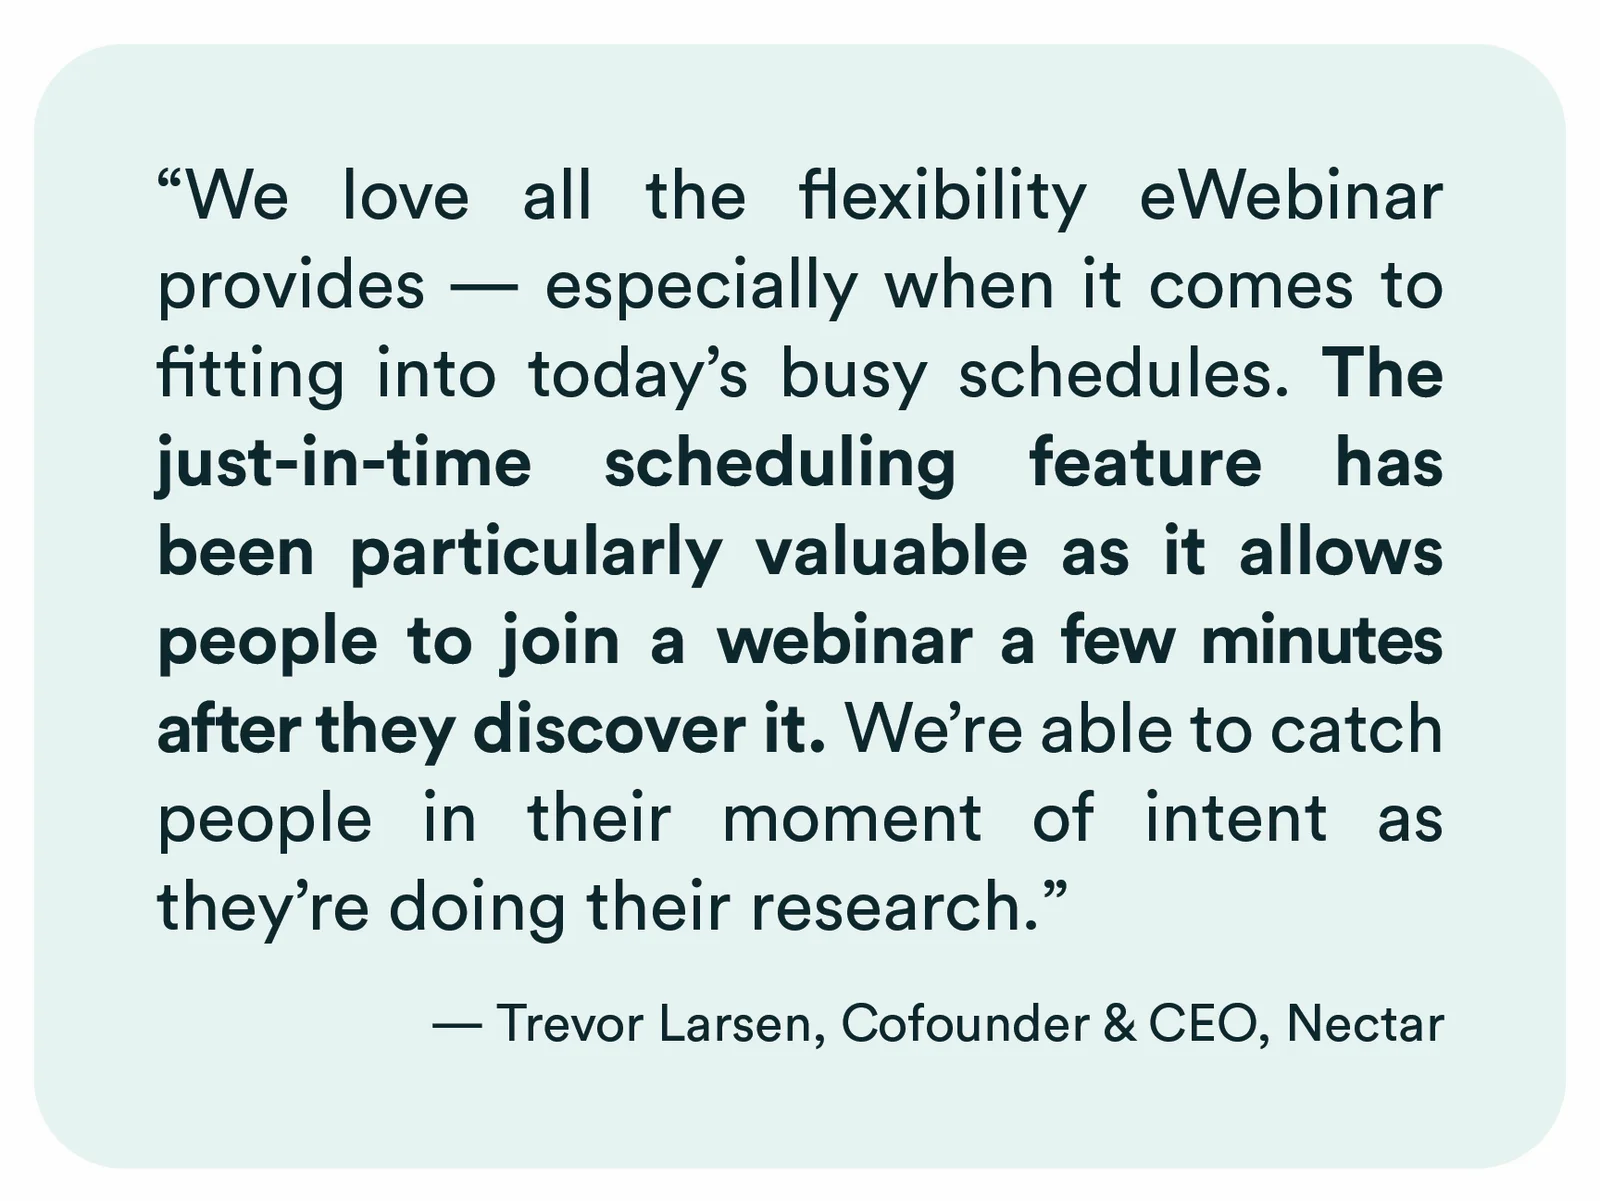
Convenient Recurring Schedule
The reason why only offering your webinars on demand is not enough is because not everyone will be free at that moment to jump right in and watch!
Giving prospects the option to add an upcoming session to their calendar will prevent them from leaving without registering and never coming back! Once they’ve signed up, you can send them (automated) reminders to make sure they remember when to show up. And at the very least, you have captured their contact info, which you can feed into your CRM via one of our integrations for ongoing lead nurture.
When setting a recurring schedule, the key is to make your webinar available frequently and at convenient times of day. Since it is an on-demand recording, there is no limit to how many sessions you can add.
Specifically, you can select:
- Start and end dates (or make it never-ending)
- The days of the week it is available
- The times of day it begins (11am, 2pm, etc.)
- And the time zone (yours or your attendee’s)
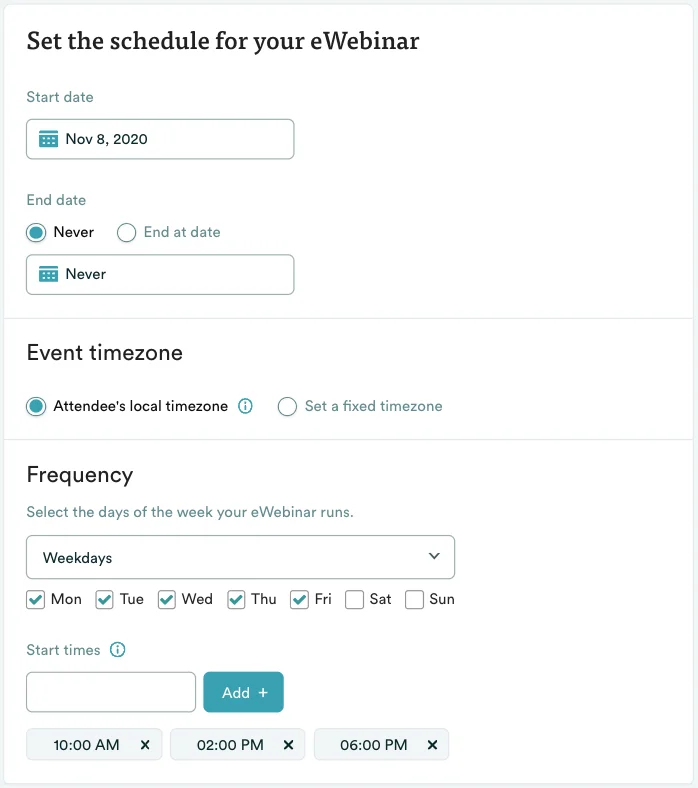
We recommend offering at least 3 or 4 sessions every day, excluding weekends, if you like. Be sure to include a session in the early evening for people who want to join after work.
Most critically, set your webinar start times to appear in the local time zones of attendees rather than in a fixed time zone, presumably your own. That way, if you offer sessions at 10am, 2pm, and 7pm, they will appear at those times whether the registrant lives in San Francisco or Hong Kong. Convenient times of day are relative!
To give you some perspective, for our own 20-minute product demo, 10% of registrants watch a scheduled session rather than join on demand (or watch a replay — more on that next). Some of our customers report about a 50/50 split between on-demand and scheduled sessions.
Think about that!
Are you willing to risk losing 10% to 50% of registrants because you only offer on-demand sessions?
Webinar Replays
Webinar replays, when enabled, are the ultimate ‘on-demand’ option. Registrants get a link to watch the replay whenever they want, day or night, and they have total control over the video. They can play, pause, or skip ahead. People who are regular webinar goers gravitate towards this option, because they can also watch at 2X speed.
(For reference, about 16% of our demo registrants choose to watch a replay.)
eWebinar is one of a small handful of webinar platforms that lets your attendees watch a replay without having to attend the webinar first. More importantly, we are one of an even smaller number of platforms that lets you offer on-demand sessions, recurring scheduled sessions, and webinar replays all at the same time for the same webinar! On most platforms, you have to choose one or the other.
Remember, it is all about giving people options. By letting them join your webinar when and how they want, on their terms, you will be able to dramatically increase the rate at which people actually show up.
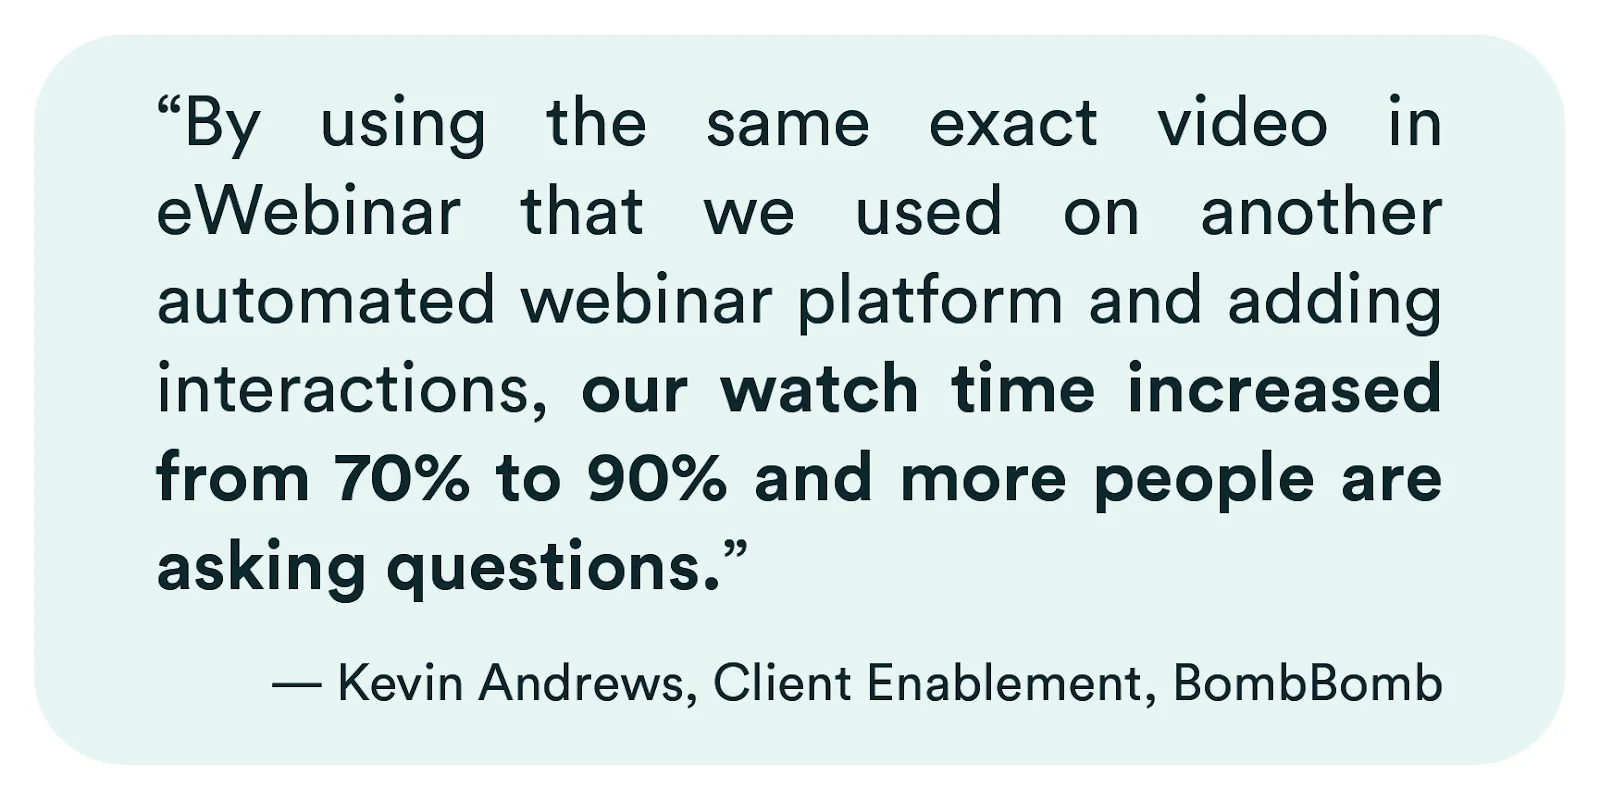
The average attendance rate across all of eWebinar’s customers is 65%. That’s 46% higher than the industry average for webinars. Our own demo, at the time of writing, has an attendance rate of 90%.
Are you feeling overwhelmed by all the scheduling options?
If so, here is the scheduling setup we recommend for most use cases:
- Recurring schedule with no end date
- Weekdays at 10am, 2pm, and 6pm in the attendee's local time zone
Step #3: Set Up Your Notifications (Like Reminders and Follow-Ups)
The next step is to set up three types of notifications: registration confirmation, reminder, and follow-up emails. By default, eWebinar has six email notifications (two of each type) that have been pre-prepared for you to send as-is or customize.
Registration confirmation and reminder emails both help to improve attendance rates. Confirmation emails let registrants easily add the event, with the meeting link, to their calendar. And reminders prevent them from forgetting when it is time to join. (Of course, both of these things only apply to scheduled sessions, not those that are on-demand.) Webinar replays get their own separate confirmation email with a special replay link in it.
Follow-up emails are critical as they help you begin to build relationships with attendees post-webinar and encourage them to take the next step on their customer journey with you. By default, eWebinar sends two follow-up emails, one to those who attended and another to those who didn’t. so you can speak to each group accordingly.
Of course, even though our default email notifications are written by experienced copywriters, they are ultimately just recommendations. You can customize them however you want, get rid of the ones you don’t like, or add new ones.
We also integrate with Twilio, if you want to send SMS notifications to attendees (provided you collect their mobile numbers first).
If you’re ready to take action now, join our on demand webinar and see how you can create your own high converting on-demand webinar.
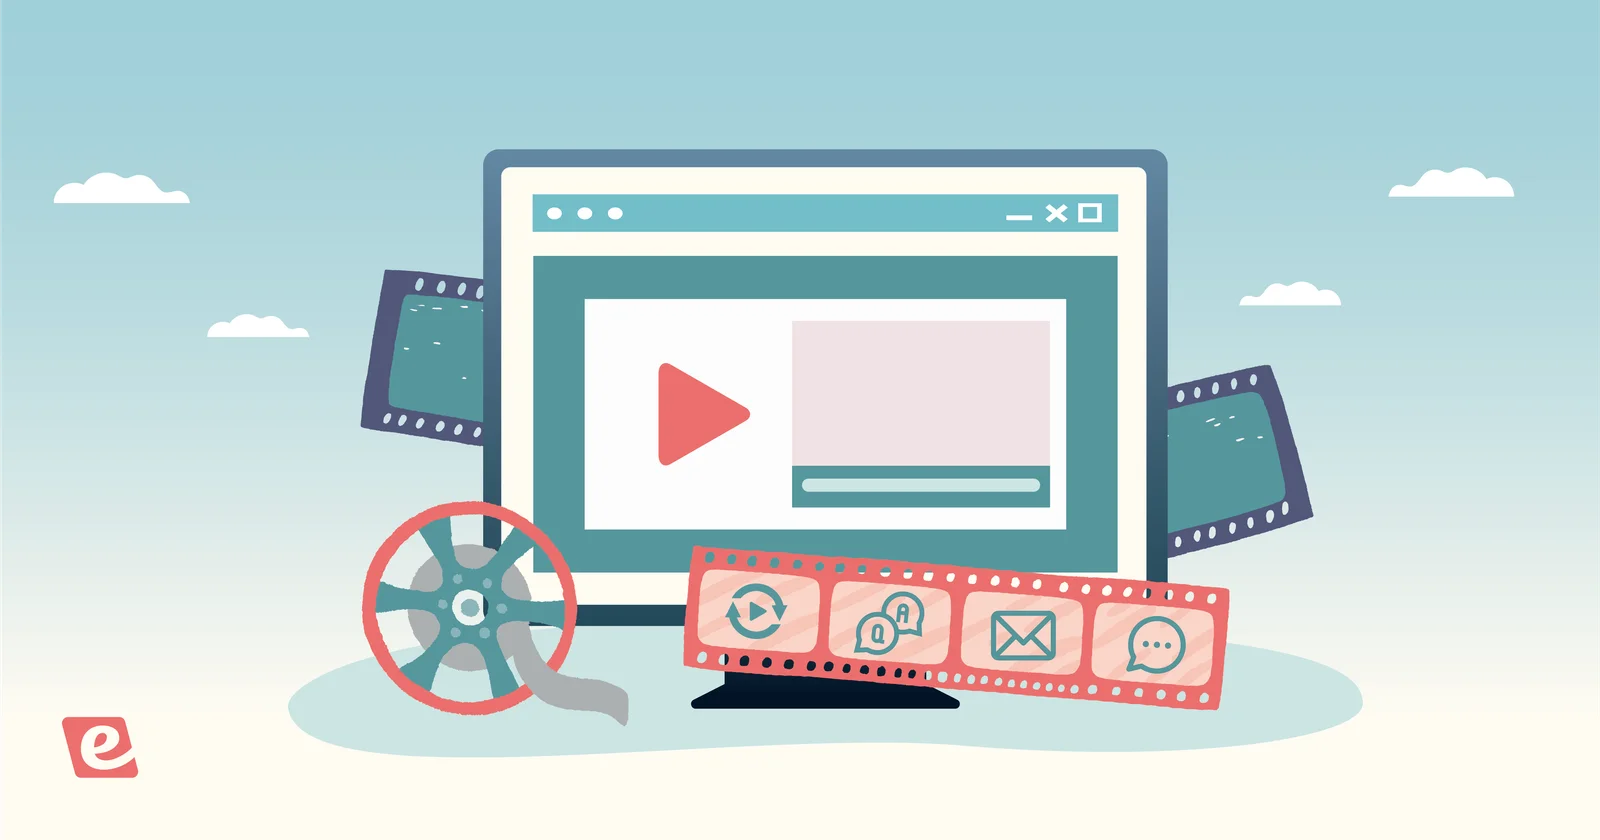
Step #4: Add Interactions (Like Polls, Tips, Handouts, and Contact Forms)
Many people are initially uninterested in on-demand webinars because, traditionally, they lack the engagement of live webinars.
However, modern on-demand webinars are arguably more interactive than live events, thanks to personalized, preprogrammed interactions.
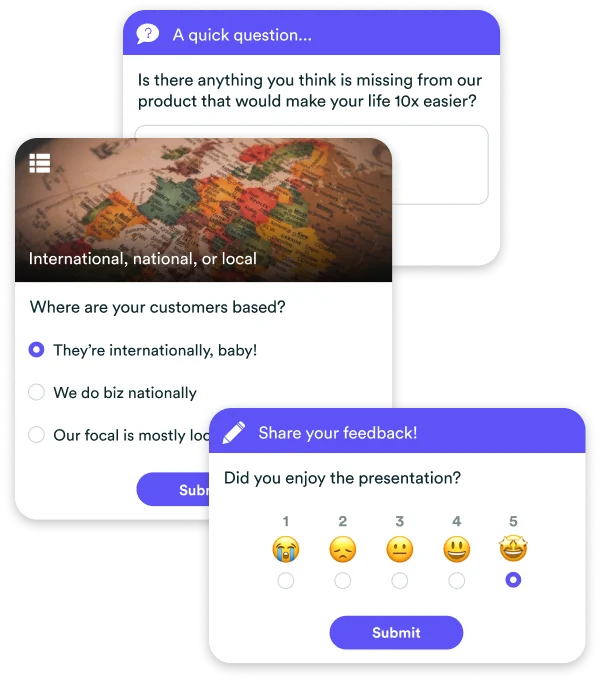 Unlike live webinars, where the host simply tells people to raise their hand or type something in the chat, eWebinar users can schedule interactions to appear in the webinar room at opportune moments throughout the presentation, like:
- Polls
- Handouts
- Questions
- Tips
- Call to action
- Contact forms
- Special offers
- Feedback
- And many more…
Here is a full list of our interactions. We have more than any other webinar platform.
Interactions also let you gather quality customer data as you can solicit feedback, ask questions, and more.
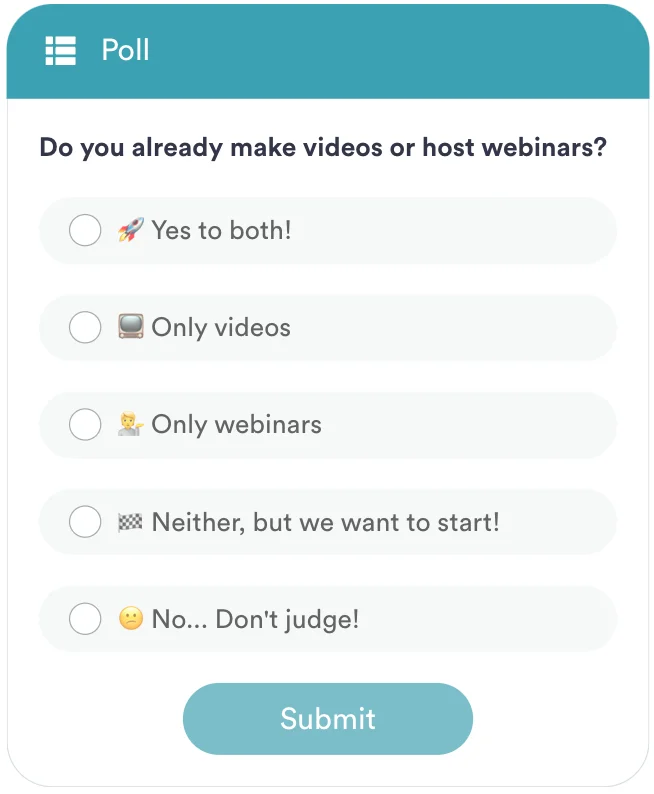
For example, in our own on-demand demo webinar (which you can join here to experience eWebinar for yourself), we ask if users are currently making videos or not. Our platform is ideal for brands already creating their own videos, so this data is useful in our marketing.
You can segment your post-webinar follow up based on attendee responses to interactions so that each person receives the most personalized content possible.
Adding an interaction in eWebinar is super easy:
- Drag the playhead along the video timeline until you reach the moment you want to add the interaction.
- Select the desired interaction and add it.
- Customize it to your liking, including adding emojis or an image.
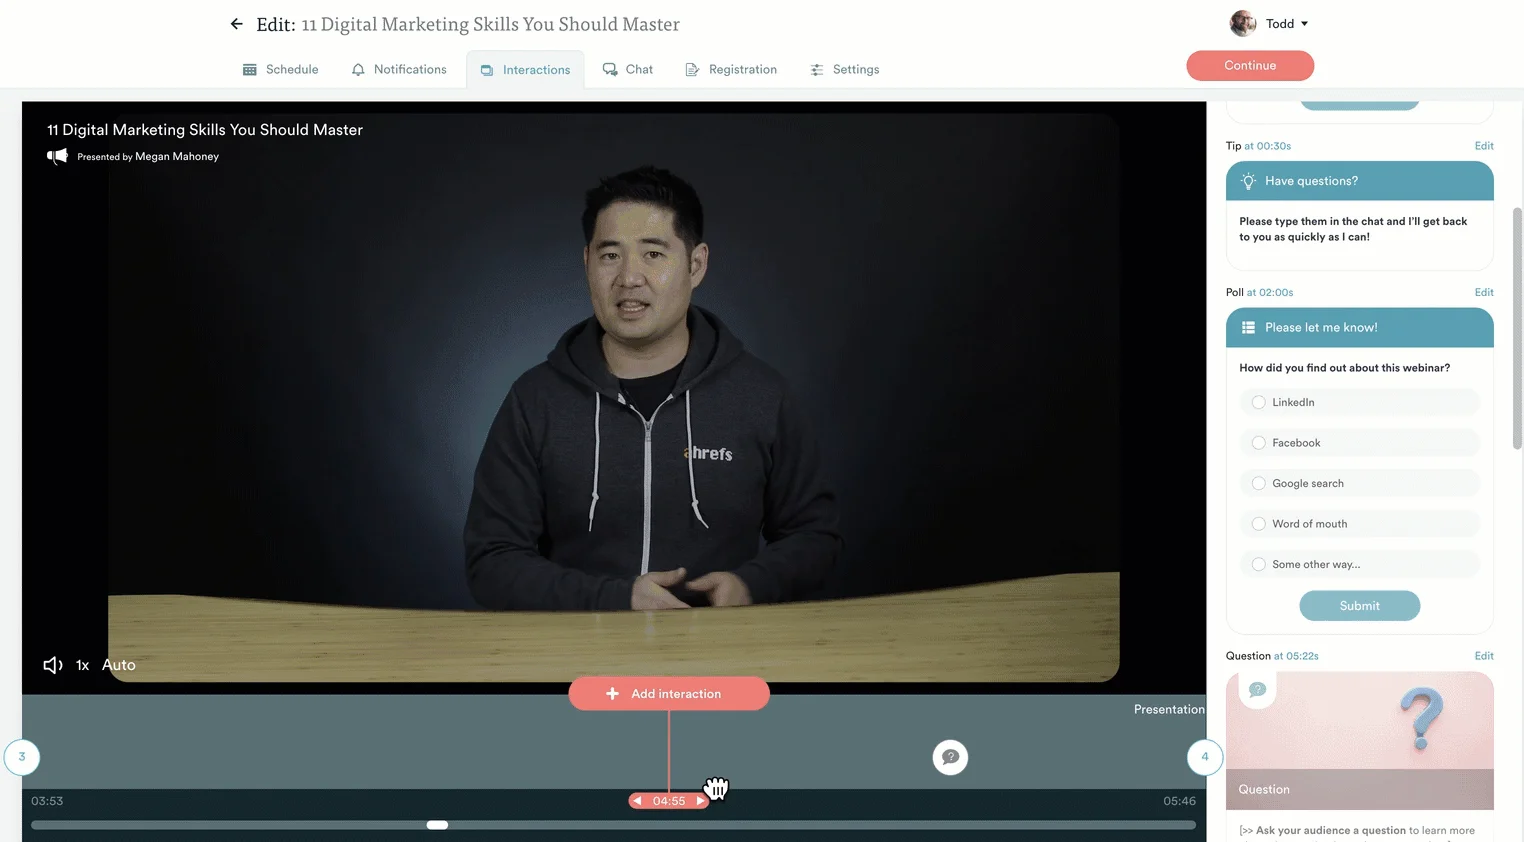 This is a much easier process than in typical webinar software that requires you to open the video in one tab and the editor in another tab. You then have to search through the video to find the moment where you want to add the interaction. From there, you write down the timestamp on a piece of paper, go back to the video editor, and then type in the timestamp where you want the interaction to occur.
We recommend adding an interaction every 3-4 minutes to account for the sometimes short attention span of attendees, though you can always test it and add more or fewer.
To see an excellent example of how to use interactions, join our demo.
Step #5: Configure Chat
People attend webinars because they want to have the opportunity to ask questions. Otherwise, they might as well watch a static video.
Having the ability to chat is critical. However, traditional on-demand webinar software doesn’t offer chat capabilities. Instead, messages are automatically forwarded to email.
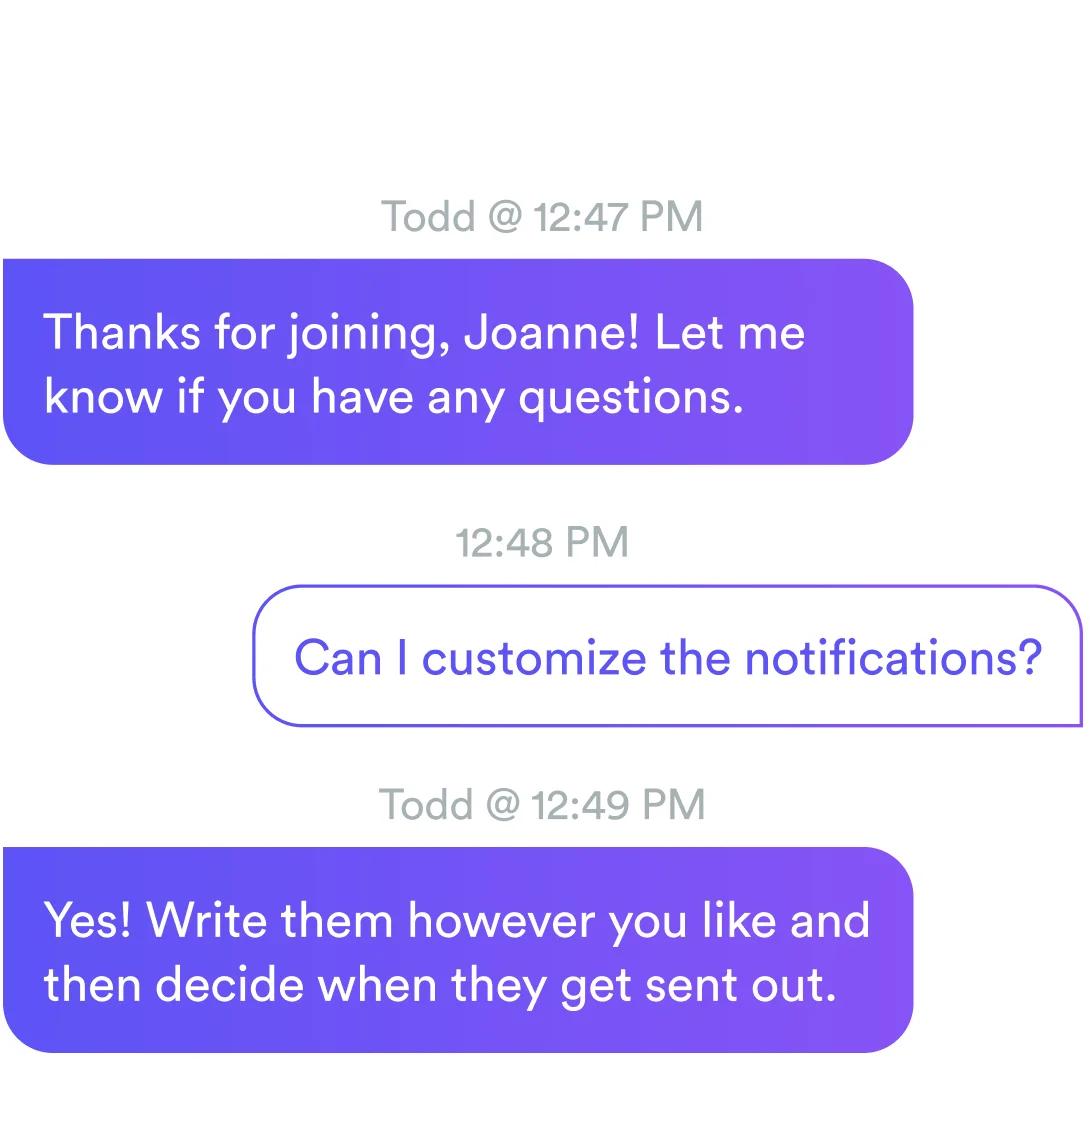
This means attendees will never receive a live response in the webinar — even when members of your team are available to respond. This can hurt conversion rates, detract from the experience of your brand, and defeat the purpose of attending a webinar (people want to ask questions). It’s for these reasons many brands continue doing live webinars instead of switching to on-demand.
Here at eWebinar, we solve this problem by notifying your team of new messages via their preferred channel (email, Slack, or browser notification.) A team member can then take a few seconds to respond in real time before getting back to their other tasks. Or you can give this to your Customer Support team, who is already answering customer questions.
If your team isn't available when an attendee sends a message, they get an auto-response letting them know their question was received and that they’ll hear back later by email.
Later, when your team is able, they can log in and respond to unanswered questions directly inside the platform. Every chat message gets a timely response from your brand and no question goes unanswered.
 Configuring chat is super easy, just select a chat moderator — add others at no additional cost — and then choose how you'd like to receive notifications: email, desktop, or Slack.
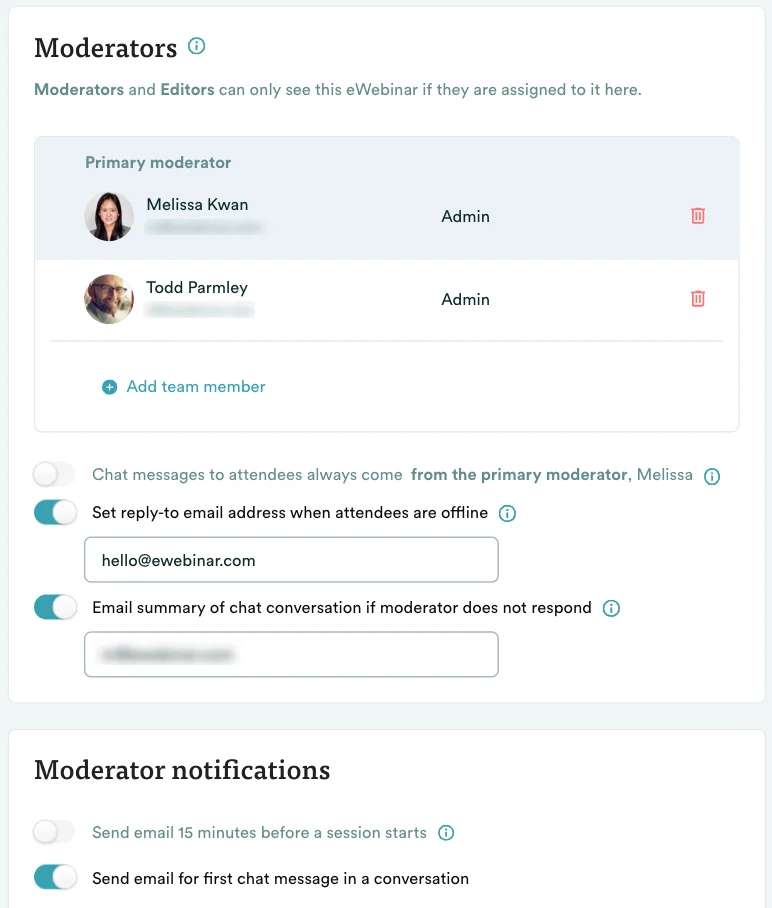
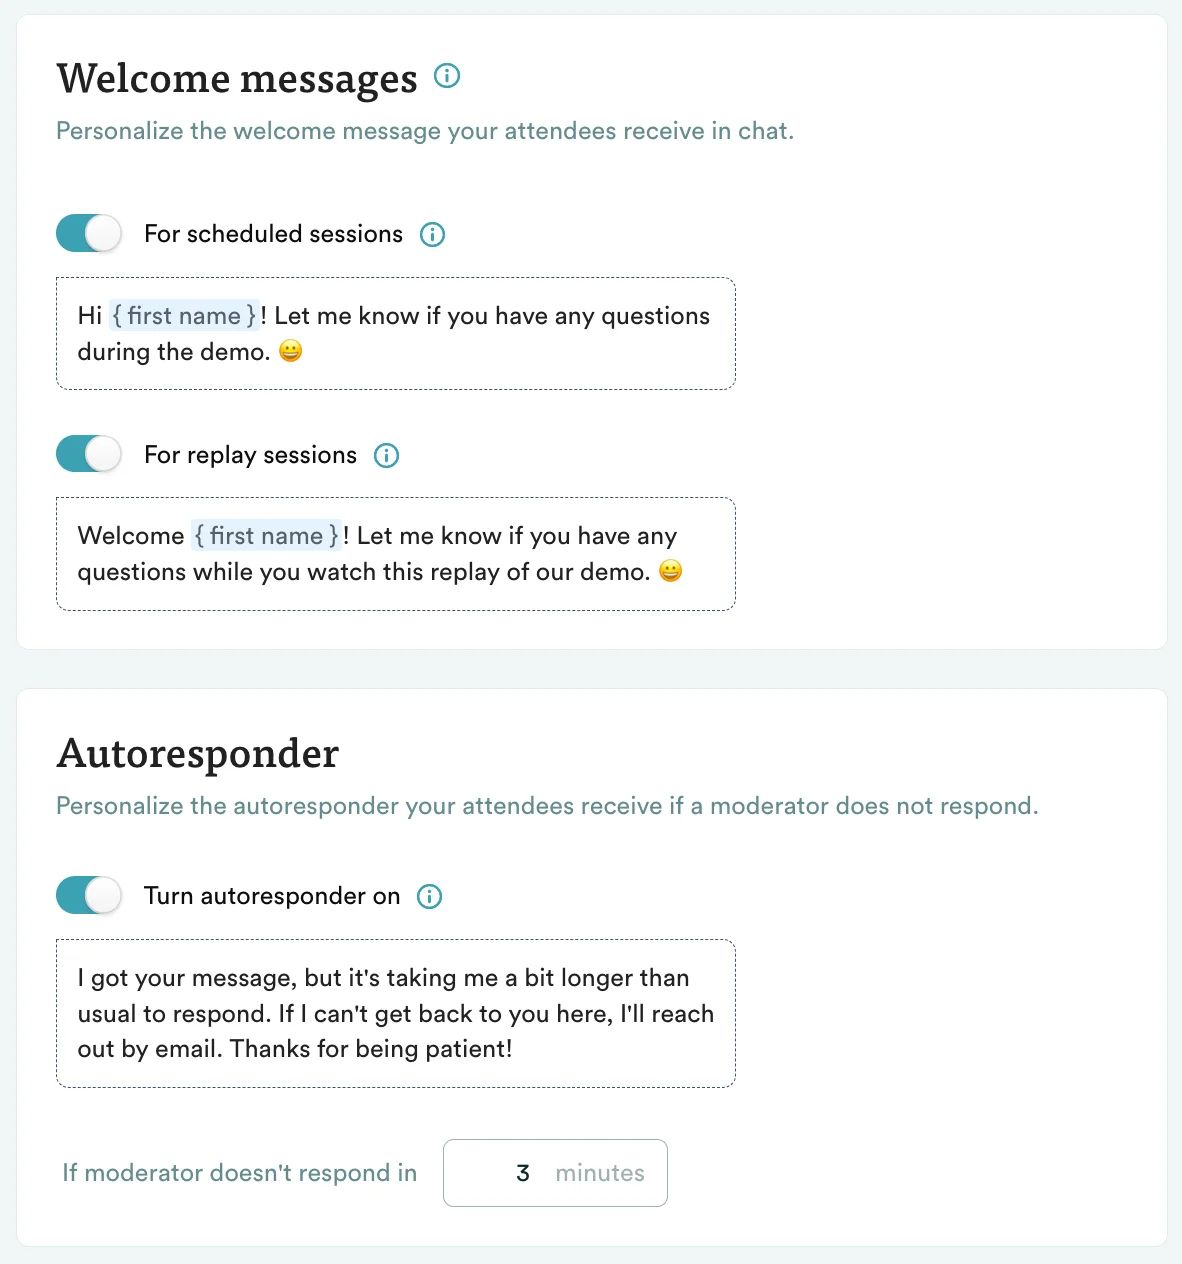
You can also edit the welcome messages and auto-response, when you are slow to reply.
To see for yourself how the chat works in eWebinar, join our demo.
Step #6: Customize Your Landing Page
Finally, set up a registration page that compels people to register for your webinar. Outline its benefits (what they will learn ) and make it super easy and clear for prospects to sign up.
At eWebinar, we offer simple landing page templates that you can edit with our no-coding-required editor, customize to your liking, and add your brand colors and logo.
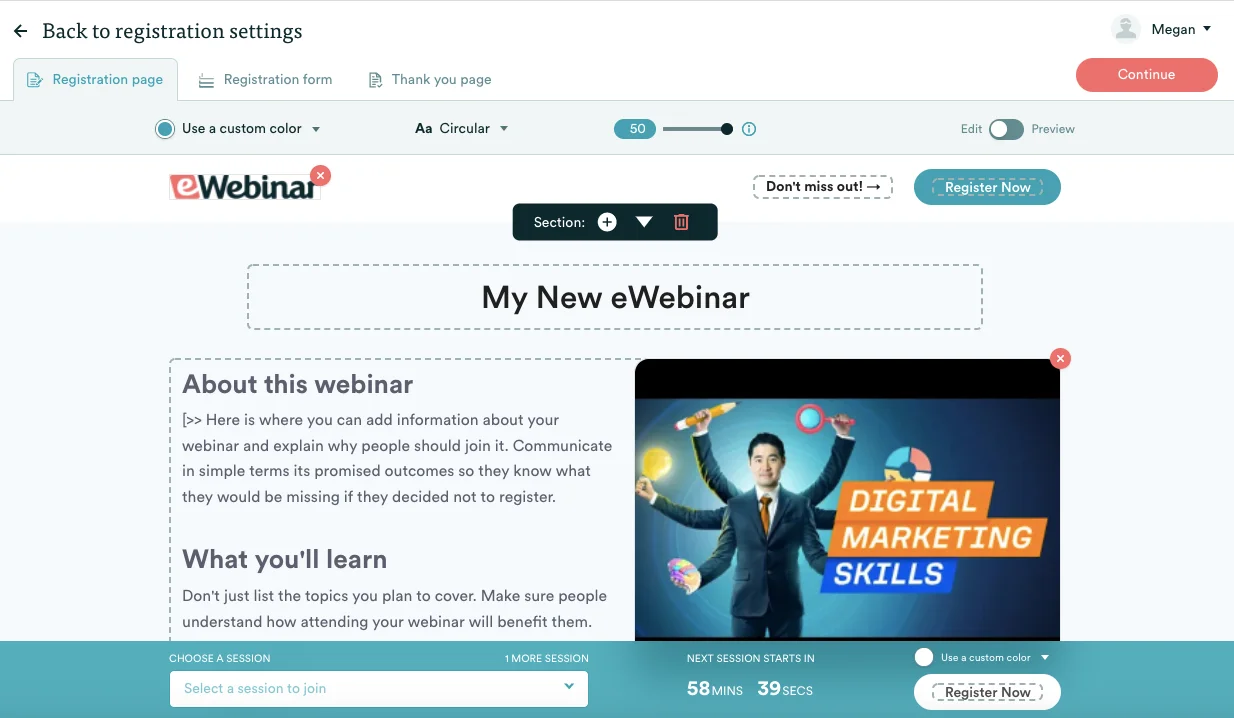
If eWebinar users want more power, we integrate with dedicated, third-party landing page builders, like Unbounce, Leadpages, or Instapage. Your webinar registration and thank you pages will be seamlessly connected to your webinar when you embed one of our many marketing widgets, like a button, embedded form, or fixed bar widget.
Step #7: Publish and Share
Once the webinar is ready to go, you can publish and promote it using the link provided. You can also share it to social media, like LinkedIn, using one of the social icons.
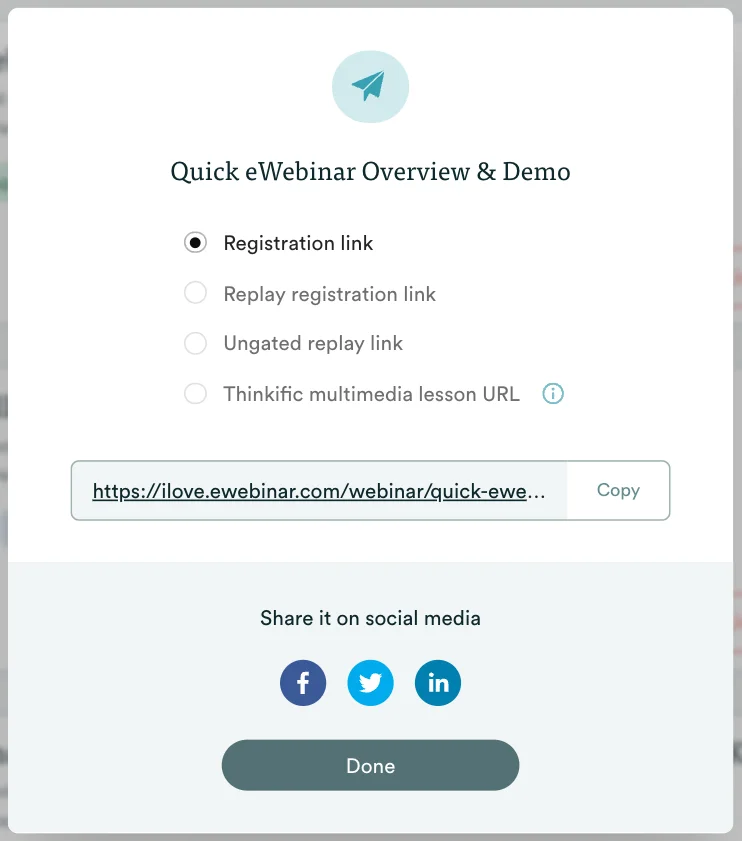
You may also include the registration link in ads, blog articles, email newsletters, and anywhere else you market online.
Why Choose eWebinar?
If you’re looking to build an on-demand webinar, here are just a few things that we have learned significantly impact attendance, engagement, and conversion rates:
- Responsiveness to chat (Do you chat with attendees when you can? Do chat questions go unanswered if nobody is live during the webinar? Or do they go straight to email? Are you able to reply to unanswered questions within one business day?)
- Webinar availability (Besides being available on-demand, what other options do people have to join your webinar? What if they can't join your webinar at that moment? Do you give them the option to register for an upcoming session or watch a replay, so they don't bounce and never come back?)
- Interactivity of the webinar (Is it a static on-demand video or is the attendee experience interactive? How interactive is it? Is it engaging from beginning to end?)
While there are plenty of platforms that support webinar automation, we built eWebinar around three key principles. We’re proud to say we are the only webinar platform that:
- Enables chat questions to be answered live (with your team receiving notifications of new messages rather than attending every session live) or in a timely way via email.
- The attendee has multiple options to join the webinar (on-demand, selecting a future session, or registering to watch a replay)
- Offers the most advanced library of interactions and makes it easy to add as many as you like using a simple drag and drop timeline editor.
To see for yourself what an on-demand webinar built with eWebinar feels like, join our demo today. Or, if you’re ready to dive in now, sign up for our free trial!
To learn more about eWebinar and our pricing, visit our website.