This guide will teach you how to create and manage breakout rooms in Zoom as the meeting host.
Table of Contents:
What is a breakout room?
A breakout room (breɪkaʊt rʊm) is part of an in-person or online meeting where a small group of participants breaks off from the larger group to discuss topics separately and work on designated tasks. Video conferencing platforms like Zoom offer virtual breakout rooms to let meeting participants better interact with one another.
Creating breakout rooms in Zoom
The breakout room feature in Zoom needs to be enabled in order to be initiated during a meeting or webinar. You also have the option of pre-assigning breakout participants before the scheduled session starts.
Enabling breakout rooms
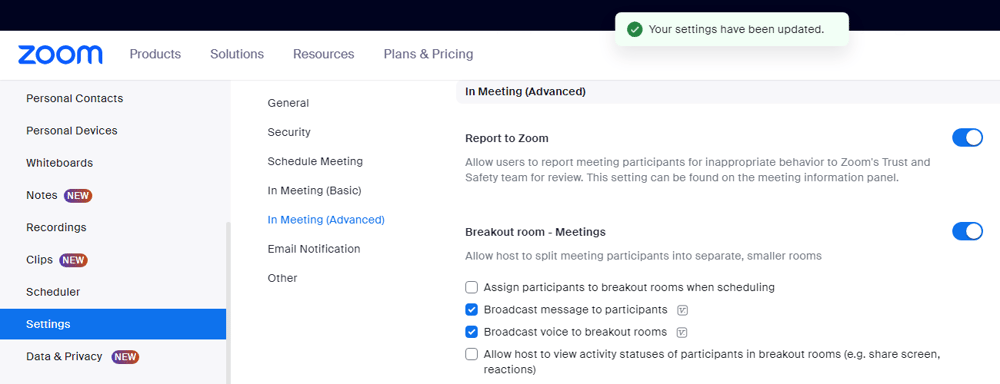
To enable breakout rooms, sign into a Zoom account with administrator privileges to edit account settings. On the Zoom website, click on My Account and then select Settings from the navigation bar at the top of your screen.

Under the Meeting tab, you'll find the Breakout room toggle below the In Meeting (Advanced) header. If a popup appears verifying your selection, click on Enable to apply the changes. If an update confirmation doesn’t pop up, click on Save to manually save your settings.
Pre-assigning breakout rooms
Zoom lets you pre-assign participants to breakout rooms before the meeting or webinar begins. If you set up a recurring meeting, Zoom will remember the randomly assigned breakout rooms and automatically pair the same participants together during every future session.
Tip: You can pre-assign breakout rooms for recurring meetings as long as you apply your changes to all meetings in the recurrence rather than saving changes to a single meeting.
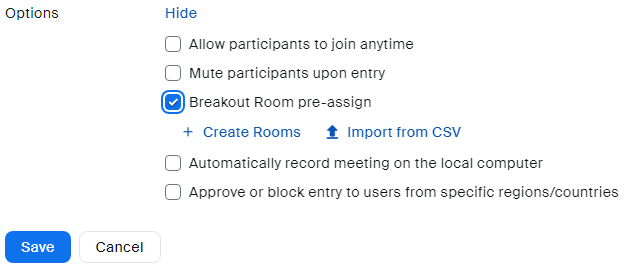
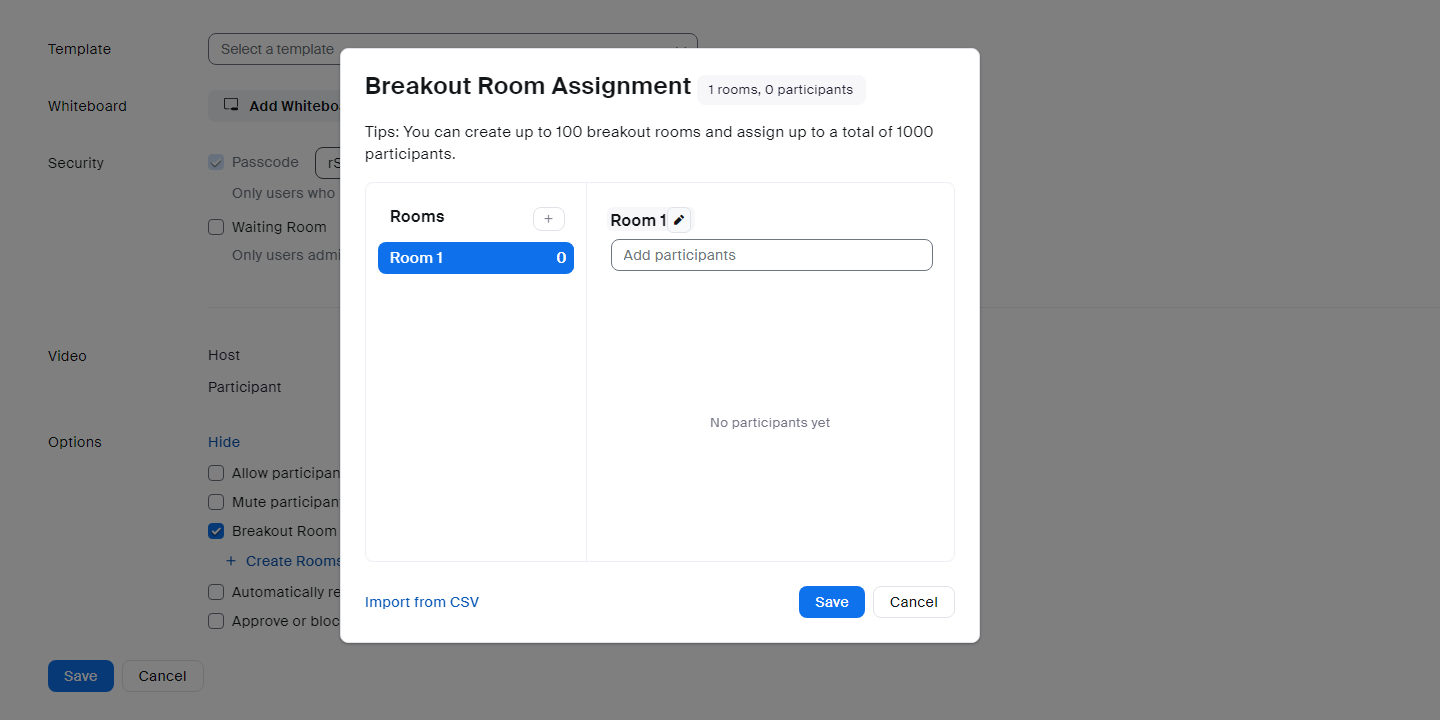
Under the Options section, select the Breakout Room pre-assign checkbox and click on Create Rooms. In the window that appears, you'll find a + button immediately to the right of Rooms — click on it to add breakout rooms.
Hover your mouse over the name of the breakout room and click on the pencil icon to rename it.
Within the Add participants text box, you can search for participants by typing their name or email address. For external users, you'll need to manually enter their email address. Once you've found the participant, hit Enter to add them to the breakout room.
Note: You can only pre-assign participants who have a Zoom account.
When you hover your cursor over the name of a participant, you'll see options to move them to another breakout room or remove them from the breakout room they're currently assigned to. You'll also be able to click and drag email addresses to reorder breakout room participants.
Finally, click on Save to finalize your pre-assignment for that Zoom meeting.
Tip: If you want to delete a breakout room, simply hover your cursor over the room name and click the trash icon.
Initiating breakout rooms during a Zoom session
Creating breakout room sessions — or "breakout sessions" — during an ongoing meeting/webinar on Zoom is fairly simple. While you're hosting an instant or scheduled meeting, you can create breakout rooms by clicking on the Breakout Rooms button in your menu bar.

Once the popup window appears, decide how many breakout rooms you want. Choosing to automatically assign participants will randomly distribute everyone based on the number of breakout rooms. Manual assignment will require the host to place each participant in a breakout room individually.
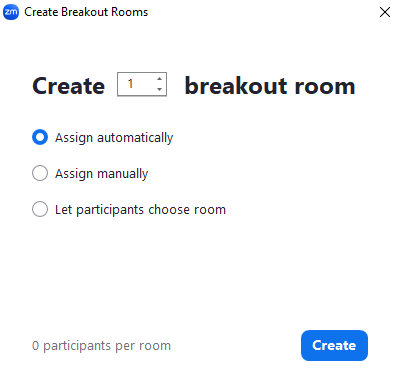
Tip: You can also enable the Allow participants to choose room option when configuring your breakout session settings to let everyone in the meeting or webinar choose which rooms to join for themselves.
Click on Create then verify that participants are assigned to the correct breakout rooms. If you pre-assigned participants before the meeting started, click on Revert to pre-assigned rooms to ensure that your pre-assignments are followed.
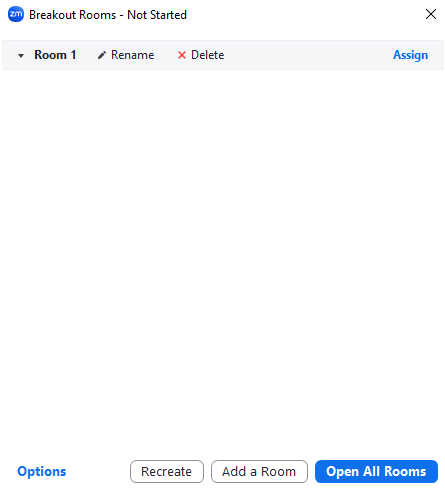
You can also click on Options to adjust your breakout room settings.
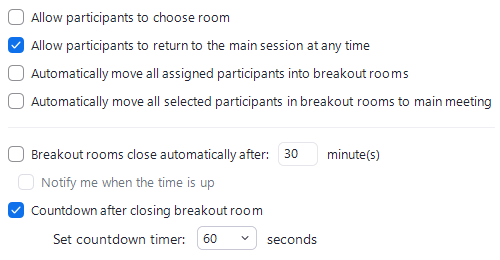
Features include closing breakout rooms automatically after a set time period elapses and allowing/restricting participants to return to the main session freely. You can also create a countdown timer that shows participants how much time they have left in their own room.
Tip: Even with a countdown timer set, hosts can still manually end the breakout session at any time by clicking on the red Close All Rooms button which triggers a 60-second timer.
Once you're satisfied with your settings, click on Open All Rooms to begin the breakout session.
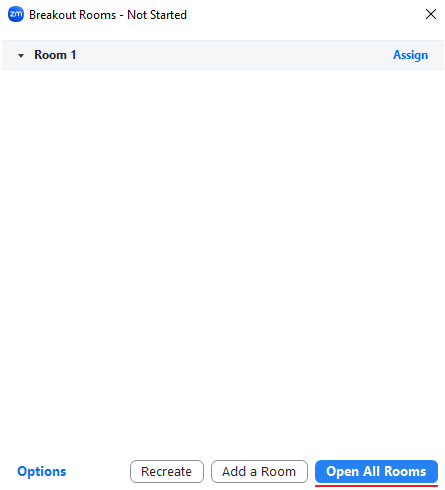
This will prompt all participants to join their breakout room. If some participants are yet to join their respective breakout rooms, you'll be able to see a "(not joined tag)" next to their name in the list of breakout participants.
Creating breakout rooms from poll results
You can also create breakout rooms based on the poll responses of participants:
-
Navigate to the Polls/Quizzes tab
-
Click Create to add the first one or on the + button to generate additional polls and quizzes
-
Name the poll or quiz
-
Click on Add Question to create questions
-
Enable the Create Breakout Rooms toggle
-
Click on Save
-
Click on Launch
-
Once you'd like to stop the poll, click on End Poll
-
Click Create Breakout Rooms
-
Zoom will separate sessions automatically based on the poll responses of participants
If your poll contains multiple questions then you'll need to enable the Create Breakout Rooms toggle for the question that you want to assign participants to breakout rooms based on. It's also worth noting that anonymous responses must be disabled in order for breakout participant assignments to work.
Zoom breakout room best practices
-
Small groups. Small groups work best with no more than three to four people in any specific breakout room. Limiting the number of breakout participants will facilitate small-group discussions and maximize participant engagement.
-
Introductions. If the participants sharing a breakout room don't know each other then it's a good idea to ask them to introduce themselves upon arriving. This is particularly important for those running Zoom Webinars but less crucial for those running internal meetings.
-
Host assistance. Zoom has an "Ask for Help" button that participants can use to request the presence of one of the meeting hosts. Clicking this button will automatically prompt hosts to join the breakout room that initiated the request.
-
Clear objectives. Whether you're using breakout rooms for employees, customers, or students it's important to provide a clear directive for what each room should be working on. Clarifying the objective will ensure that participants meet expectations by the end of the breakout session.
-
Pre-breakout polls. Because Zoom meetings and webinars can be a passive experience, it's a good idea to run a poll before creating breakout rooms. This will get all participants into an active participation state of mind and increase engagement once the breakout rooms have been created.
-
Feature limitations. Access to certain features will be restricted once participants are moved into breakout rooms. This includes the chat, whiteboard, and anything else in the main meeting session — so make sure you notify participants ahead of time so they can back up anything they need.
-
Broadcast permissions. When configuring your breakout room settings, you'll have the option to enable message/voice broadcasting for hosts. We recommend you enable both of these options so the host can chat with participants across all rooms through audio and text.
-
Post-breakout summary. At the end of the breakout session, have participants report back and provide a summary of what was discussed/accomplished within their room. Even better would be to have them produce a deliverable based on the stated objective.
-
Recording limitations. Zoom doesn't record any activity that occurs within breakout rooms. This means that any asynchronous participants won't be able to review information that was discussed by breakout participants when watching the meeting replay.
How many breakout rooms does Zoom support?
Zoom lets you create up to 100 breakout rooms and pre-assign up to 1,000 participants. The capacity of each breakout room will depend on the meeting capacity, the number of breakout rooms created, and whether participants were assigned before or during the meeting.


