
If you know who someone is, you can add their name and email to the end of a link. This makes it easier for them to register. We call these personalized links, and there are three kinds:
| Link | What happens when they click |
|---|---|
| Personalized landing page link | The registration form is pre-filled. They still submit it. |
| Personalized series link | The series page recognizes them. Their email is locked, and they register when they pick a session. |
| Instant join link | They're registered and taken straight into the session. |
All three work the same way. You add URL parameters to the end of the link, by hand or with merge fields in your email tool, CRM or in-app messaging tool. This article covers the first two.
Personalized landing page links
A personalized landing page link passes information about a known contact into your eWebinar landing page, or any page that contains an eWebinar registration widget. The registration form is pre-filled, which reduces friction and makes it faster for people to register.
How it works
You can add URL parameters to your eWebinar landing page link (or to any page where an eWebinar registration widget is embedded) to automatically fill in the form fields when someone clicks it.
For example, you can add parameters like these to the end of your landing page link:
?name=Jane%20Doe&email=jane@example.com&session=ondemand&showform=1Click this example link to see how it works:
Required fields
You must include the contact's name and email in your parameters, since they are required for registration.
Name field(s)
Registration forms may use one or two fields for the contact's name, so make sure the URL parameters you use match your form.
If your form uses one field (Name):
name=Jane%20Doe
If your form uses two fields (First name and Last name):
firstName=JanelastName=Doe
Email field
email=jane@example.com
Note that properties are case-sensitive.
How to build your URL
Start with your eWebinar landing page link (or a link to a page with an embedded form)
Add a question mark (?) to begin parameters
Add your fields using this format:
field=value
Separate multiple parameters with an ampersand (&)
Add a space within a parameter with
%20
Example:
?name=Jane%20Doe&email=jane@example.comOptional parameters
Automatically open the registration form
On standard eWebinar landing pages, you can automatically open the registration form by adding:
showform=1Pre-select a session
You can pre-select a session in the dropdown. In this example, "Watch now on demand" would be pre-selected:
session=ondemandFor the full list of built-in parameters, including every option for pre-selecting a session, see Properties built-in to the registration form below.
NOTE: Consent checkboxes may not be pre-selected. Registrants must check it themselves.
Pre-populate hidden fields
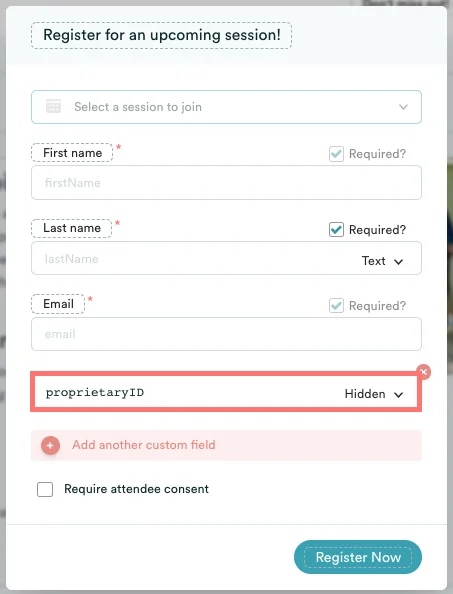
We support Hidden fields in our registrations forms, so you can pass data through in the URL without registrants being able to see or change it.
This is useful if you want to associate the registrant with an existing record in your system.
For example, you might pass a proprietary ID from your CRM in the URL to a hidden field in the form. When the attendee registers, that ID is stored alongside their registrant data in eWebinar. When the data is sent back to your system (via integrations or exports), you can use that same ID to match the attendee to their existing record.
Properties built-in to the registration form
There are a few properties that are built in, but which you can use to pre-populate your registration form in via the mechanism above. They are:
| session |
Used to specify the session time to register for. The value must be either: YYYY-MM-DDTHH:MM:SS+HH:MM This specifies the time of the session in ISO 8601 format. It's a standard format between services. You can specify any valid session time based on the schedule you set for this eWebinar. replay This states the attendee wants to register for a replay session. ondemand This registers the attendee for an on-demand session (the "Watch now on demand" option). |
| name | Full name of the attendee, for forms that use a single Name field (use %20 for the space, e.g. name=Jane%20Doe) |
| firstName | First name of attendee |
| lastName | Last name of attendee |
| Email of attendee | |
| source | Any text of your choosing used to track where this registration came from typically |
Pre-populate custom fields
Any custom field you have added to the registration form can be pre-populated the same way. Use the field's property name as the parameter name, exactly as it appears in the form editor (property names are case-sensitive):
?email=jane@example.com&firstName=Jane&company=Acme&plan=premiumParameters that do not match a built-in property or a field on the form are ignored.
Personalized series links
A personalized series link adds a known contact's name and email to your series page link, so the series page recognizes them.
How to build your URL
Start with your series page link from your series' Share page. Then add the person's name and email, the same way you would for a landing page link:
https://ilove.ewebinar.com/series/ewebinar-academy-50?name=Jane%20Doe&email=jane@example.comYou can use either one name field or two:
name=Jane%20DoefirstName=Jane&lastName=Doe
Only name and email are supported on the series page. Other parameters, like hidden fields, custom fields or source, only work on landing page links.
What happens when they click
- If they've registered for the series before, a "Welcome back" window opens. They click Email my code, enter the code we send them, and they're back on their series page.
- If they haven't, the series page greets them by name. When they choose an eWebinar, they skip the email field. They pick a session, confirm their name, and register. That registers them for the series too.
Their email is locked the whole time, so they always register with the email you gave them. This is useful when your users have several email addresses and you need them to use one in particular, like the one they use to log in to your platform.
To learn how to use personalized series links to move people through your series, see How to Move People Through an eWebinar Series.