Here is what we will cover:
eWebinar has built several direct integrations with popular CRMs and marketing automation software, like Hubspot and MailChimp. Here is a full list of the direct integrations we support with other products.
We have also made it possible to connect eWebinar with many other products, with which we do not support a direct integration, via Zapier.
Regardless of whether you use a direct integration or Zapier, you will find the basics of setting things up are very similar.
How to enable an integration with your CRM
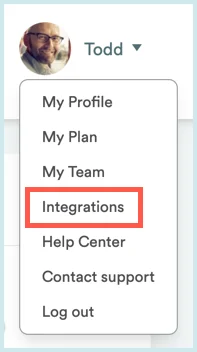
To enable an integration, log in to eWebinar and go to Integrations, which you will find in the profile menu in the top-right corner of any page.
Once there, you'll find all Available integrations listed.
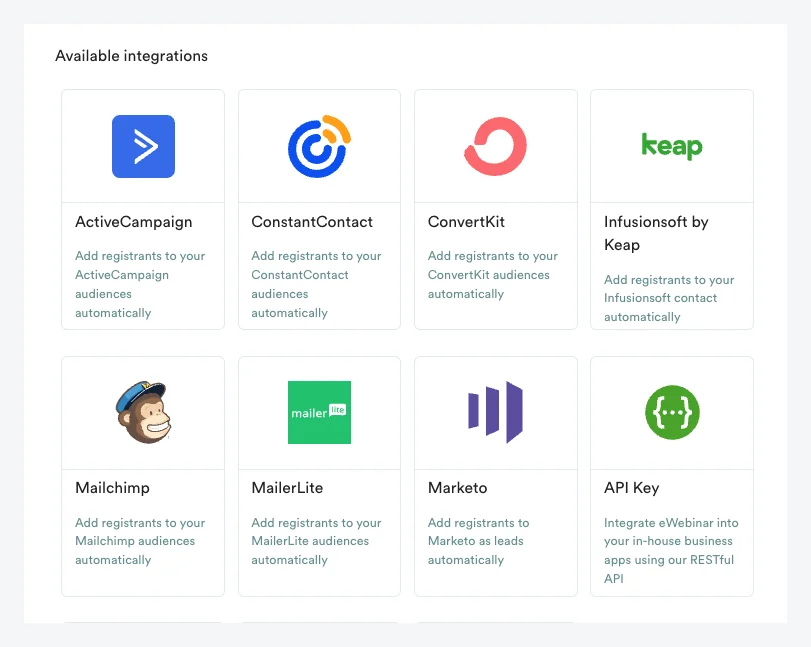
Click the integration you want to set up. When you do, a window will open for it.
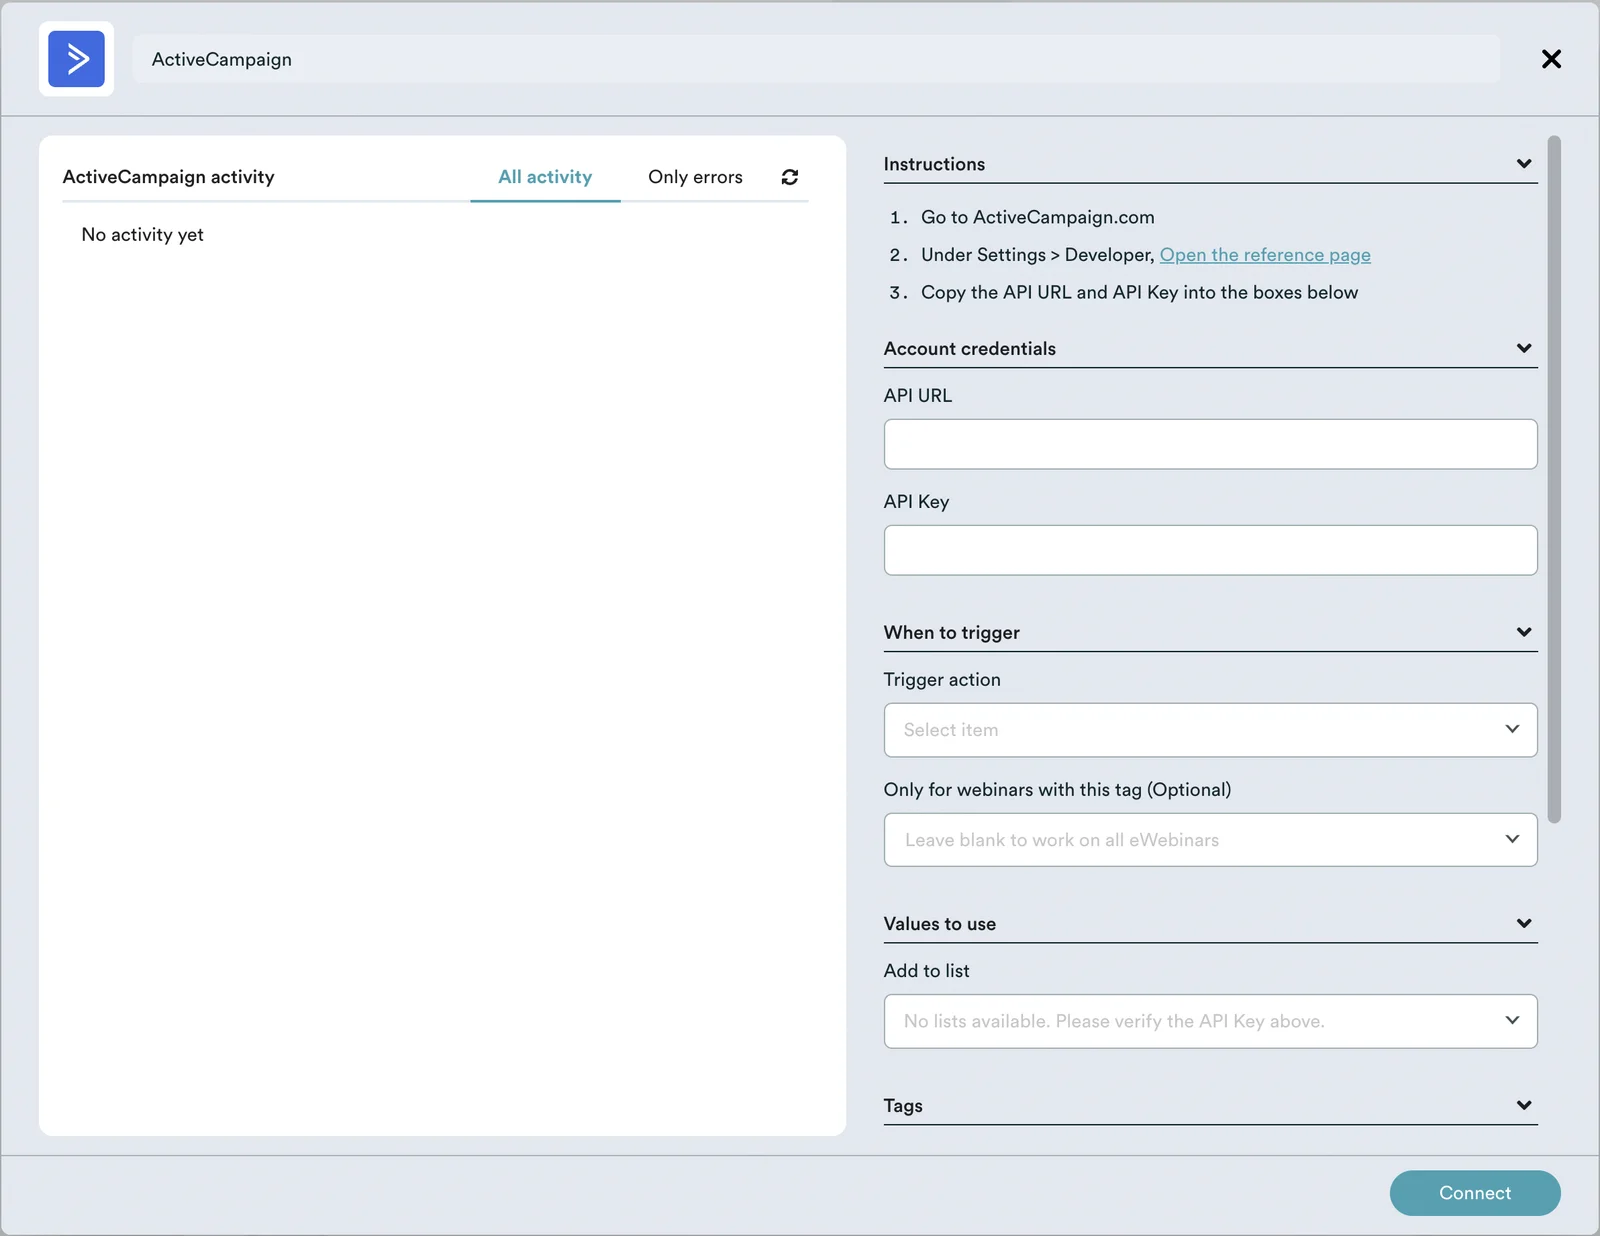
The left side of the window shows a large blank area. Once the integration has been set up and is working, this is where you'll be able to see all of the activity that happens between eWebinar and the integrated service. We'll show you later how this comes in handy if there are any issues.
The right side contains various integration settings, grouped by function, with a simple set of Instructions above them on how to proceed.
Beneath the Instructions, you will find Account credentials. Some integrations will ask for fields such as an API Key or API URL (which you can find in the other product). Other integrations might simply show a Sign in button. Either way, follow the instructions to connect eWebinar and give it permission to interact with the third-party product.
Once your accounts are connected and the integration enabled, proceed with the rest of the setup.
Two types of CRMs: advanced and basic
There are two types of CRM systems:
- More advanced systems that can track a set of events performed by a lead
- Basic systems that simply capture a set of static fields for a lead
Advanced CRMs
Hubspot, Salesforce and Marketo fall into the category of advanced CRMs, which can track events for a given lead. For these systems, eWebinar's built-in integrations automatically create separate events when a registrant registers for a webinar and then watches or misses that webinar. These events contain fields capturing attendance information for that particular webinar.
If the same person attends two different webinars, there will be another set of events attached to the lead. In these systems, workflows and drip campaigns can be triggered based on one or more of the events associated with a lead.
Basic CRMs
Most CRMs, however, don't have this ability to track 'per contact' events. In simpler, basic CRMs, all of the data about a registrant must find its way into a custom field on the Contact or Lead itself. In these systems, events on a lead are captured by applying a tag or setting a custom field's value at the time the event occurs. For this reason, these Integrations with eWebinar use triggers, just like you would set up for a Zap in Zapier, if you know that process.
Since basic CRMs will often have a single field to track a certain type of event, like attendance, if a lead attends more than one webinar, data from earlier webinars can be overwritten.
Setting up integration triggers
On the right side of the integration window, you will find up to four groups of settings:
- When to trigger
- Values to use
- Tags
- Map eWebinar properties to <CRM> fields
Think of these groups as working together to define a basic rule, where the trigger can cause the specified values/tags to be applied to the lead:

Here's a list of the triggers to choose from, including what they are and when they fire:
| Triggers... |
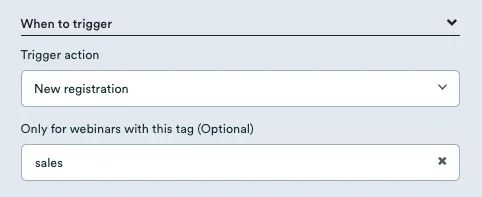
If you want certain trigger-based rules to only apply to certain webinars, you can achieve that by, first, adding the same tag to the relevant webinars on the homepage and , second, entering that tag in Only for webinars with this tag (Optional) under When to trigger.
In the example shown below, the trigger is set up to only apply to webinars that have been tagged with 'sales' on the home page.
Typically, for a basic CRM integration you will set up 4 triggers:
- New Registration
This trigger fires when someone successfully registers for your webinar and is what creates the lead in your system, provided it doesn't already exist. Basic information gets set like firstName, lastName and email. Responses to custom fields in your registration form can also be passed through, if you have set up the appropriate property mappings. - Webinar Missed
This trigger fires when a registrant misses the session they registered for. Here you can apply a missed tag to the registrant and then place them in to an email drip campaign in your CRM, asking them to sign up for a new session. - Attendee Stayed for X%
This trigger fires at the end of the webinar if the attendee stayed and watched at least X%. Generally, people set this value somewhere around 70%, but it is totally up to you: you know your video and when you surface your sales offers and other critical information. Once this trigger fires, you might tag the lead as watched and add them to a drip campaign thanking them for attending. - Attendee Left before X%
This trigger fires at the end of the webinar only if the attendee left before watching whatever value you set for X%. Here you might tag a lead as Left early so they end up in a drip campaign asking them to watch a replay.
The value you choose for X% should be the same for both Attendee Stayed for and Attendee Left before. If you enter two different values, you'll find some attendees may fall through the cracks.
Setting values, tags, and mapping fields
Again, when a trigger fires, there are up to three groups of settings that tell eWebinar what to do: Values to use, Tags, and Map eWebinar properties to <CRM> fields.
Values to use is CRM-specific. Different CRMs have different required fields you must fill in that will be added to the lead when the trigger fires. In the case of ActiveCampaign, for example, you must choose a list to add the lead to.
Tags is the group that lets you specify which tags to apply to the lead in your CRM . You can also enable an option to apply existing tags that the webinar already has to the lead. (Tags can be added or removed from webinars on the homepage.)
Map eWebinar properties to CRM fields is where you specify what eWebinar properties to send to your contact object in your CRM and in which CRM fields to place the property values.
There are many built-in properties you can map to your CRM, or you can map properties from your registration form and/or interactions, like answers to polls.
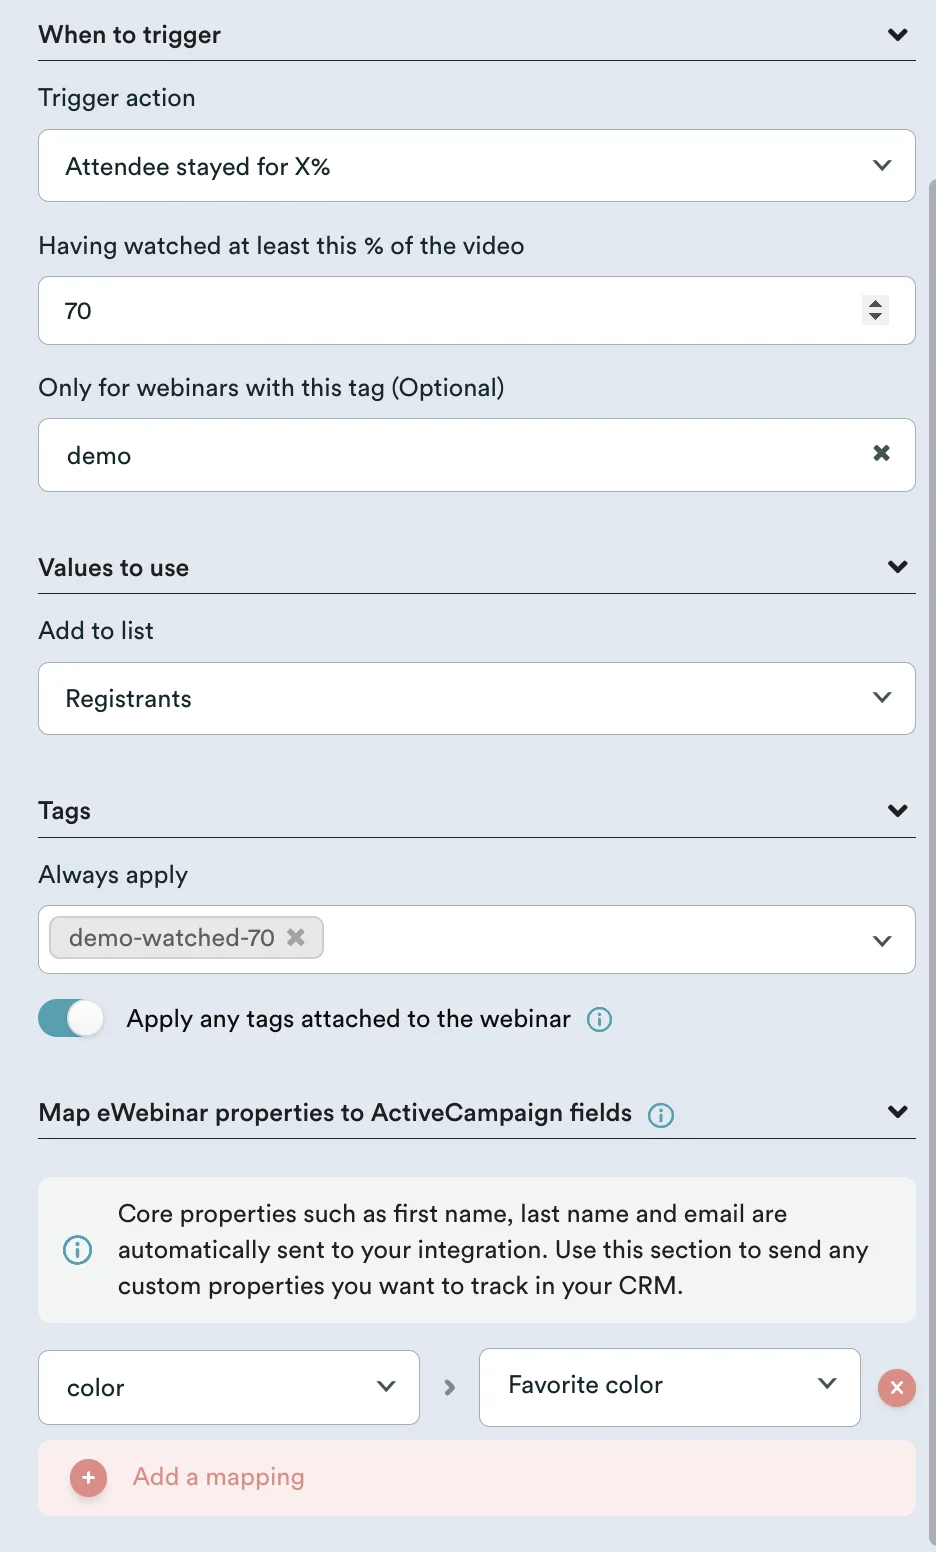
Below is an example of a trigger set up for ActiveCampaign that will:
- Fire when a registrant watches at least 70% of the video for any webinar tagged with demo and then, once fired, cause:
- The registrant to be put into the Registrants list in ActiveCampaign
- The tag demo-watched-70 and all other tags associated with the webinar to be applied to the tags field for the contact in ActiveCampaign. (We know the webinar is at least tagged with demo.)
- Finally, the answer for the property color, which in our case was the property name we assigned to a Poll asking the attendee's favorite color, will be sent to a custom field for the contact in ActiveCampaign named Favorite color.
For a greater understanding of how to properly map properties in eWebinar to fields in your CRM, check out this entire post we wrote on the topic:
Troubleshooting integration problems
When you initially set up your integration, you may find certain fields aren't correctly being sent over to the CRM or you may have issues with the way you've set up your workflows. These issues usually arise because of how you are sending the information.
One common mistake happens with Polls where you set up a multiple-choice field in your CRM to capture your Poll's answers, but the values don't exactly match the values of the property in eWebinar, so an error results from the API call to the CRM.
In these cases, you can troubleshoot the issue by going back to the Integrations page and clicking on the specific trigger that is having problems. When the integration's window opens, on the left you'll see a history of its API activity. The activity shows a list of the triggers that have fired, such as a New Registration.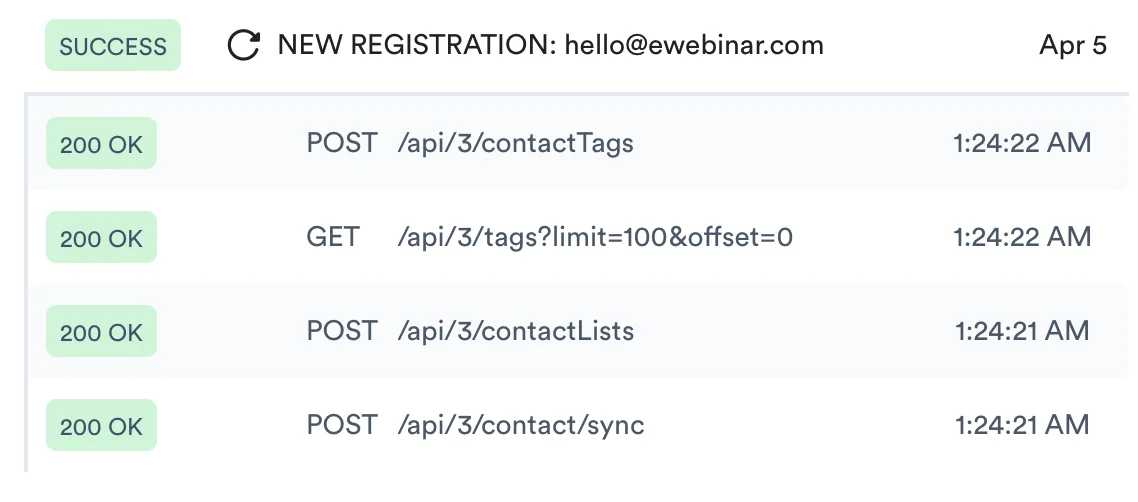 The above shows a New Registration trigger firing for a registrant with the email hello@ewebinar.com. In this case, four API calls were necessary to execute the conditions associated with this trigger, which you can see listed beneath it, performed one right after the other starting with a POST /api/3/contact/sync and ending with a POST /api/3/contactTags.
This is where integrations can get very technical. The good news is you don't need to understand what all these things are. What's important is that, as you can see on the left, all these API calls were executed successfully and have a green status code of 200 OK. This means the trigger is working as expected with your CRM.
Sometimes, API calls will fail. When that happens, you can re-run the trigger by simply clicking Replay (the circular arrow icon to the left of NEW REGISTRATION). If a momentary glitch originally caused the API call to fail, for example, re-running it may allow it to succeed.
NOTE: You can re-run triggers whether they're marked with SUCCESS, FAIL or PENDING.
When an individual trigger fails, you can click it to see the details of what happened. In many cases a human-readable error will appear in the response, making it more obvious what went wrong. Here is an example of that:
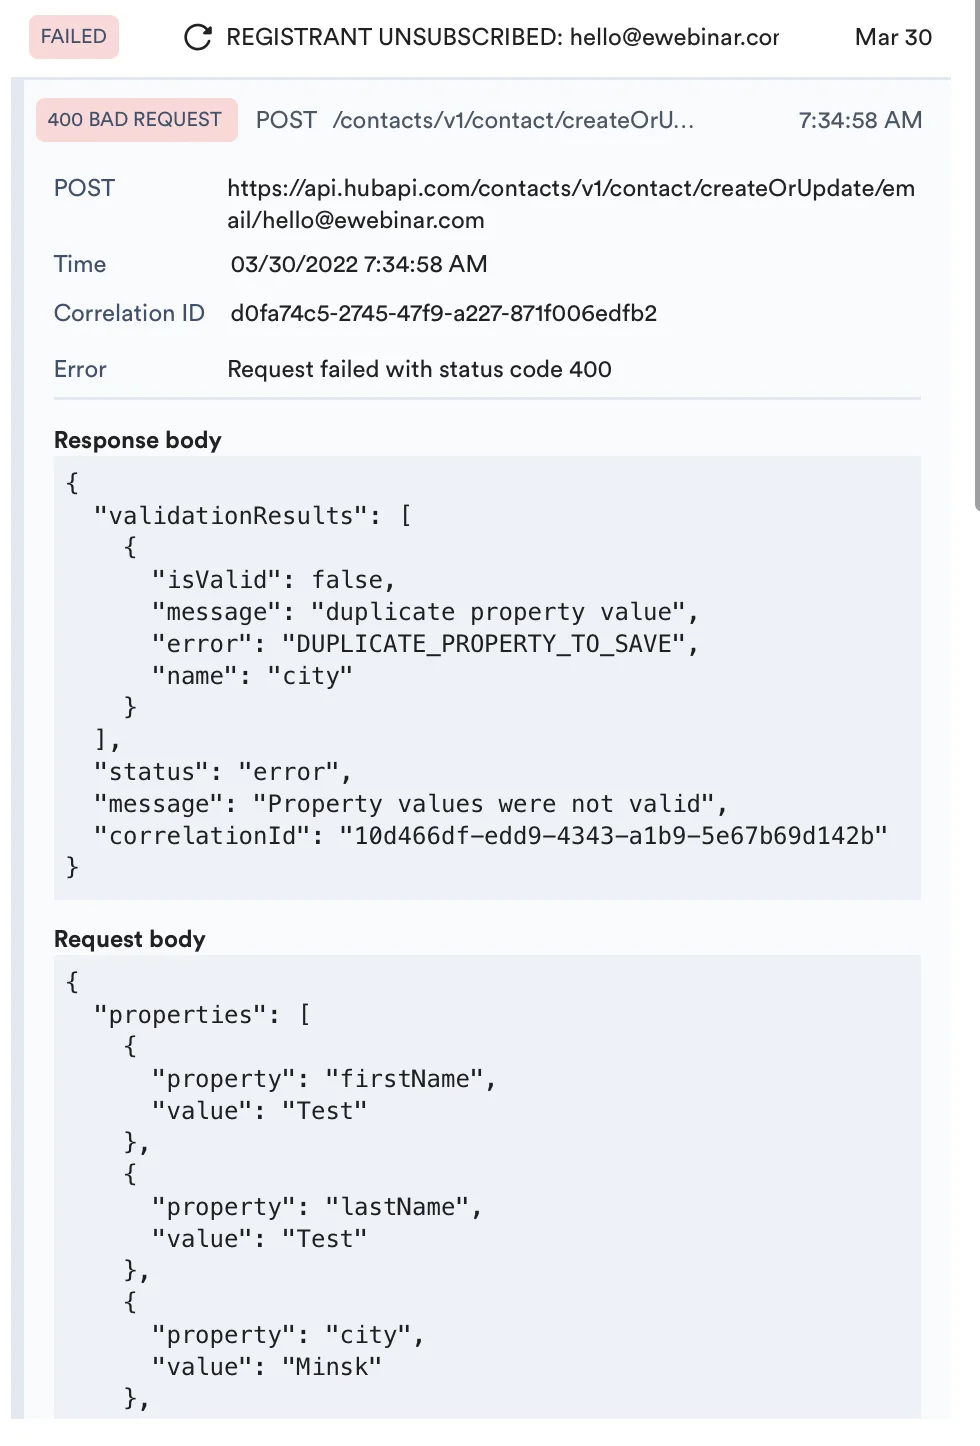 In this case, you can see that when the Registrant Unsubscribed trigger fired for the contact with the email hello@ewebinar.com, Hubspot complained that there was a duplicate property value named 'city'.
That's actually because 'city' is one of the values eWebinar automatically sends to Hubspot and, in this setup, 'city' had also been mapped manually. The fix for this issue was simply to remove the 'city' property from the manual mappings. After which the trigger started working.
If errors like this persist, contact support@ewebinar.com so we may troubleshoot them with you.