The purpose of this article is to explain how to map properties in eWebinar to fields in your CRM, so that you can send registrant data captured in eWebinar to your CRM.
Before you begin, you must first do the initial setup of the integration between eWebinar and your CRM, which you can learn how to do here:
How do I integrate eWebinar with my CRM so it is part of my sales funnel?
What are properties in eWebinar and what can I do with them?
To demonstrate how to map properties from eWebinar to fields in your CRM, we will use three concrete examples from our own on-demand demo. These three examples represent the three types of data that can be collected about registrants:
Learn where to find registrant data within eWebinar, how to download it to Excel, and how you can also make it accessible from your CRM of choice.
If you are familiar with these then skip straight to the Answers to questions asked in your registration form section. If you are not, there are three basic ways to access registrant data captured in eWebinar:
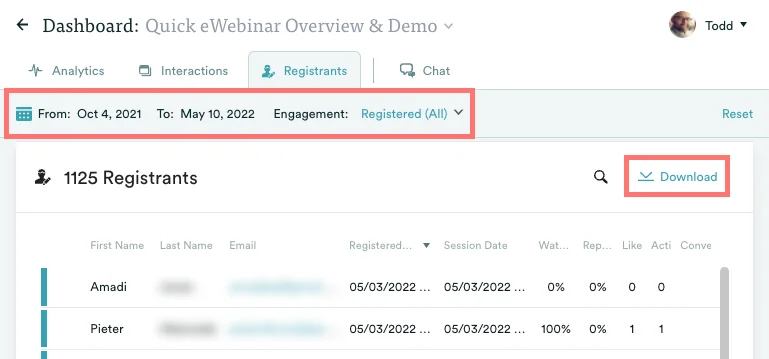
On the Registrants page
The first way you can access data about your registrants is on the Registrants page. To get there, click Registrants on any webinar on the home page.

Once there, you will see a list of all of the registrants for that webinar. Click on any particular one to see their full record of information, including all of their responses to interactions.
By downloading it to Excel
You can also download your registrant data from the Registrants page as a CSV file and open it in Excel. You can decide which registrants to export to Excel by using the filters at the top of the page.
By sending it to your CRM
Though the two methods above are great ways to access registrant data, most eWebinar users want to send the data to their CRM for each Contact or Lead.
For certain integrations, like Hubspot, Salesforce, and Marketo, we automatically create some of the most useful fields for you. But you can always add to the properties eWebinar captures by defining new ones in your interactions and mapping them to fields in your CRM. This process is described in detail in this article.
Answers to questions asked in your registration form
In this first example, we'll discuss how properties work in registration forms and how to define property names for custom questions you may add to them. If you would like to understand how to map these properties to fields in your CRM, read the second example below concerning responses to interactions, where it explains the process. (The process for mapping properties to fields is always the same.)
The example we'll use here is a custom question we added to the registration form of our on-demand demo, which asks how people heard about us. We did this so we could better understand how prospects are discovering our product, from word of mouth to organic search.
To accomplish this goal, we took the following steps:
1. We edited the Registration form, which you can get to from the Registration tab.

2. We clicked to Add another custom field and added the Text question, "How'd you hear about us? We'd ❤️ to know!"
NOTE: There are several different types of custom fields you can add to your form and ask for things like a registrant's Phone or Country. You can even add Hidden fields. (Learn more about Hidden fields here.)
3. We gave the property capturing the answers to this question a name in the space provided: where_heard.
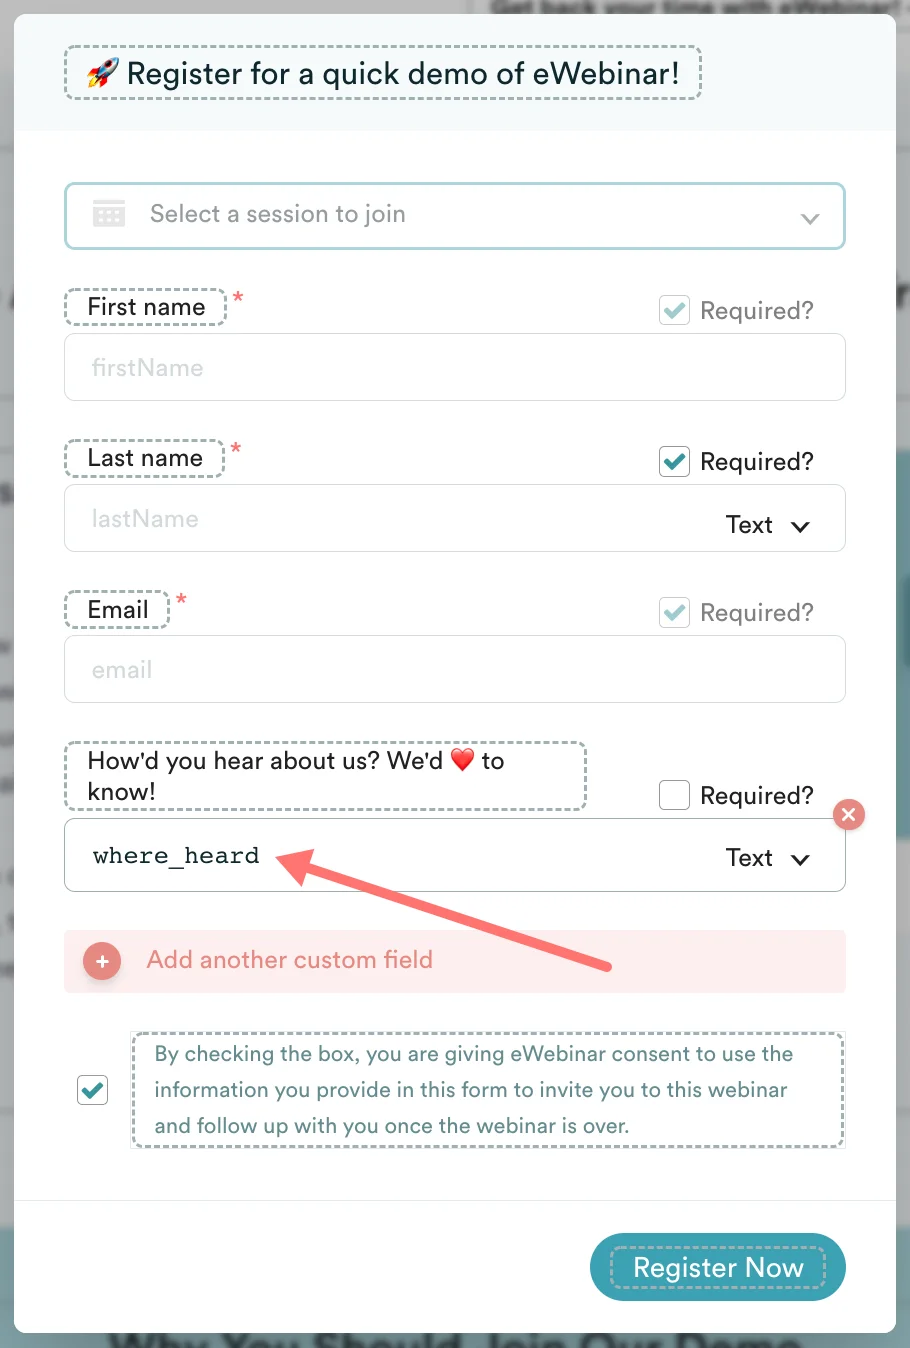
NOTE: Be sure to review the rules for how to name properties before doing so.
You'll notice in the screenshot above that the default fields of First name, Last name and Email already have property names: firstName, lastName and email respectively. The names of these fields can not be changed.
Once we had added a custom question and assigned its corresponding property a name (where_heard), we then mapped it to a custom field we created in our CRM.
To learn how we did that, continue reading the second example below, which outlines this universal process. (You can skip to step 2 if you want.)
Responses to interactions (like Polls and Questions) to your CRM
For our second example, we'll demonstrate how to map responses to interactions to your CRM using a Poll from our on-demand demo.
Near the end of our demo, a Poll comes up asking if attendees plan to sign up for eWebinar. We did this so we could send targeted follow-up emails from our CRM, which happens to be Hubspot, to different groups based on their answers to the poll.
To accomplish our goal, we took the following steps:
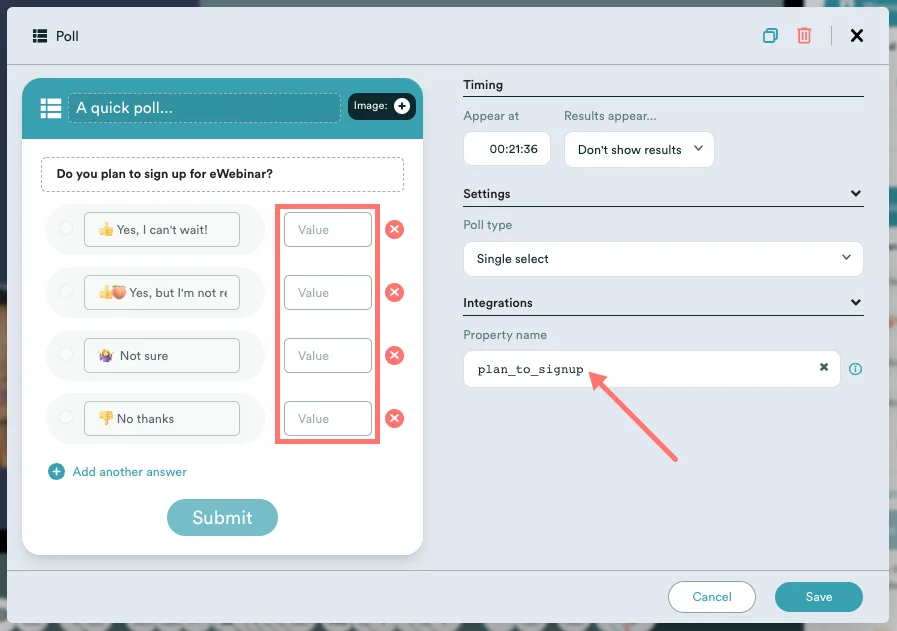
1. When we created the Poll interaction, under Integrations, we assigned a Property name to the property which would capture the responses to the poll: plan_to_signup.
NOTE: Be sure to review the rules for how to name properties before doing so.
In our case, we chose to send the answers to the Poll exactly as they are written to our CRM. However, if we had wanted, we could have created custom Values for each answer in the spaces provided (indicated below).
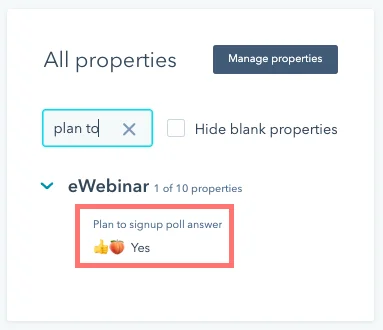
2. Next, we went into Hubspot and created and added a new custom field to our Contacts, naming it in the process: Plan to signup poll answer. This process will be different in every CRM. If you need assistance, contact your CRM's support team.
As a side note, the type of property used to capture Poll answers is called a SELECTION. (More on property types below.)
In the context of a Poll, a SELECTION means the property has a series of possible answers (strings) from which the attendee can choose one.
When you are setting up a custom field in your CRM to map to a SELECTION, the strings you create in your CRM must match the strings in eWebinar exactly or the integration will not work.
NOTE: You may not always need to create a custom field in your CRM to map a property to from eWebinar. Sometimes, you will be able to map the property to an existing field.
3. We then went back to eWebinar and mapped the property we created in eWebinar to the field we created in Hubspot by taking the following steps:
- We went to the Integrations page and opened up the integration in question, in this case, Hubspot.
- Under Map eWebinar properties to Hubspot fields, we clicked Add a mapping.
- In the left drop-down, we searched for the property in eWebinar by name (plan_to_signup) and added it. (All standard and custom properties will be available to search for and choose from here.)
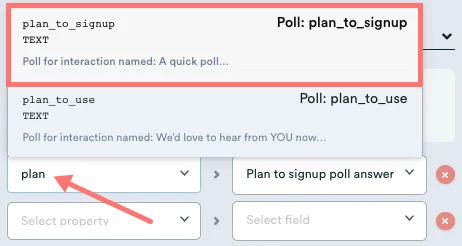
If you want to better understand the information shown inside the red box in the screenshot above, we cover it in detail at the end of the article.
- We then searched for and added the custom field from HubSpot (Plan to signup poll answer) in the right drop-down. (All available fields in your CRM will be available to search for and choose from here.)
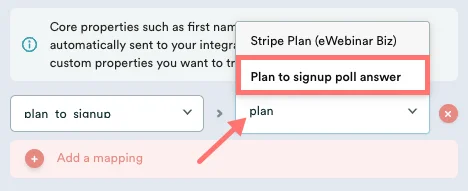
Here is what it looked like when we were done:

Now, whenever anyone answers that Poll in our demo, their response is sent to their Contact record in Hubspot. From there, we can use it to assign the Contact to a particular workflow or add them to an email drip campaign that speaks to them in a targeted way based on their answer.
Whatever data you send from eWebinar to your CRM can be used to define the conditional logic in workflows and email drip campaigns, per your CRM's functionality.
Automatically created or captured attendee data, AKA standard properties, like Join link, Replay link, or UTM source
The process of mapping properties from eWebinar to fields in your CRM is always the same, no matter the scenario. It is described in Step 2 and Step 3 of the previous example.
This includes the mapping of eWebinar's standard properties, see the full list, unless they happen to be core fields like firstName, lastName, and Email, which are automatically mapped and sent to your CRM for you as part of the integration.
In some cases, you will be able to map properties to existing fields in your CRM. For example, if you add Country to your registration form, it is more than likely your CRM has a Country field already that you can map the data to.
In all other cases, you will need to create a custom field in your CRM (Step 2 above) and then map the relevant property to that field in eWebinar (Step 3 above). This includes things like the attendee's Join link, Replay link, and UTM source.
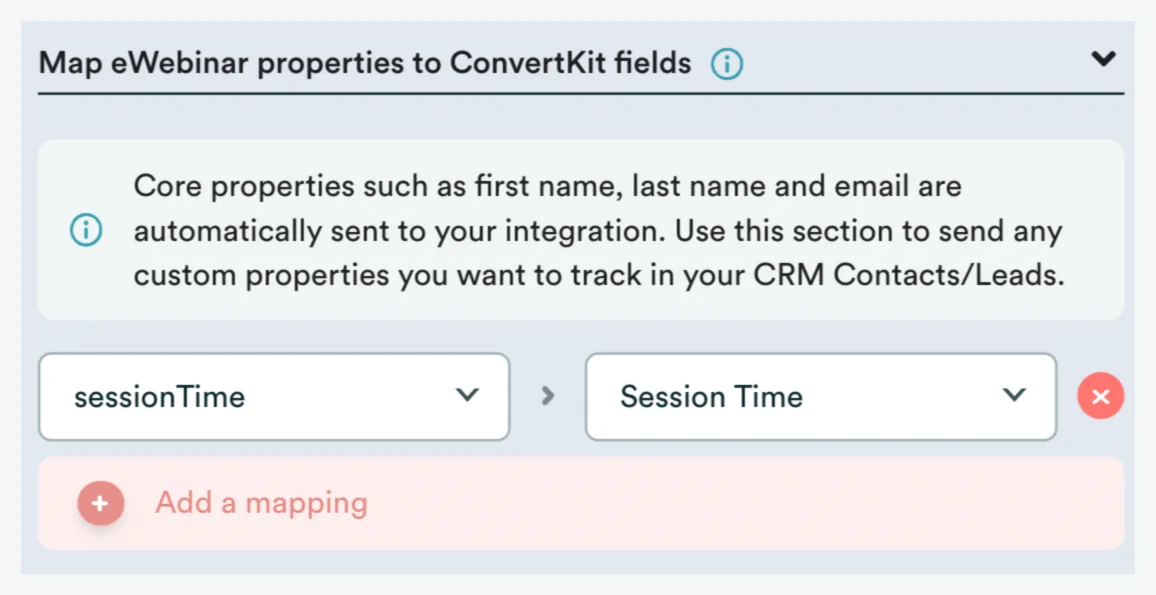
Here is an example below of us mapping sessionTime, a standard field in eWebinar, to Session Time, a custom field in Hubspot, which we had created previously.
Understanding property types and names
You may have noticed in one of the screenshots above that when you search for a property to map to a field in your CRM, you will see a bunch of information about the property, what it is and how it works.
To help you understand what you are looking at, we have notated one of our built-in properties, Trigger action, as an example.
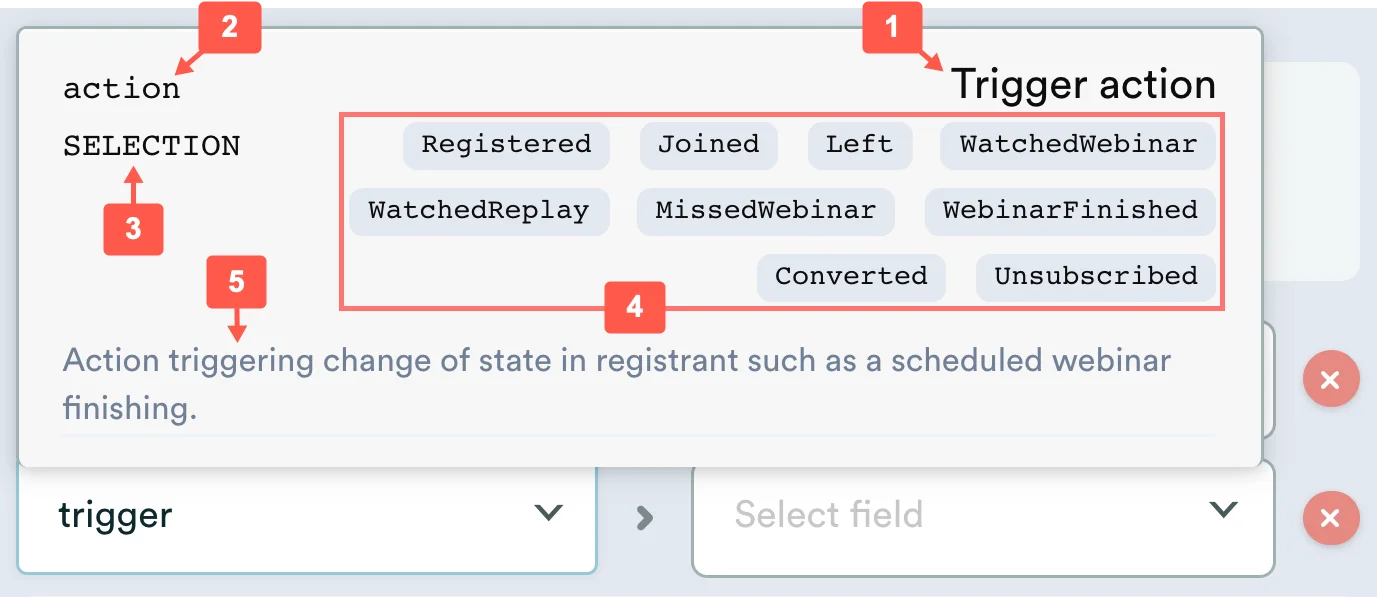
- Name: The user-friendly name of the property
- Property name: The name of the property as it is used on the back end.
- Property type: The type of property it is, which will determine how you set up the corresponding field in your CRM. See a list of all property types below.
- Property values: The specific values, if any, associated with the property. Examples of properties that have values are BOOLEAN (true/false), SELECTION (shown above), and MULTISELECTION.
- Property description: A brief explanation of what the property is and does. In this case, the Trigger action property captures the trigger which caused the integration to fire.
Different types of properties
For reference, all properties fall into one of the following property types:
| PROPERTY TYPE | TECHNICAL DESCRIPTION | EXAMPLE VALUES |
| TEXT | Simple string | Referred by a friend |
| MULTILINETEXT | Long string that can contain carriage returns | The quick brown fox jumped over the lazy dog. The quick brown fox jumped over the lazy dog. The quick brown fox jumped over the lazy dog. |
| NUMBER | Number | 12 |
| Verified valid email | support@ewebinar.com | |
| PHONE | International phone number starting with + | +1-212-456-7890 |
| COUNTRIES | 2 letter IBAN country code abbreviations. |
US* |
| STATES | 2 letter abbreviations for states in the United States or, for other countries, the string of text entered. |
CA* (in the US) Corsica (in France) |
| SELECTION** | String from one of the selections | Red |
| MULTISELECTION** | 0, 1 or more strings from a set of selections. This value is usually passed as a JSON array but can be a comma separated string depending on the integration type. | Red,Blue |
| URL | A valid URL | https://google.com |
| DATETIME | Is a date + time string in ISO format | 2020-07-10 15:00:00.000 (which represents the 10th of July 2020 at 3 p.m.) |
| BOOLEAN | Can be true or false | TRUE |
* The full name of the country or state is displayed to registrants.
** SELECTION and MULTISELECTION properties appear as drop-down menus to registrants and allow for the selection of a single answer or multiple answers, respectively.