How do I pre-populate my registration forms and track attendees through registration? (including setting up an affiliate system)
With property names, registration form fields can be pre-populated for convenience or used to track attendee data from registration to integration.
By now, you probably know about properties and property names in eWebinar. If not, you should first read this article, which talks about how to get data out of eWebinar and into your CRM or marketing automation software.
In this article, we'll show you how to use property names to put data into eWebinar via the attendee registration form.
In one scenario, you might want to pre-populate some of the registration form fields based on your knowledge of a registrant. In another popular scenario, you might want to track some piece of data from registration all the way through to your integrated CRM, for example, to keep track of a proprietary ID you have for that attendee. You may want to set up affiliate tracking for your webinar, click here to read how to do that
Property names make this easy; you can populate any of the registration form fields for any registrant using parameters added to your registration form's URL: Here is the process:
First, get your registration URL. It should look something like this:
https://ilove.ewebinar.com/webinar/interactive-demo-getting-started-with-ewebinar-1187
Then add register?showform=1 to the end of it. This is the URL to your registration form and should look like this
https://ilove.ewebinar.com/webinar/interactive-demo-getting-started-with-ewebinar-1187/register?showform=1
To populate fields automatically, you would add the property names and values to the either the registration or registration form URL as query parameters. The parameters are what show up after the ? of a URL and take this form: propertyName=value.
To put more than one parameter in the URL, separate them with the & character.
So, let's say you wanted to pre-populate your registration form with the Name, Email, and Proprietary ID — a property named proprietaryID that contains a Proprietary ID from your system — the URL would look something like this:
In the example above, the registrant's name is Robin Hood, their email is robinhood@nottingham.com, and their Proprietary ID is 123245.
NOTE: We used "%20" above to represent the space between "Robin" and "Hood". Alternatively, if the form had both a First Name and Last name field, we could have added two parameters to the URL instead of one: firstName and lastName.
About hidden fields
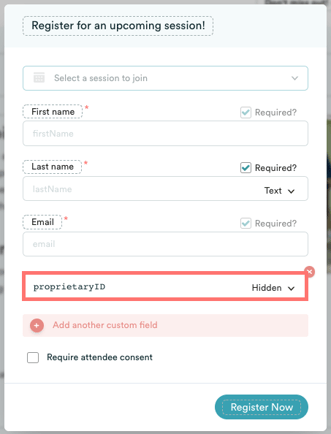
In our example, Proprietary ID is a field you probably don't want your attendee to be able to see or change, as it would just confuse them. The only reason you added it was to track the ID of an attendee through their lifecycle in eWebinar.
This is why we support Hidden fields in our registration form. If you set a field as Hidden, you can still pass through data via the URL, but the attendee will never see it.

Properties built-in to the registration form
There are a few properties that are built in, but which you can use to pre-populate your registration form in via the mechanism above. They are:
| session |
Used to specify the session time to register for. The value must be either: YYYY-MM-DDTHH:MM:SS+HH:MM This specifies the time of the session in ISO 8601 format. It's a standard format between services. You can specify any valid session time based on the schedule you set for this webinar. replay This states the attendee wants to register for a replay session. |
| firstName | First name of attendee |
| lastName | Last name of attendee |
| Email of attendee | |
| source | Any text of your choosing used to track where this registration came from typically |
How do I set up affiliate tracking through my eWebinar?
There are two ways to set up affiliate tracking for one of your webinars, by tracking the forwarding of some URL parameters, which you just learned to do earlier in this article, or by using an existing affiliate tracking system. We will discuss how to do both.
Tracking the forwarding of a URL parameter
The basic steps are setting some URL parameter (a hidden field on your registration form or using something like utm_source), which gets tracked per registrant in your registrant record, and then in a special offer card you have a link that calls the URL parameter. For example, if using utm_source, your registration link would look like this:
https://myplace.webinar.com/.../registration?utm_source=affiliate1
Then, the link in your special offer would look like this:
https://myplace.checkout.com/buyit?from={utm_source}
With this set up, your checkout page would have the utm_source value that came in on the registration URL, assuming your affiliates send out the correct registration link.
Using an existing affiliate tracking system
Using this method requires you to be familiar with scripts and you may need to purchase our custom domain add-on for everything to work reliably. To use this method, first sign up for an affiliate tracking system (we use FirstPromoter.com for our rewards system). The system will give you a code per affiliate, which would look something like this:
https://myplace.ewebinar.com/registrationpage?via=affiliate2
Then, you would need to follow their instructions to copy the appropriate Javascript code, and add that Javascript as a custom script in eWebinar's script manager, and set it to run on the webinar's registration page.
The caveat to this is that depending on how these systems work, you may need to make sure all your pages are on the same domain due to cross-domain cookie privacy. To fix this, you will need to purchase our custom domain add-on (instructions on how to set that up can be found here). With this add-on, all your webinar pages and check-out pages can be hosted on the same domain, negating the cross-domain cookie issue.