With eWebinar, you can conveniently preview each component of your eWebinar as you build it, test interactions and chat features in the eWebinar test room, send yourself preview email notifications, and view your registration pages. These features allow you to have peace of mind knowing that your eWebinar is ready to captivate and engage your audience.
- How to test your interactions and chat in the webinar room
- How to test your email notifications
- How to test your registration pages
- How to reset your analytics before launch
- How to promote your eWebinar before launch
- How to A/B test your eWebinar over time - ADVANCED
If you need to set up a sales funnel for your eWebinar before launch, read this article:
How to test your interactions and chat in the webinar room
Here is a step-by-step video guide on how to test your eWebinar before launch.
If you want to ensure a seamless experience for your eWebinar attendees, the Webinar test room is the ideal place to conduct your testing. You can test out the timing of your interactions and experience how chat worksby using the Webinar room test link. Here are the steps:
- Publish your eWebinar
Before you can test the webinar room, you must first publish your eWebinar. Don't worry though, as long as you don't share the registration page link, no one will be able to find your eWebinar until you're ready to launch it.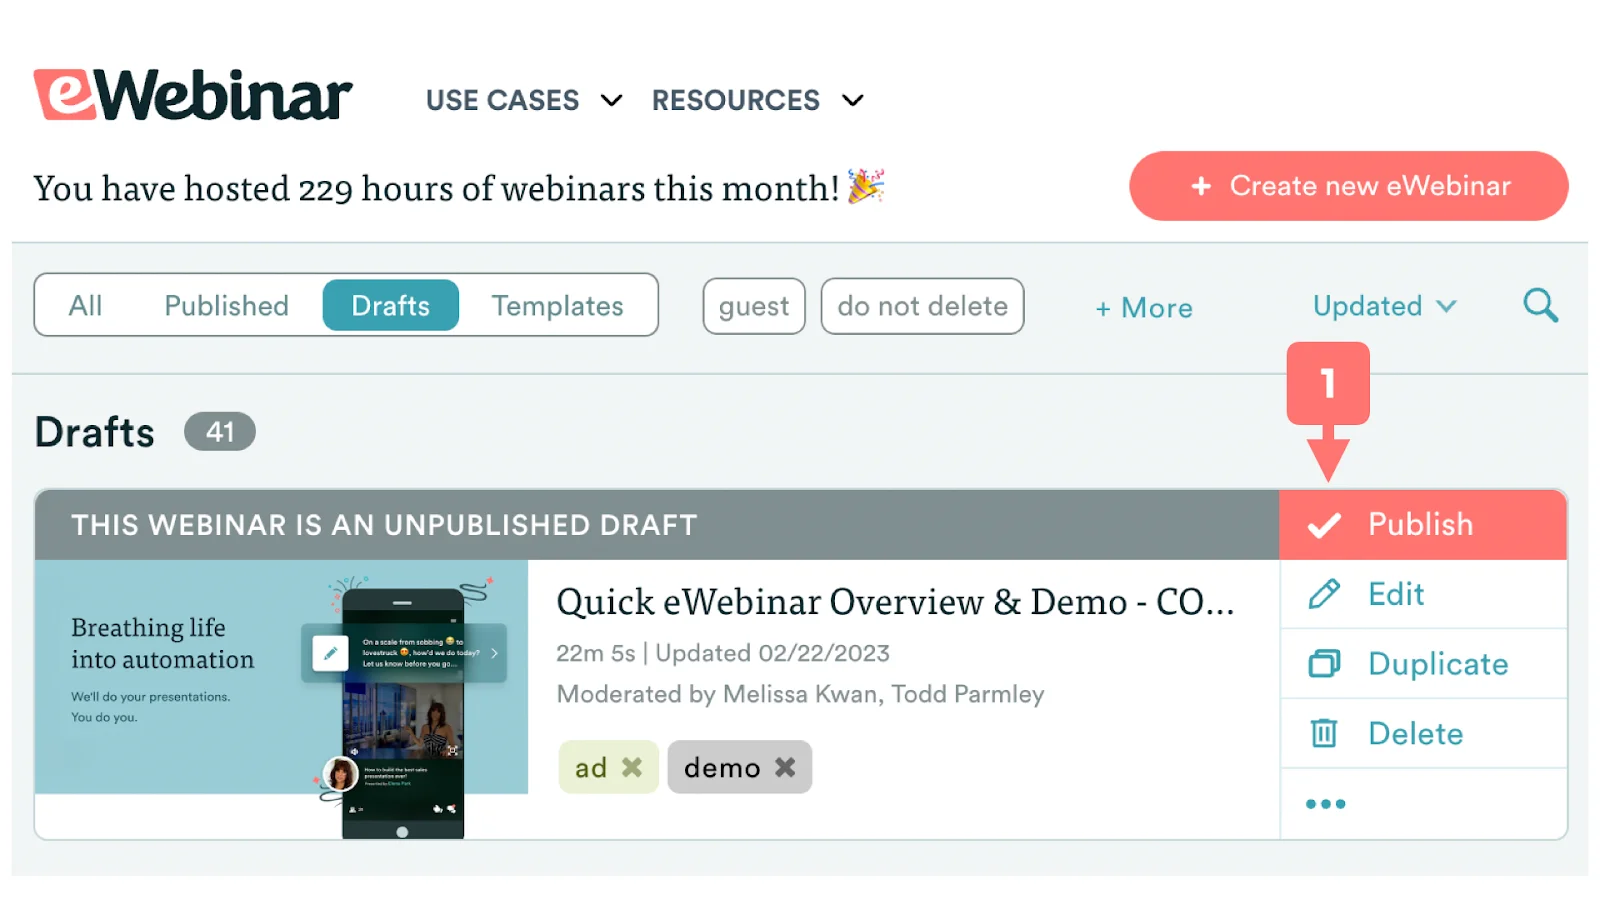
NOTE: Keep in mind, if you're using the Upcoming Webinars page to list your active eWebinars for your audience, a published eWebinar will appear on this page by default. To exclude a published eWebinar from this list, go to the Sharing section on the Settings tab of the eWebinar in question and hide it. Don't forget to change it back when you're ready to launch.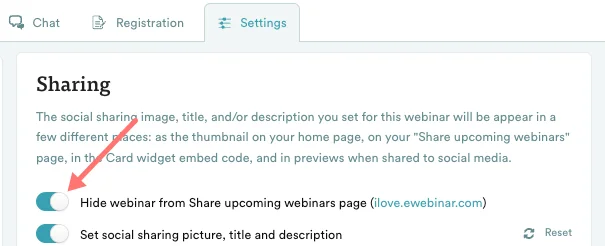
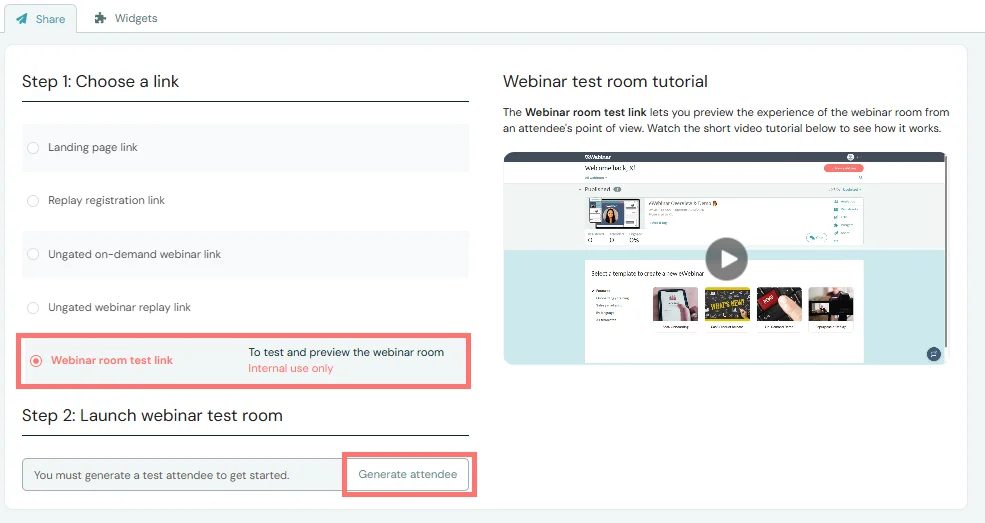
- Click Share to access the Webinar room test link
Once you have published your eWebinar, go to the eWebinar in question and click Share. The ‘Share modal’ will open, and you will see different options for sharing your eWebinar, select the Webinar room test link. - Generate Test Attendee
When you go to use the Webinar test room link for the first time, a prompt will appear asking you to Generate a test attendee. This will create a test registrant in the Registrants tab of your eWebinar analytics dashboard. The test room is effectively the same as the live webinar room, but with added flexibility to test integrations, chat functions, and session types: and to jump around, as needed.
It's important to note that the generated registrant will be labeled as a test registrant in the Registrants tab. If you don't want the test registration to affect your analytics, you can manually delete it after testing. - Join Webinar Test Room
Click Launch test room and the webinar test room will open in a new tab. Alternatively you can also copy and paste the link into a new tab. - Navigate the Webinar Test Room
The test room controls found at the top of the page let you test two different types of sessions and jump around the video as needed. If the test controls get in the way, you can drag and drop them to a new spot on your screen using the handle on the left side.
Use the drop-down to choose the type of session you wish to test: Scheduled or Replay.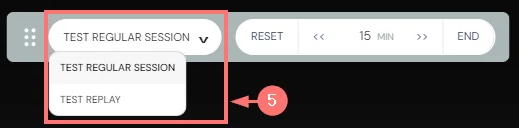
Here is how testing works for each session type:
- Scheduled sessions
For scheduled sessions, you’ll see two buttons in the test controls that allow you to jump to the Start or End of the eWebinar. When you decide to go to the Start of the eWebinar, you will be prompted to join the Webinar waiting room, and it will take you back to a couple of seconds before the beginning of the eWebinar, so you can experience the waiting room. If you click End, you will be taken to a couple of seconds before the eWebinar ends, this way you can experience your eWebinar’s exit room.
Additionally, you can skip forward or backward in the video by using the right (>>) and left (<<) arrows respectively. The number in between the arrows is the number of minutes you want to skip ahead or back by. It is set by default at 15 minutes, but you can change it to whatever you want. You will be prompted to Join Now every time you jump to a new place in the video.
TIP: If you want to test what happens after the exit room ends, i.e. the Post Exit Room, go to the End of the eWebinar and then skip forward to the end of the Exit Room.
NOTE: If you have added no scheduled sessions to your eWebinar nor enabled just-in-time sessions, if you try to test scheduled sessions, you will be taken directly to the post-exit room, as there are no sessions to test. - Replays
If you choose the Replay option, you can play or pause the eWebinar, or scroll through the video just like attendees can, as these are expected behaviors in this session type. The top bar will display a Reset button to take you back to the beginning of the replay. The skip forward or rewind options in the same bar are grayed out and disabled in the replay session, as you can use the bottom bar to scroll through the video. Also note that Replays do not have Waiting, Exit or Post Exit Rooms.
- Scheduled sessions
- Test your interactions
If you are looking to test the interactions on our platform, you can simply do so by participating in the questions, polls, quizzes, or clicking on specific links. In case you've already completed an interaction and want to retest it, just click on Start (for a scheduled session) or Reset (for a replay session). This will clear all previous interactions and their answers, allowing you to experiment with various answers. - Test your chat
To test the chat feature, simply send a message in the Chat box as the test attendee. Then, head over to the Chat admin to respond and see how the attendee perceives your answer. Additionally, you can see what the private welcome messages look like, test if you're receiving the notifications of new chat messages (including if you are integrated with Slack), and how the auto responder you set up works.
How to test your email notifications
As you build your eWebinar, you can customize your email notifications for registrants on the Notifications tab. This includes registration confirmation emails, reminders before the eWebinar, and follow-up messages after the eWebinar. Once you've finished editing your emails, you can send yourself a preview to ensure it meets your standards by hitting the Send preview button.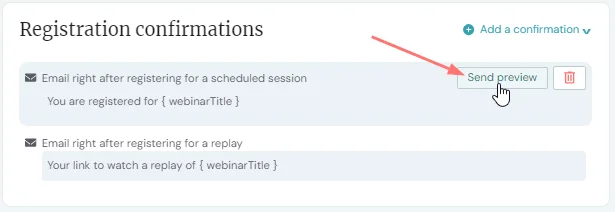
How to test your registration pages
To test your registration pages, go to the Registration tab and customize the registration page, form, and thank you page. Once you have finalized editing, you can enable a preview within the edit mode to see how a potential registrant would encounter these pages.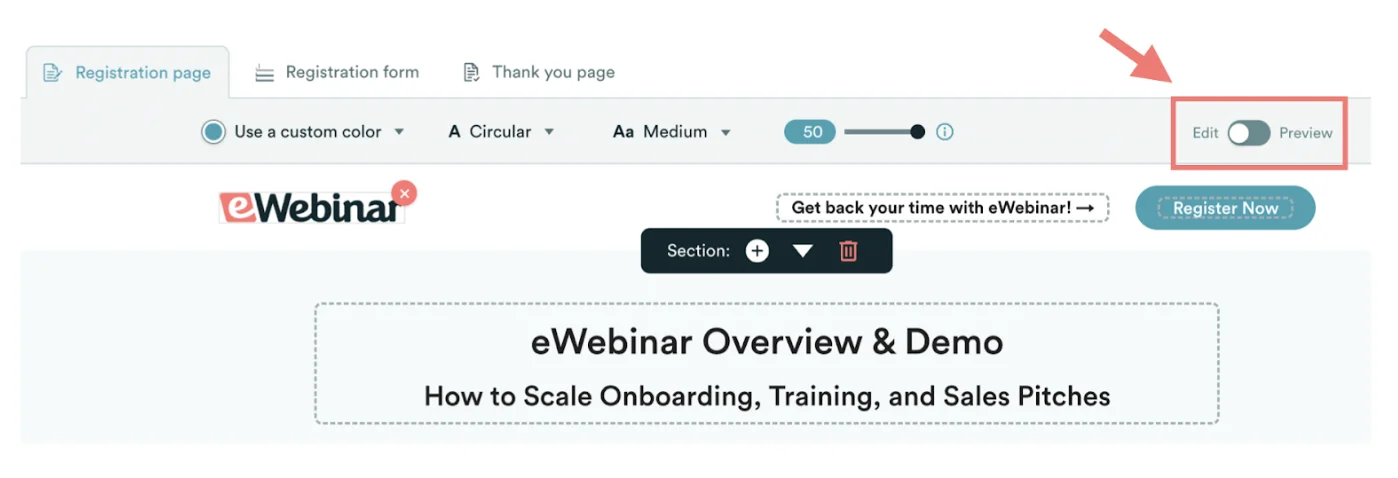
NOTE: You can also preview how your list of sessions will appear on the registration page. To do this, navigate to the Schedule tab in edit mode, and on the left-hand side, you'll see the Sessions Preview. The sessions displayed in this section correspond to the exact moment in time you're viewing them, and you can also specify and test in different time zones.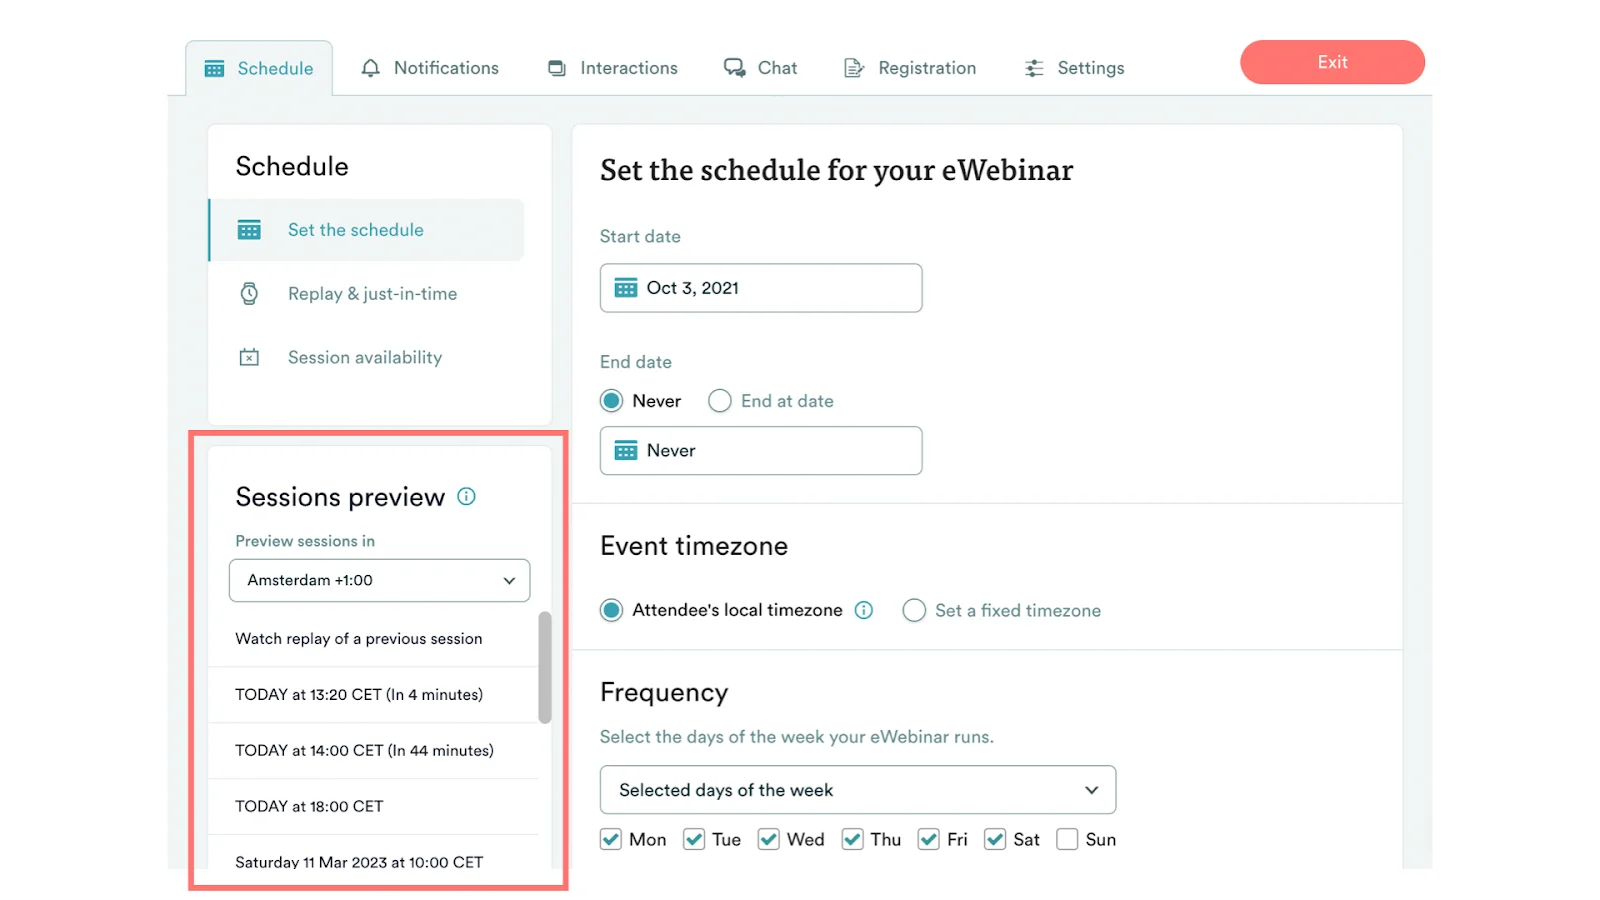
How to reset your analytics before launch
After you have finished testing, you may want to reset the Analytics of your eWebinar before you launch it. There are two ways to do this:
- Delete all of your registrants
- Change the date your Analytics are counted from
To learn the details of how to do this, check out this article on the topic:
How to promote your eWebinar before launch
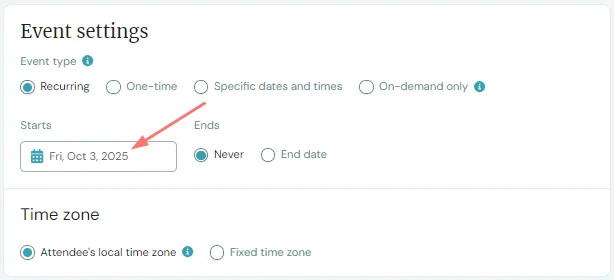
Before you promote your eWebinar in advance of its premiere session, be sure to first set the Start date of your Schedule to be your (future) launch date and disable both just-in-time sessions and the ability for your audience to register to watch a replay.
Otherwise, people will be able to register for your eWebinar before you launch!
If the video for your eWebinar isn't done yet, don't worry! You can still do it.
You will need to publish your eWebinar before you can promote it and yet you cannot publish an eWebinar without a video.
If your video is not ready yet, use a placeholder video which you can replace before launch. (Look for the Replace video button on the Interactions tab.)
We suggest uploading a rough cut of the video as close as possible to the end product so you can start playing with and creating interactions.
Go the Schedule tab of the eWebinar in question and:
1. Set the Start date to be the (future) launch date of your eWebinar
2. Add at least one Start time. Your first session will be your earliest Start time on your Start date.
IMPORTANT: Sometimes, people want their premiere session to happen at a set time in a particular time zone, presumably their own, so they are sure they are available to chat live with attendees for the entire session. Or maybe because they invited the original guest presenter to moderate chat for that one day only.
If this is your intention, be sure to select and specify a Fixed time zone in your Schedule. Otherwise, if you select Attendee's local time zone, people will be able to join your eWebinar at the Start time of your eWebinar in their own time zone, before the intended time of your premiere.
3. Disable on-demand and just-in-time sessions and the ability to watch a replay
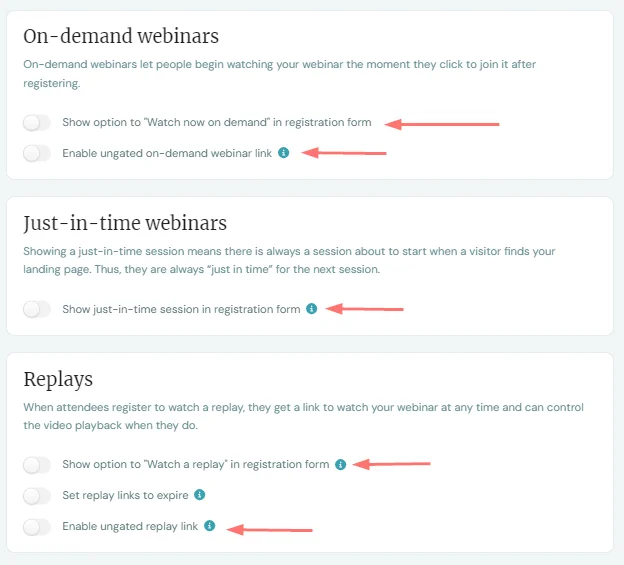
NOTE: If you want your audience to be able to register for replays, on-demand, and just-in-time sessions after launch, be sure to re-enable these options after your premiere session.
Once you do these three things and publish your changes, you can share your Registration link with your audience and allow them to register for a session before your official launch date, without having to worry about them being able to access your eWebinar before then.
How to A/B test your eWebinar over time: ADVANCED
To A/B test your eWebinar, in order to see which version of your presentation is more effective in converting attendees, you will need to create two versions of the same eWebinar and then use your own A/B testing infrastructure to surface the registration links accordingly to different test groups, whether that is done by way of an email campaign or landing page.
IMPORTANT: A/B testing your eWebinar (also known as split testing) is only recommended for advanced users who have experience with it.
Be sure to define all of the custom properties in your interactions, setup your registration form and properties, edit your notification emails and get things just right. Then clone it to create a second version of the eWebinar. This way, everything will be copied over to the new version. Interaction and registration form properties will be tracked in exactly the same way both in eWebinar and your CRM via the same integration triggers already setup. And you can compare the results of your eWebinars as ‘apples to apples’.
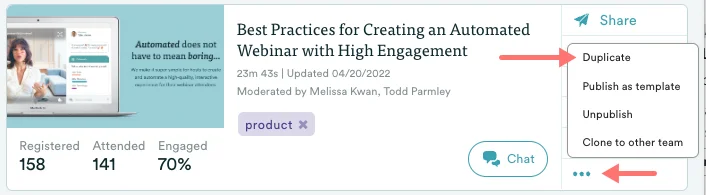
To duplicate the eWebinar go to the More menu of the eWebinar in question and click Duplicate.
IMPORTANT: After you duplicate your eWebinar, some things aren't exactly the same in the second version. The special offers have a different conversion tracking pixel URL for example. So be sure to set up conversion tracking again for this new pixel on your conversion confirmation page. It can host any number of conversion pixels.