Although “conversion” is typically a sales term, it can mean a number of different things in eWebinar, depending on your goals.
For example, while a conversion could be defined as when an attendee purchases your product or signs up for a trial, it could also be when they use a certain feature in a SaaS product after a training or register for the next webinar in a series.
Tracking conversions is simply a way to measure how well attendees respond to your webinar’s primary call to action.
Here are a few examples of conversions you can track and the interaction you would use to do so:
| CONVERSION EVENT FOR THE ATTENDEE | INTERACTION |
| Signs up for a free trial of your SaaS product | Special offer |
| Tests out a feature in your SaaS product (after a training) | Call to action |
| Registers for the next webinar in a series of webinars | Next webinar |
| Purchases your online course hosted on the Thinkific platform | Thinkific offer |
| Fills out a contact form to request a meeting with your sales team | Contact form |
Table of contents
Advanced tracking code setup
- How to make conversion tracking code more reliable – RECOMMENDED
- How to use Javascript to inject query parameters into the conversion pixel URL
- How to customize the tracking code to capture more data
- How to use the tracking code across more than one webinar
- How to track multiple purchases made by the same attendee
- How to track recurring subscriptions
The use of the Contact form or Next webinar interaction to track conversions does not require the use of tracking code. It happens automatically inside eWebinar.
Two rules that govern conversion tracking
There are two main rules that govern how conversion tracking works in eWebinar:
1. Only 1 type of interaction may be used for conversion tracking per webinar
When you create a new eWebinar, the type of interaction used to track conversions is set up for you automatically based on the goal you set for your webinar or on the template you choose to create it from.
You can see which interaction has been enabled for conversion tracking by going to the Settings tab in edit mode and looking under Conversion tracking.
![]()
If you wish to switch to a different type of interaction to track conversions, go to the Interactions tab and add the interaction in question. (Filter by Conversion to see your options, shown below.)
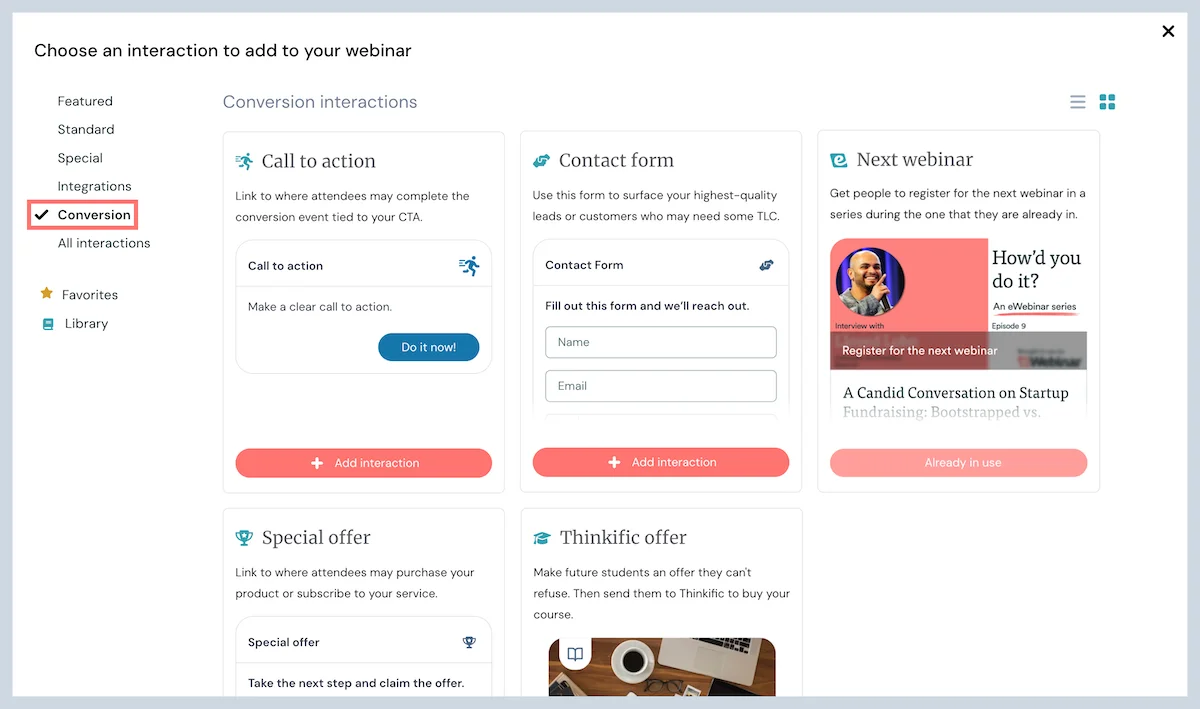
Then, enable conversion tracking for it. (When you make this change, conversion tracking will become automatically disabled for whatever interaction was being used previously, so that only one type of interaction is enabled at a time.)
![]()
2. Each type of interaction may only track one conversion event
Just as you may only choose one type of interaction to track conversions per webinar, each type of interaction may only track one conversion event.
For example, if you chose to use the Contact form interaction to track conversions and added it to your webinar six times. It wouldn't matter which one the attendee filled out and submitted, it would still only count as one conversion.
Tracking more than one conversion event in a webinar
"One conversion event per webinar" reflects a best practice of sales webinars: to only make one sales offer per webinar. However, if you want to make more than one sales offer in your webinar for, say, two different products, you can:
1. Capture data that will help you distinguish between the two in your registrant data
2. Track multiple purchases made by the same attendee
Keep in mind, however, that eWebinar's analytics will not be able to distinguish between the two conversion events.
Three types of interactions for tracking conversions
There are three types of interactions you may use when tracking conversions:
'Special offer' or 'Call to action' interactions
Special offers and Calls to action are, by far, the most common interactions used to track conversions. As such, they offer the greatest amount of flexibility.
Keep in mind, however, that with greater flexibility can come greater complexity and it may require a significant amount of setup to ensure your conversions are being counted as accurately as possible.
The Special offer, Call to action, and Thinkific offer interactions share the same tracking code, which means two things:
1. When you enable conversion tracking for one, you enable it for them all.
2. They may be used interchangeably in your webinar. For example, if you added two Special offers and one Call to action to your webinar, they would all count towards the same conversion event, which means they should all be driving attendees to do the same thing (e.g. purchase your product).
Provided conversion tracking is enabled, there are the two steps you must take to set up conversion tracking for a Special offer or Call to action:
NOTE: The set up process for Thinkific is a bit different and can be found here.
Advanced tracking code setup
Once your basic setup is complete, you may also wish to do one or more of these:
- How to make the tracking code more reliable, RECOMMENDED
- How to use Javascript to inject query parameters into the conversion pixel URL
- How to customize the tracking code to capture more data
- How to use the tracking code across more than one webinar
- How to track multiple purchases made by the same attendee
Step 1: Find and copy the conversion tracking code
Finding and copying the tracking pixel code for a Special offer, Thinkific offer, or Call to action interaction is straightforward. Simply, go to the Conversion tracking section on the Settings tab in edit mode and click to copy it.
![]()
NOTE: You can also find the same tracking code when editing the interactions.
Step 2: Embed the conversion tracking code
Now that you have copied the tracking pixel code, you need to embed the code where the conversion event takes place. There are two main scenarios for this:
1. A sale or trial sign up
If the goal of your webinar is to get people to purchase your product or sign up for a free trial, you must embed the tracking code on the purchase or sign up confirmation page, more commonly known as the thank you page. This is page that comes up after someone completes a purchase or sign up. In short, this approach requires the user to land on a specific page where the tracking code is embedded for the conversion event to be considered complete.
If you are using a payment or course platform, you'll need to find the setting that allows you to add custom HTML inside the <BODY> of your "Purchase Complete" page. If you have trouble finding this, contact the support team of your payment or course platform.
For Thinkific: When in the Thinkific admin area, you must go to Settings under the Code tab. There you will find a section called 'Order tracking code'. That is where you paste the <img> tag. It also states that for free courses you should instead place the code in the 'Signup tracking code' area.
2. A specific action performed inside your SaaS product
If your goal is to get attendees to perform a specific action inside your SaaS product after attending a training, unless there is specific landing page you can use to trigger the conversion event, you must use Javascript to fire the tracking code.
IMPORTANT: Before you embed the tracking code, you may wish to read the next section of this article, as you may want to customize the code first to ensure its reliability.
How to make the conversion tracking code more reliable
While the example used in this section is for the purchase of a product or service using the Special offer interaction, the principles are the same for any conversion event that relies on the user landing on a specific page when the conversion event is complete.
The tracking pixel code is simple. It's just a single pixel transparent image that is accessed with code that looks something like:
<img src="https://api.ewebinar.com/v1/conversion/pixel/3?webinarId=4429&email={{email}}&amount={{amount}}¤cy={{currency}}&orderId={{order_id}}&productId={{product_id}}&productName={{product_name}}" width="1" height="1" alt="" />
The purpose of the pixel is to track attendees from eWebinar through to your checkout system and back. Without modification, the pixel use cookies to identify attendees. Unfortunately, this system isn't very reliable because of recent changes to privacy settings in browsers like Safari. Safari doesn't allow cross-domain cookies by default for the sake of a user's privacy, which means in this case the tracking cookie typically won't work reliably.
In order to make the code above work more reliably, you will need do one of the following, or preferably, both:
1. Use the same domain on your third-party payment processor and eWebinar
For example, if you owned mydomain.com and were selling an online course via Thinkific, you would have lesson.mydomain.com for your Thinkific site/course and webinars.mydomain.com for eWebinar. To configure your custom domain in eWebinar go to Domains in the profile menu in the upper right-hand corner and follow the instructions.
Custom domain must be added to your subscription before you may use it. Learn more
2. Swap out the placeholder {{email}} in the code above with the actual email address of the person who just purchased your product.
Most checkout systems have a way to do this using syntax such as:- {{email}}
- {email}
- {checkout.email}
You will need to contact the support team of whatever payment processor you use, like PayPal, to find out the right syntax to use for their platform and then replace {{email}} in the code with the syntax required.
Making sure your eWebinar and payment processing pages are on the same domain and replacing {{email}} with the syntax that dynamically replaces the email of the person who checked out is critical if you want the purchase pixel to work as well as possible and track most conversions.
Note that, even after including the email of the purchaser, there may be conversions that are missed, like for example, if the attendee uses a different email to register for your webinar than they use to purchase your product on your checkout page while using a different device than they used to watch the webinar.
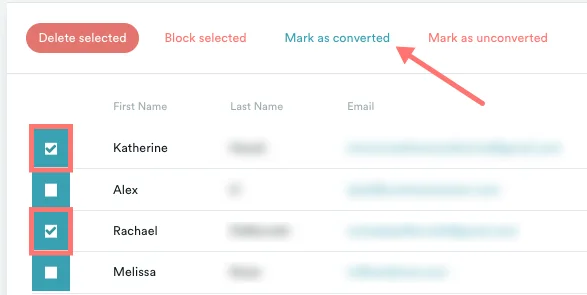
To account for this, we made it possible for you to manually mark someone as having converted, for the handful of conversions that might get missed.
You can do this by going to the Registrants tab of your webinar, checking the box next to the attendee(s) in questions, and clicking Mark as converted.
How to use Javascript to inject query parameters into the conversion pixel URL
Many page builder systems don't have an easy way to have placeholders like {{email}} replaced dynamically. However, many systems pass in the information needed by the pixel as query parameters. For example, lets say after a customer checks out they end up at:
https://mydomain.com/checkout-thankyou?customer_email=some@email.com&order=1234
Instead of using the <img> tag to send the pixel to eWebinar you can instead use <script> tag with this code (assuming the query parameters of your page are named customer_email and order):
<script>
window.onload = function() {
   // Get URL parameters
   var urlParams = new URLSearchParams(window.location.search);
   // Get email and orderId from URL parameters
   var email = urlParams.get('customer_email');
   var orderId = urlParams.get('order');
   // URL encode the email and orderId
   var encodedEmail = encodeURIComponent(email);
   var encodedOrderId = encodeURIComponent(orderId);
   // Define image source template
   var srcTemplate = "<<THE_URL_OF_THE_PIXEL_GOES_HERE>>";
   // Replace placeholders in template with actual values
   var newSrc = srcTemplate.replace('{{email}}', encodedEmail).replace('{{order_id}}', encodedOrderId);
   // Create new img element
   var img = document.createElement('img');
   img.src = newSrc;
   img.width = '1';
   img.height = '1';
   img.alt = '';
   // Append the img to the body (or another appropriate element)
   document.body.appendChild(img);
};
</script>
In the code above you would replace <<THE_URL_OF_THE_PIXEL_GOES_HERE>> with the URL found in src parameter of your <img> pixel.
How to customize the tracking code to capture more data
You will notice there are other placeholders inside the code that you can also replace in order to give eWebinar more information about the conversion.
For example, the placeholder {{amount}} can be replaced with the value of your product, such as: 49.99.
If you're using the Thinkific offer, you'll find that this has already been done for you as the code for it has already replaced {{amount}} with Thinkific's syntax for dynamically adding the price of the product purchased, which is {{total_price}}.
Make sure if you replace {{amount}} that you use only a number. No symbols like $ should be added. To specify the type of currency used, replace {{currency}} with a currency 3 letter abbreviation such as USD.
Every time a customer visits your purchase complete or thank you page, the tracking code will be triggered and eWebinar's analytics will register the conversion for that webinar.
NOTE: If the page is refreshed, the code will run again. This won't cause an issue though, since the conversion will still be tracked and the amount replaced with the amount of the most recent call.
Here are all of the placeholder fields in the code:
| {{email}} | Email used during the checkout process |
| {{amount}} | Purchase amount such as 49.99 |
| {{currency}} | Three letter currency symbol such as USD |
| {{order_id}} | Unique ID for the purchase of a specific product |
| {{product_id}} | Product ID - Not needed |
| {{product_name}} | Product name - Not needed |
Thinkific tip: Your purchase pixel code, after replacing the placeholders with Thinkific's dynamic field syntax, will look something similar to this:
<img src="https://api.ewebinar.com/v1/conversion/pixel/3?webinarId=4429&amount={{total_price}}¤cy=USD&orderId={{order_number}}&productId={{product_id}}&productName={{product_name}}" width="1" height="1" alt="" />How to use the tracking code across more than one webinar
You may have more than one webinar that drives attendees to the same checkout flow. On your checkout confirmation page you will want the conversion pixel to fire across those webinars so that the attendee is marked converted regardless of which webinar they used to arrive at the final purchase. You can do this in two ways.
- Simple: Just grab the conversion pixel code from each of your offer cards in your webinars and add all of the pixels on your checkout confirmation page.
- Better: You can modify the URL in the pixel to take into account multiple webinars. You can do that by adding webinarId= parameters with the IDs of the webinar. Example:
<img src="https://api.ewebinar.com/v1/conversion/pixel/3?webinarId=4429&webinarId=2527&amount={{total_price}}¤cy=USD&orderId={{order_number}}&productId={{product_id}}&productName={{product_name}}" width="1" height="1" alt="" />
You can also accomplish this by using webinar tags. In this case, start by removing the webinarId= parameter and instead using a tag= parameter which specifies a single tag. All webinars with that tag will be included for the conversion pixel. This approach is more flexible as new webinars with that tag will automatically be included in your conversion pixel without having to modify your checkout page. Example:<img src="https://api.ewebinar.com/v1/conversion/pixel/3?tag=course_sales&amount={{total_price}}¤cy=USD&orderId={{order_number}}&productId={{product_id}}&productName={{product_name}}" width="1" height="1" alt="" />
How to track multiple purchases made by the same attendee
If you expect the same attendee to purchase more than one product and want to track the total amount spent across all of their purchases, then you must replace the placeholder {{order_id}}. eWebinar will use Order IDs to add the purchase amounts of different orders to total the amount purchased by the attendee.
When we confirm a new order has occurred, because it is the first time we are seeing a particular Order ID, we will add the sales {{amount}} to the total revenue associated with both the Special offer and the attendee.
How to track recurring subscriptions
When selling a subscription, the amount spent often isn't known until the person is charged at a later date. This typically happens when a trial is complete and either the customer churns (without paying) or converts (and pays).
eWebinar makes it possible to update the amount attributed to a conversion from your backend system once you know this amount. You can call the purchase tracking pixel URL using a GET from your backend service to add an amount to your attendee's record based on their email. If this happens monthly, you can also provide an Order ID that's different for each month so that the total amount accumulates and eWebinar tracks the LTV of the attendee for you. For example:
<img src="https://api.ewebinar.com/v1/conversion/pixel/3?webinarId=4429&email=my@customer.com&orderId=0001&amount=49.99¤cy=USD" width="1" height="1" alt="" />
Contact form interaction
The second type of interaction you may use to track conversions is the Contact form interaction. The idea is that you surface a contact form as the primary CTA of your webinar. When attendees successfully submit the form, it counts as a conversion.
The most common use case for this kind of CTA happens at the end of a sales demo for an enterprise product, where the attendee, if interested, must speak with a salesperson before they can actually make the purchase.
To set this up for your webinar, go to Basic info on the Settings tab and change Conversion event interaction type to Contact form.
Then, add the Contact form interaction to your webinar wherever you like.
And that's it! A successful submission of the contact form will count as a conversion.
Keep in mind that if you add the Contact form to your webinar multiple times, it will still only count once toward the same conversion event if the attendee submits more than one contact form.
Next webinar interaction
If you have created a series of webinars, the primary CTA of the first webinar may be to register for and attend the second webinar, and so on. If so, the type of interaction you should use to track conversions is the Next webinar interaction.
To set this up for your webinar:
Go to Basic info on the Settings tab and change Conversion event interaction type to Next webinar.
Then, add the Next webinar interaction to your webinar, ideally where you plan to ask people to watch the next webinar in your video.
And that's it! A registration for the webinar in question – whether by one-click registration or the successful submission of the pop-up registration form – will count as a conversion.
NOTE: You may only add the Next webinar interaction to your webinar once.
Where to find conversion data in eWebinar
Once things are set up and conversions start resulting from your webinars, you will be able to see the total number of conversions (and the total revenue per offer, if relevant) in the Analytics and Registrant records for each webinar.
NOTE: You won't see any changes to your Analytics until at least one conversion successfully registers for the first time.
You can download registrant data to a CSV or map it to your CRM. (If you do map it, you'll find the purchase information in the client summary field or as its own set of fields in Zapier.)
What conversion alerts are and how to set them up
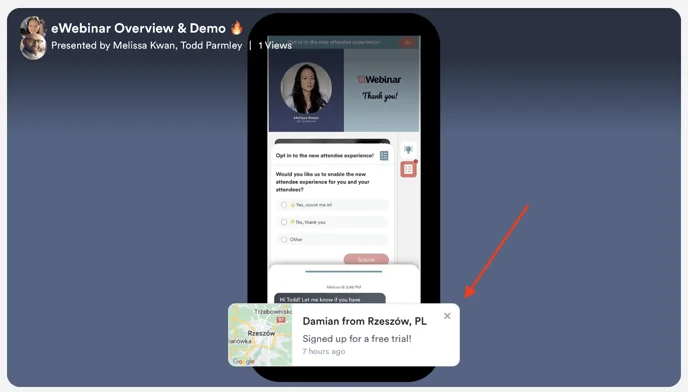
Conversion alerts provide social proof to your attendees that others have already made the decision to claim whatever offer you make in your webinar, to sign up for your service, buy your product, or some other conversion event. Conversion alerts help to build trust, create urgency, and increase conversions.
In order for conversion alerts to work, you must first set up conversion tracking, which generally means adding a snippet of tracking code to your checkout success page. Read the full instructions.
Once tracking is set up, when conversions start to happen, conversion alerts, if enabled, will appear at intervals throughout your webinar (for whatever period of time you specify) and display the first name of who converted, where they are from (based off of their IP address), and when they converted. You can customize the message in the alerts (i.e. Signed up for a free trial!) and how recent conversions should be (i.e. from the last 7 days). Finally, you can configure if alerts appear at the top or bottom of the presentation room during your webinar.
NOTE: Only real conversions will appear in your alerts. While you set things up, you may see the names of people appear who have not converted. Those names are meant as placeholders only.