If you would prefer to use your own chat provider in your webinars instead of eWebinar's chat, you may replace our chat with yours in the webinar room.
Before taking this step, consider:
How to replace eWebinar's chat with a third-party chat provider or chatbot
The process for replacing eWebinar's chat with a third-party provider is divided into two parts:
Part 1: Integrate your chat provider with eWebinar
eWebinar currently supports integrations with the chat providers listed below. Click the links to find the instructions for how to set up each one:
*Any chatbot may be used with any chat provider or chatbot with embed code.
Once you have completed the relevant setup instructions, move on to part 2.
Part 2: Enable your chat provider in each eWebinar
Once the integration has been set up, the instructions for how to begin using your chat provider in eWebinar are the same, regardless of the provider.
You may not enable your chat provider for all of your webinars at once. It must be enabled for each webinar individually.
Here is what you do:
1. On your eWebinar homepage, find and edit the webinar where you would like to add the third-party chat provider.
2. Go to the Chat tab
3. Switch your Chat Preferences to Third-party chat for the types of sessions you'd like to add your chat to, Scheduled sessions, Just-in-time/On-demand sessions, and/or Replays.
4. Select your chat provider from the available drop-down under Configured integrations.
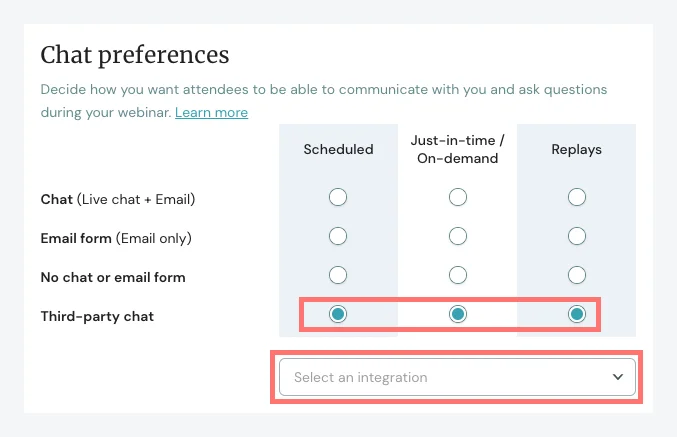
5. Save and publish your changes.
If all was done correctly, our chat solution will be replaced by yours in the webinar room for the session types in question.
Repeat these steps for each webinar where you would like to replace our chat.
Why you might not want to replace eWebinar's chat
If you decide to replace eWebinar's chat with your own, you will be losing the benefits of our fully integrated chat system. Before you move ahead, here is what you could be giving up:
- Personalized welcome messages triggered right after the attendee joins
- An auto response when moderators are slow to respond
- Private messages scheduled to appear at set moments during the video, including the ability to add conditional display logic to them
- A timestamp/link showing when a message was sent during the video
- The attendee's responses to interactions relative to sent chat messages
Alternatives to replacing eWebinar's chat
If the reason you are thinking about replacing eWebinar's chat is because you don't want to ask your team use yet another tool in their workflow, consider the following:
- Use our Slack integration (if you use Slack)
- Set up a centralized email address that may be sent from eWebinar into your chat and/or support ticketing software when a new message arrives. That way, everyone on the team can see messages as they come in and click through to the exact spot in eWebinar where they may be answered. Click here to learn more about how to set this up.
How to set up Hubspot chat in eWebinar
Our integration with Hubspot lets you do two things:
- Send Registrants from eWebinar to Hubspot as Contacts
- Replace eWebinar's chat with Hubspot's in your webinars
Learn more about the Hubspot integration with eWebinar.
To do the latter:
1. Sign up for Hubspot, if you haven’t already.
2. Login to eWebinar and go to the Integrations page from the profile menu.
3. Find and click Hubspot under Available integrations.
4. In the modal window that opens, click the button to sign in to your HubSpot account under Account credentials.
5. When prompted, click Authorize to give eWebinar access to your Contacts object in HubSpot.
6. Click Connect.
7. Next, in Hubspot, click on the Automations option on the left sidebar, then select Chatflows.
8. Make sure that you have at least one active chatflow, if not create or turn one on.
9. Check and confirm in the Target settings for the chatflow that the targeting URL is eWebinar's webinar room, you may have to add the target URL. You may have to finish the setup in Part 2 before editing the chatflows target settings
Once you have set up the Hubspot integration in eWebinar, move on to Part 2 of the setup, which is to enable Hubspot chat in each eWebinar.
How to set up Intercom chat in eWebinar
Our integration with Intercom allows you to replace eWebinar’s chat with Intercom's in your webinars.
To set up the integration:
1. Sign up for Intercom, if you haven't already, and sign in.
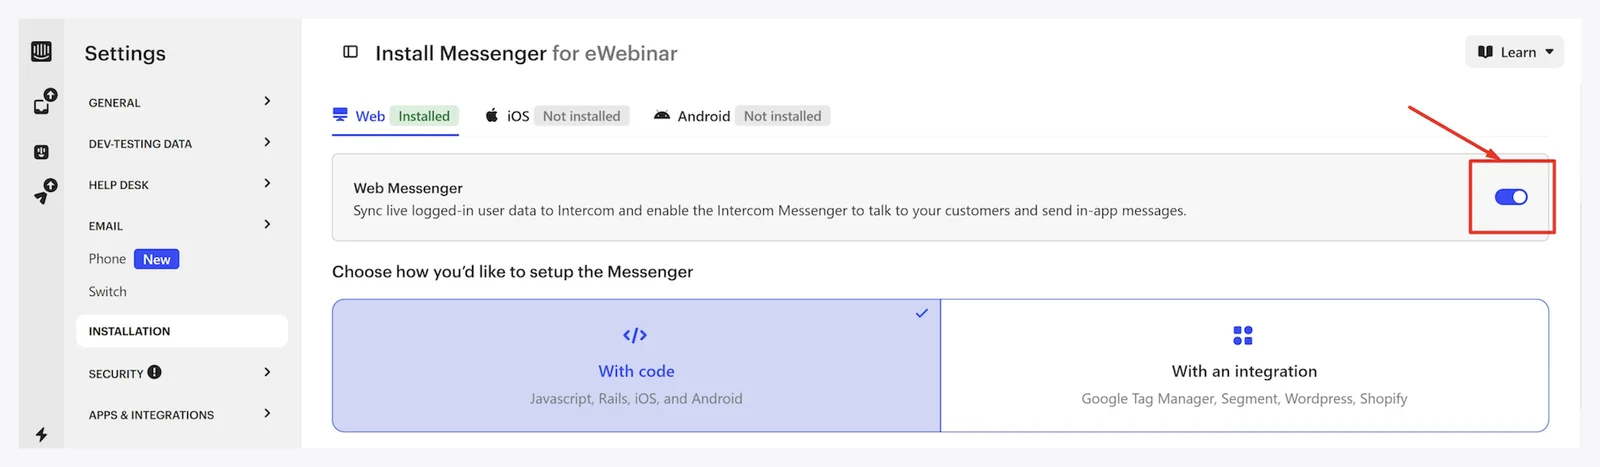
2. From your Intercom dashboard, go to Settings → INSTALLATION
3. Enable Web Messenger
4. Select With code under Choose how you'd like to setup the Messenger
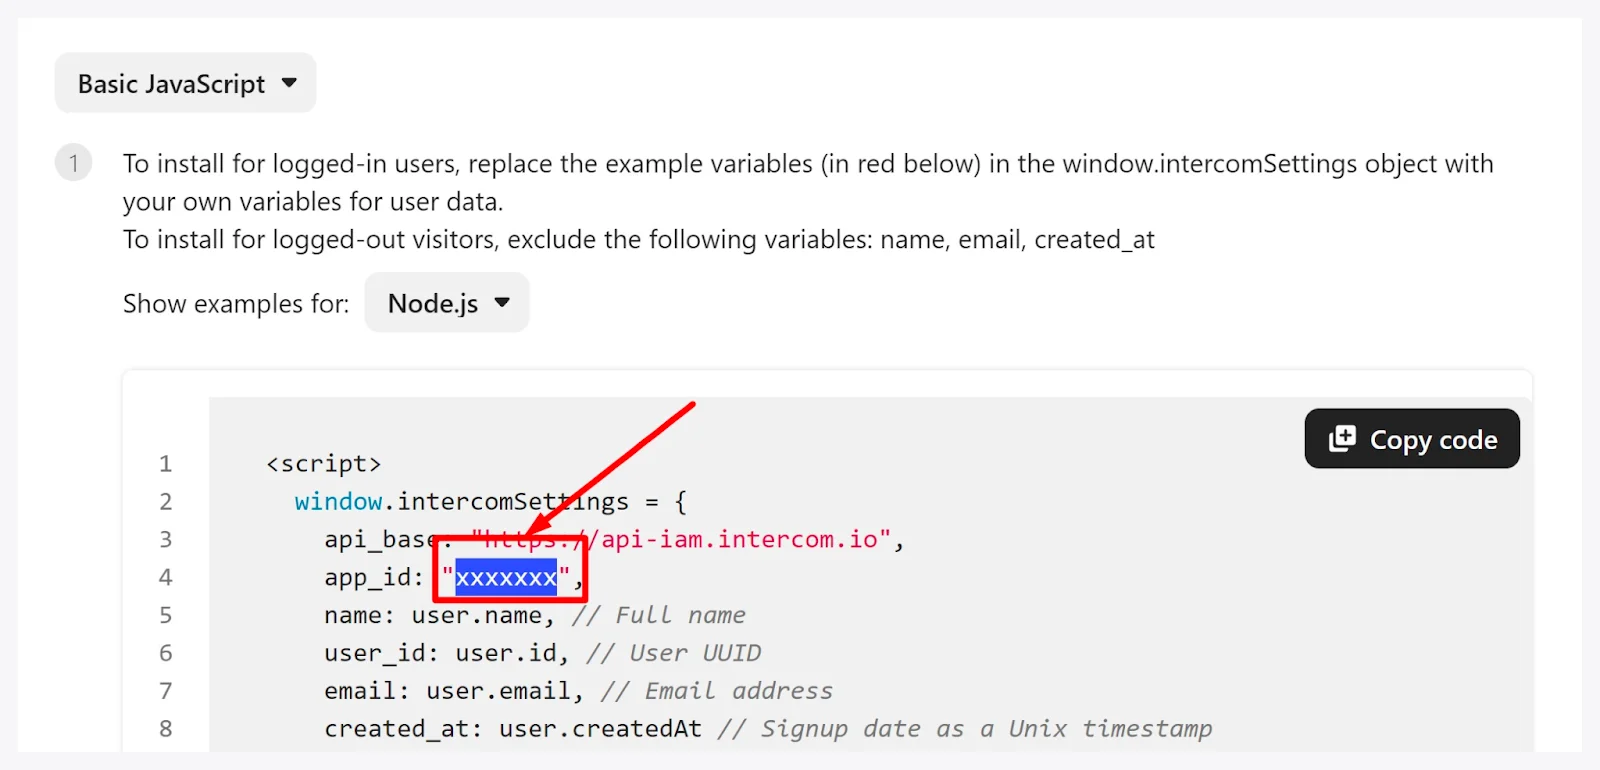
5. Find your App ID between brackets next to app_id and copy it (only the characters between the quotation marks).
4. Login to eWebinar and go to the Integrations page from the profile menu.
5. Find and click Intercom under Available integrations.
6. In the modal window that opens, paste your APP ID into the available field under Account credentials.
7. Select your Regional Location too.
8. Click Connect.
NOTE: Do not share your Intercom App ID with anyone.
Once you have set up the Intercom integration in eWebinar, move on to Part 2 of the setup, which is to enable Intercom chat in each eWebinar.
How to set up Drift chat in eWebinar
Our integration with Drift allows you to replace eWebinar’s chat with Drift's in your webinars.
To set up the integration:
1. Sign up for Drift, if you haven’t already, and log in.
2. From your Drift dashboard, go to Settings → App Settings → Drift Widget
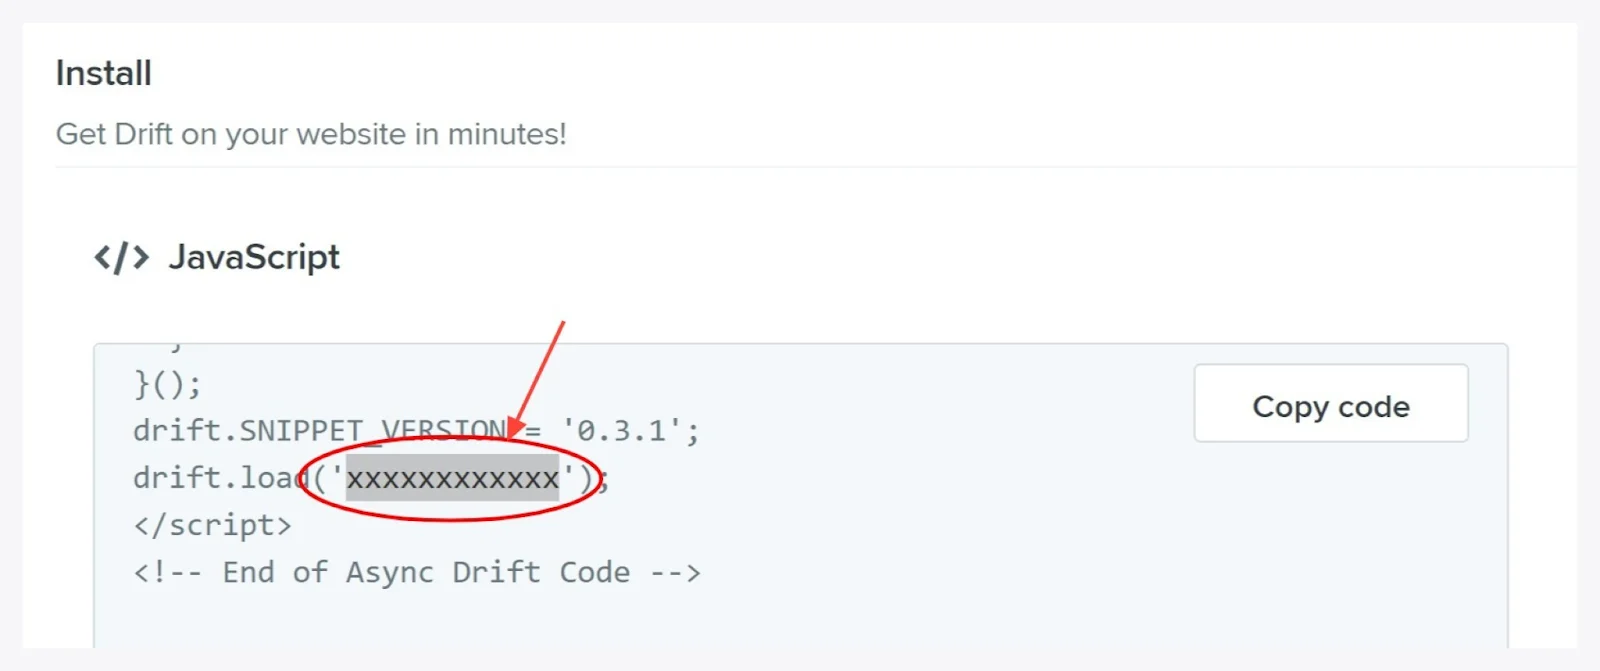
3. Click Install and then JavaScript
4. Scroll to the end of the code block, find your App ID between brackets next to drift.load, and copy it (only the characters between the quotation marks).
5. Login to eWebinar and go to the Integrations page from the profile menu.
6. Find and click Drift under Available integrations.
7. In the modal window that opens, paste the App ID into the available field under Account credentials.
8. Click Connect.
NOTE: Do not share your Drift App ID with anyone. Also, keep in mind that Drift requires a paid plan to handle multiple chat conversations at the same time.
Once you have set up the Drift integration in eWebinar, move on to Part 2 of the setup, which is to enable Drift chat in each eWebinar.
How to set up Zendesk chat in eWebinar
Our integration with Zendesk allows you to replace eWebinar’s chat with Zendesk’s in your webinars.
To set up the integration:
1. Sign up for Zendesk, if you haven’t already, and log in.
2. From the Zendesk home page, click the gear icon in the left navigation and Go to Admin Center
3. Next, click Channels and then Messaging
4. Click on the Web Widget
5. Edit the settings as you'd like and click Next
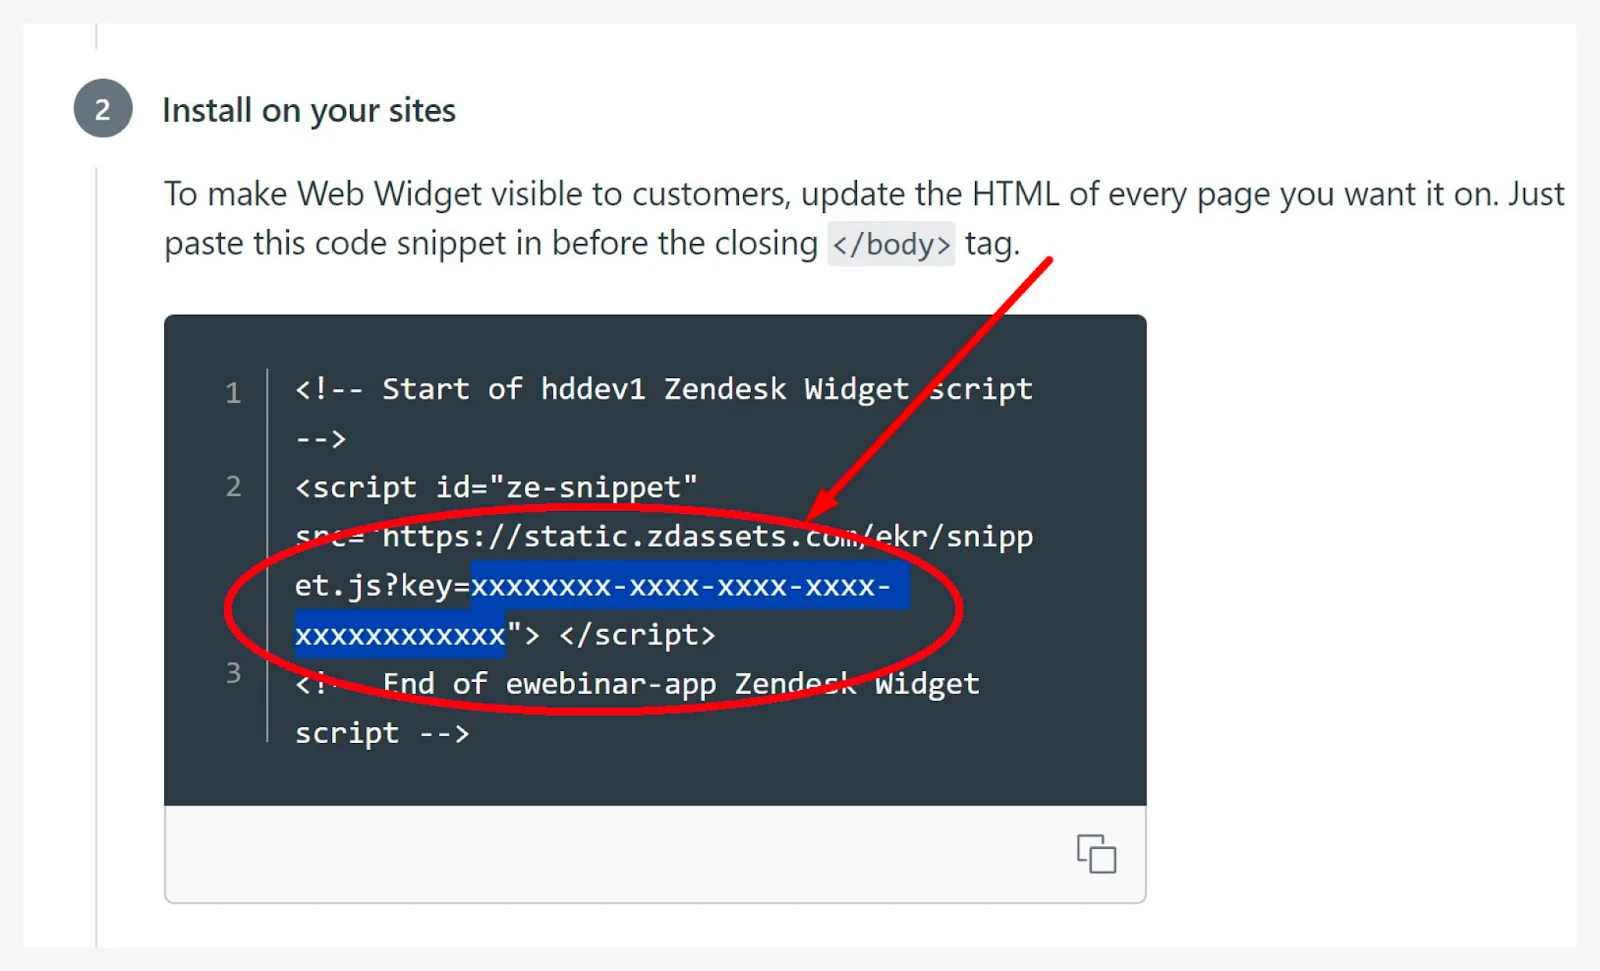
6. In the code block that shows up, find and copy your Snippet Key, which is the string of letters next to ?key=
7. Login to eWebinar and go to the Integrations page from the profile menu.
8. Find and click Zendesk under Available integrations.
9. In the modal window that opens, paste your Snippet Key into the available field under Account credentials.
10. Click Connect.
NOTE: Don't share your Snippet Key from Zendesk with anyone.
Once you have set up the Zendesk integration in eWebinar, move on to Part 2 of the setup, which is to enable Zendesk chat in each eWebinar.
How to set up any third-party chat provider or chatbot in eWebinar
With this universal integration, you may replace eWebinar’s chat with any chat solution or chatbot that offers embed code.
To set up the integration:
1. Find and copy the embed code from your chat provider or chatbot. (Contact their support team if you cannot find it.)
2. Login to eWebinar and go to the Integrations page from the profile menu.
3. Find and click Chat script under Available integrations.
4. In the modal window that opens, paste the embed code into the available field under Third-party chat settings.
Optionally, you may then rename this integration in the available field at the top left of the modal window.
5. Click Connect.
NOTE: Because this is not a direct integration, we cannot guarantee how well the integration will work or look. If you encounter issues, please contact is at support@ewebinar.com and we will do what we can to help, though that may only be assistance with small issues.
Once you have set up the integration between eWebinar and your chat provider, move on to Part 2 of the setup, which is to enable your chat provider in each eWebinar.