You can set rules for which interactions are displayed (or not displayed) to individual attendees based on their:
- Answers to registration questions
- Responses to previous interactions
- Behavior or characteristics (standard properties)
These rules are called conditional display logic, which means certain conditions (defined by you) must be met in order for an interaction to appear to an attendee.
Conditional display logic lets you take your webinars to the next level by creating a more personalized experience for each attendee, displaying only relevant interactions depending on who the attendee is and what they do.
Examples of three use cases for conditional interactions
Here are three concrete examples of the three use cases for conditional interactions:
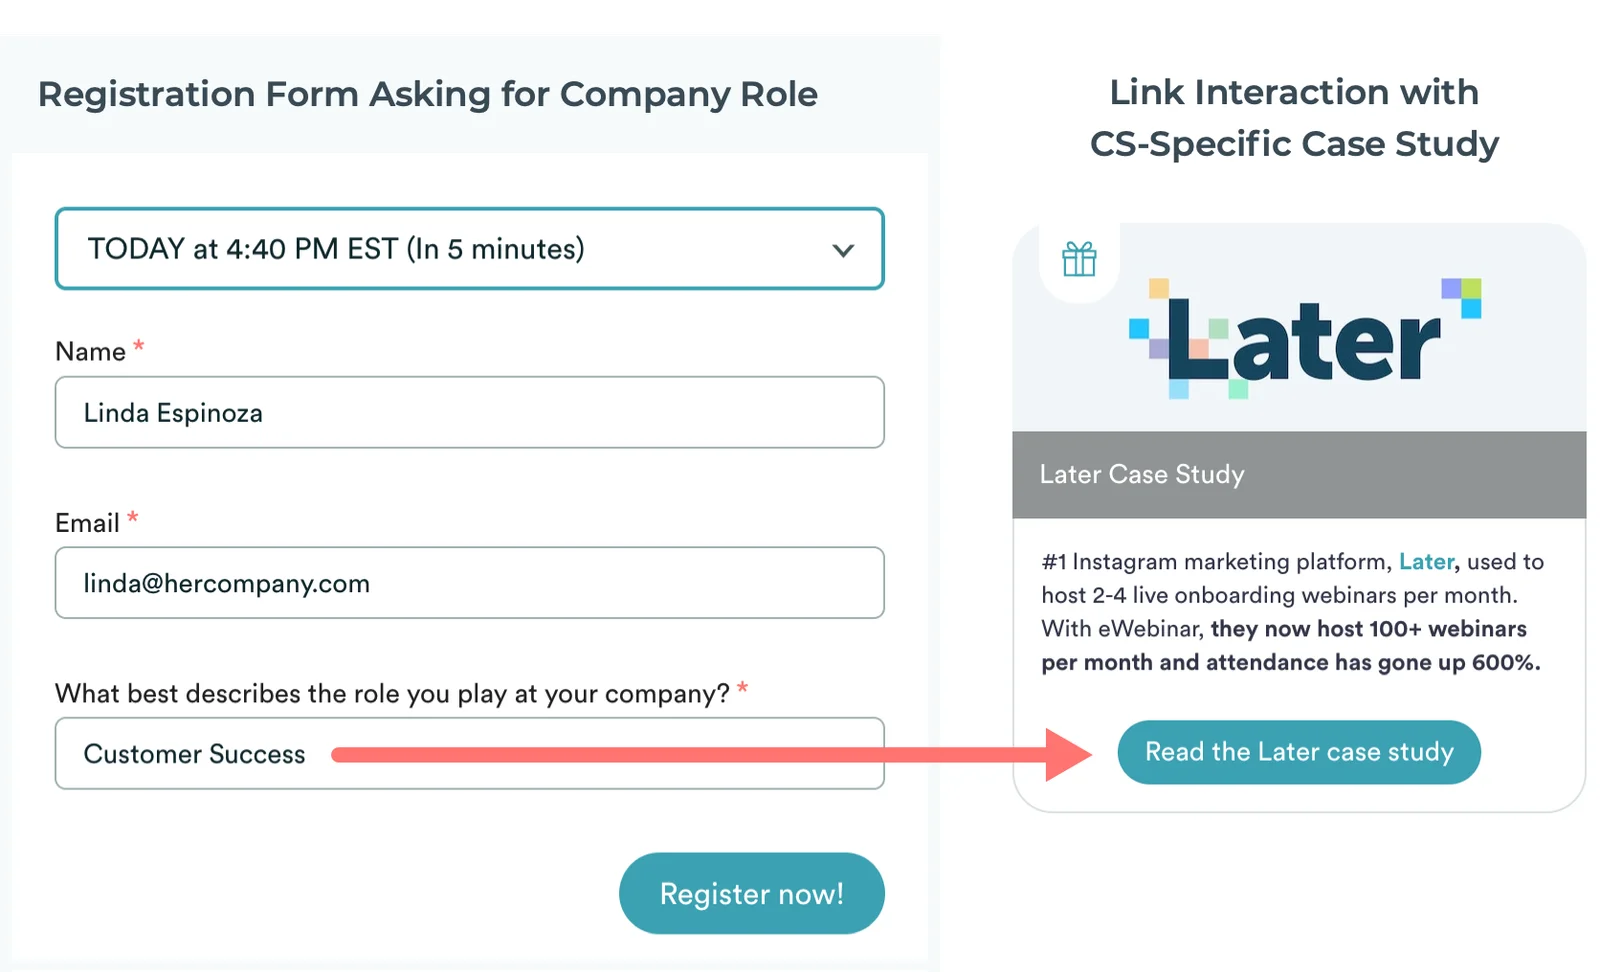
Example #1: Display interactions based on answers to registration questions
A required question is added to the registration form asking what role the registrant plays at their company. When ‘Customer Success’ is the response, a CS-related case study (Link interaction) is shown during the webinar.
Learn how to set up conditional display logic from answers to registration questions.
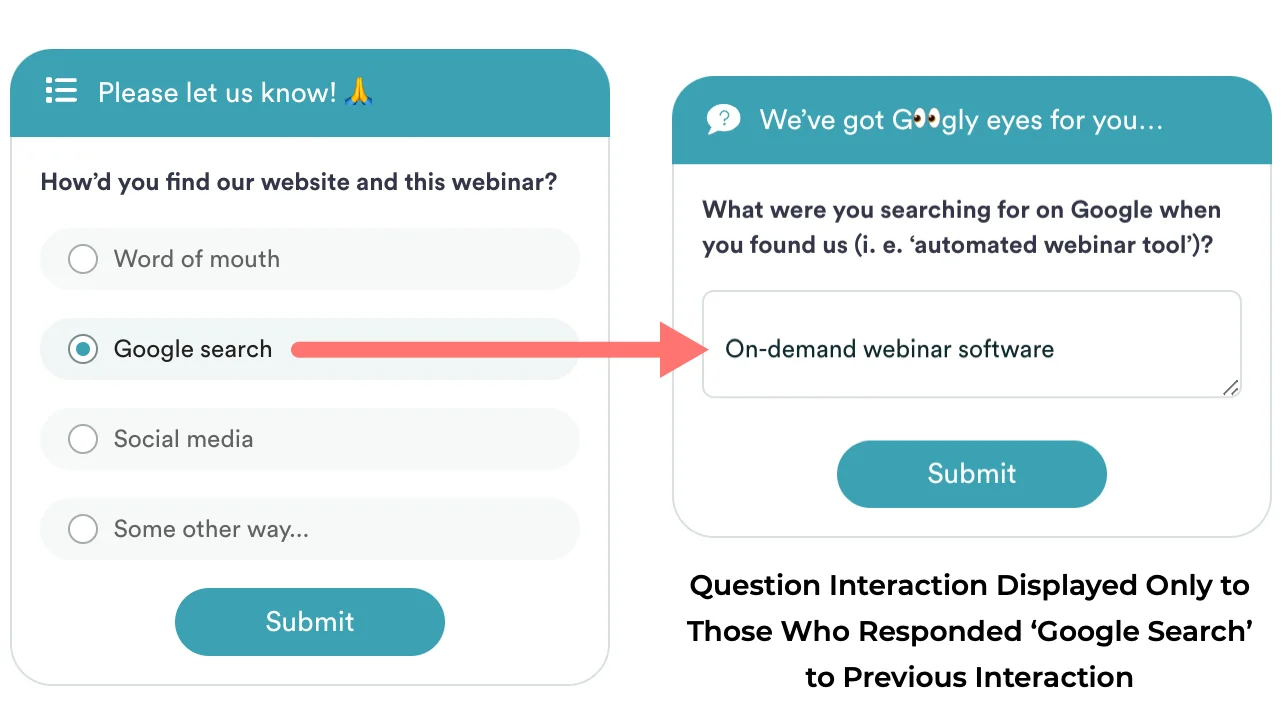
Example #2: Display interactions based on responses to previous interactions
A Poll interaction asks how registrants discovered your website. For those who answer ‘Google search’, and only those people, there is a follow-up Question interaction: 'What were you searching for when you found us?'
Learn how to set up conditional display logic from responses to previous interactions.
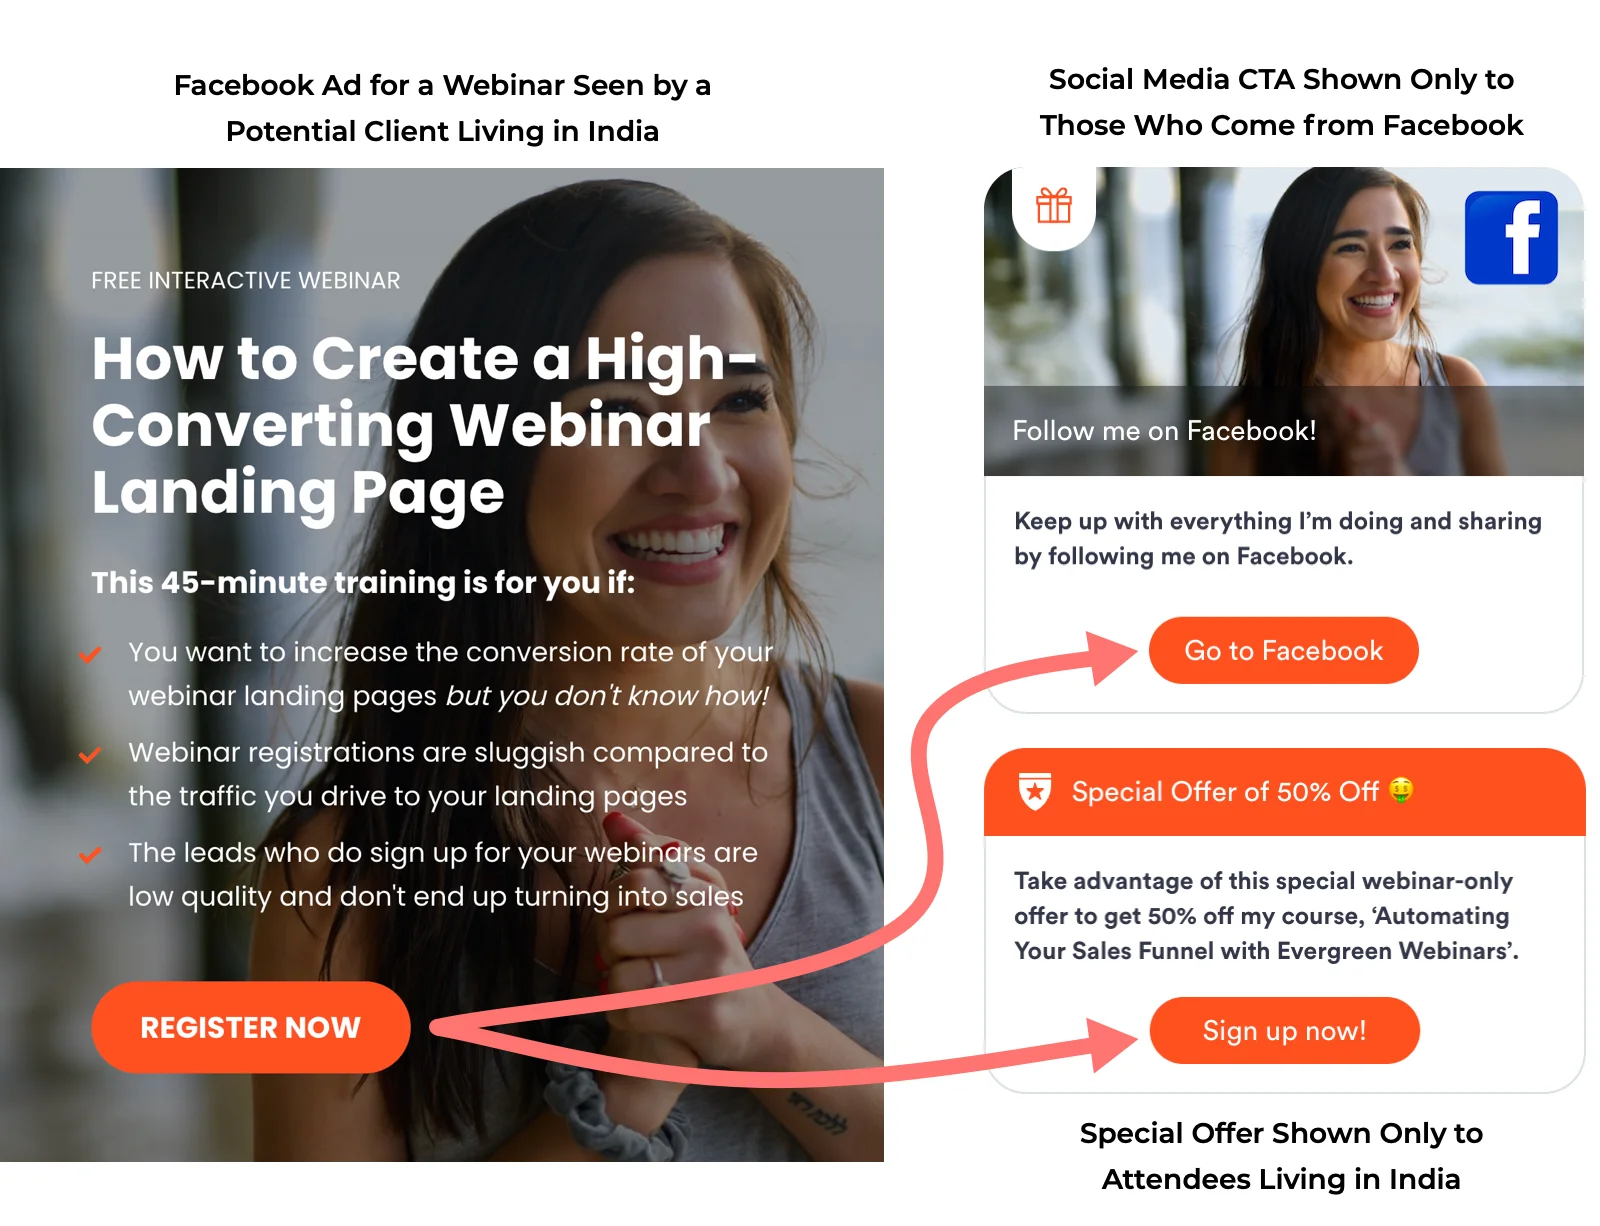
Example #3: Display interactions based on attendee behavior or characteristics (standard properties)
eWebinar captures certain information about registrants automatically, like their country (based on their IP address), the URL they came from before hitting your landing page, and any UTM parameters passed through from ads and promotions. These are known as eWebinar's standard properties.
In this example, a company places an ad on Facebook to drive attendees to their webinar. When an attendee comes from that channel, they see a social media call-to-action (Link interaction) to follow the company on Facebook.
Since the company has customers around the world, different Special Offer interactions are surfaced with links to appropriate pricing in each market.
Learn how to set up conditional display logic from eWebinar's standard properties
How to set up conditional display logic for interactions
Here is what we will cover in the 'how to' part of this article:
- Conditional display of interactions is defined by properties
- How to set up:
- Conditional display logic based on an answer to a question from the registration form , WITH VIDEO TUTORIAL
- Conditional display logic based on a response to a previous interaction , WITH VIDEO TUTORIAL
- Conditional display logic based on attendee behavior or characteristics (standard properties), WITH VIDEO TUTORIAL
- Tips and troubleshooting for conditional display logic
Struggling a bit? Read tips and troubleshooting for conditional interactions.
Conditional display of interactions is defined by properties
Conditional display logic is built around and defined by properties. Properties are the data collected about attendees: from the registration form, from their responses to interactions, or from their behavior (i.e. what type of session they registered for, what type of device they are using, etc.)
To make sure you have a strong understanding of properties, we recommend you read this article before continuing:
What are properties in eWebinar and what can I do with them?
Setting up conditional display logic is typically done in two parts (unless you are defining logic using a standard property derived automatically from attendee behavior).
PART 1: You must set up the conditions that the logic will be based off, which could be adding a field to the registration form, inserting an interaction into your webinar, or setting up UTM parameters outside of eWebinar, for example.
PART 2: You must then create the interaction you wish to display conditionally and define the conditions by which it should (or should not) appear.
How to set up conditional display logic based on an answer to a question from the registration form
Setting up conditional display logic for an interaction based off a response to a question from the registration form is done in two parts. First, you must set up the question in the form. Second, you must create the interaction you wish to display conditionally and define the conditions by which it should (or should not) appear.
Watch this 3-minute video or keep reading below to learn how to do this:
PART 1: Setting up the question in the registration form
Edit the webinar in question, go to the Registration tab, and edit the Registration form. Then:
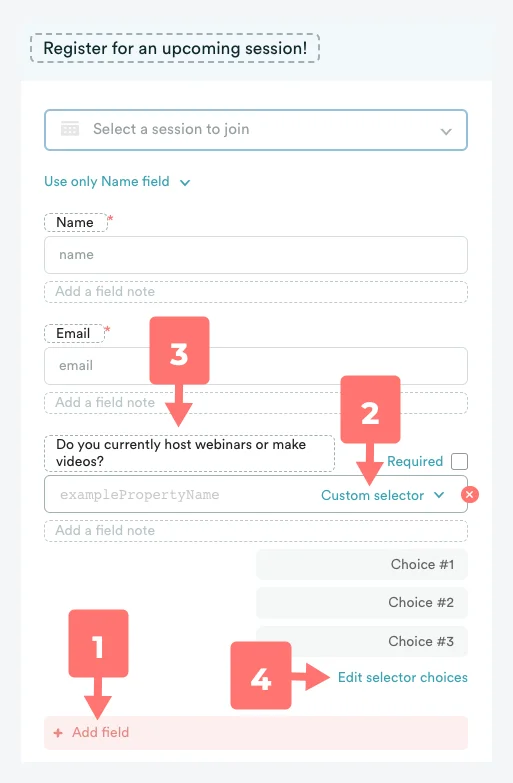
- Click Add field at the bottom of the form.
- Choose Custom selector for the field type.
NOTE: We generally recommended only using Custom selector when setting up your question. This is because if the attendee's answer doesn't match exactly the condition in your display rules, it will not work. Custom selector (which is a drop-down menu) makes this foolproof. - Enter the field name or question you wish to ask.
- Click Edit selector choices to define the possible responses.

- Customize the responses people may choose from, using the Add another choice button as needed.
- (OPTIONAL) You may customize the values associated with each response, which are the values passed through to your CRM if you set up that integration.
- Click Save when you are done customizing the choices.
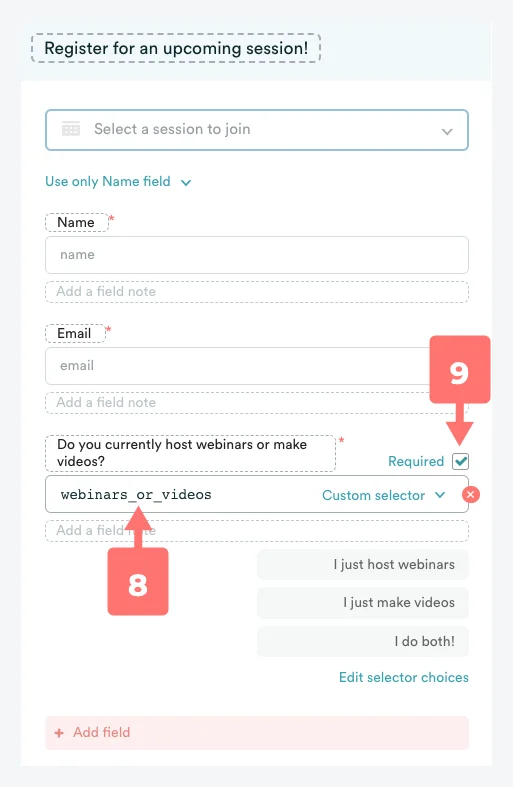
- Give the field a Property name, being sure to follow the rules for naming properties. This is the most important step!
- (OPTIONAL) Make the field Required. If you do not, your conditional logic will only apply to the registrants who choose to answer your question, which could only be a small fraction of the total.
- Be sure to Save your changes.
PART 2: Setting up conditional logic in the interaction
Now that you've set up the question in your registration form, you can set up the conditional logic in your interaction. To do this, go to the Interactions tab and insert the interaction into the video timeline and customize it as you normally would. Then:
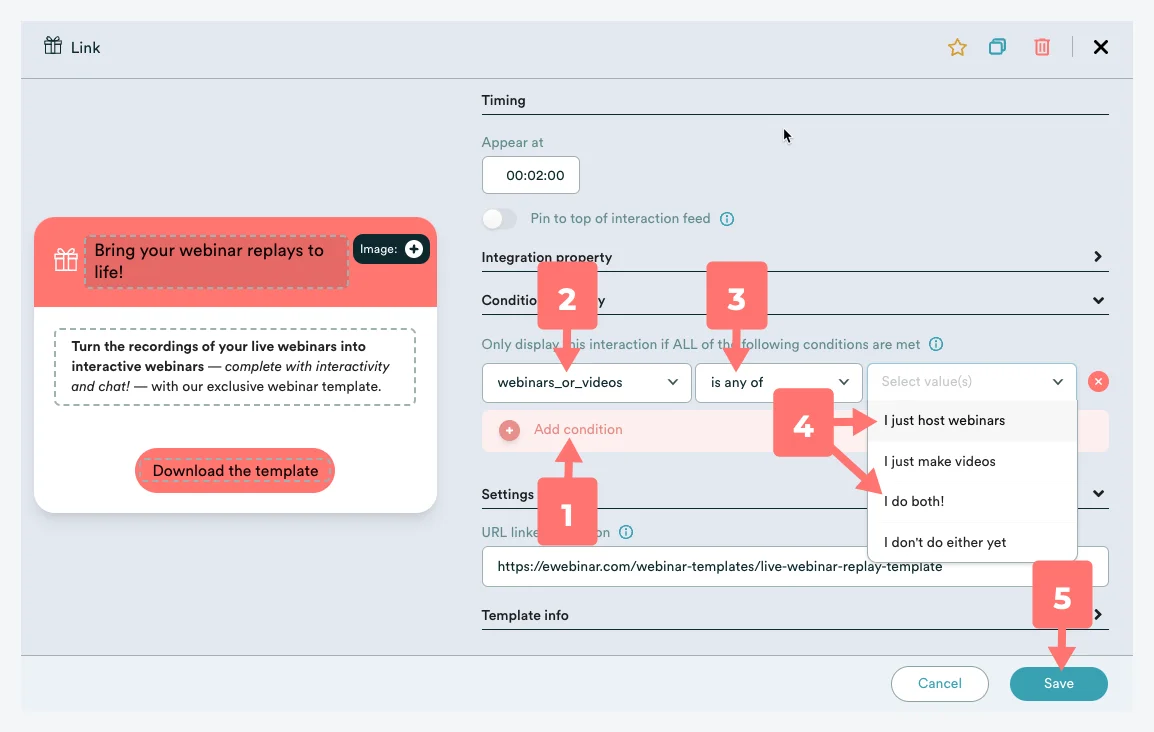
- Click Add condition.
- Choose the Property name of the field you created in the registration form, in this case, webinars_or_videos.
- Choose the type of conditional statement you wish to make. In this case, is any of has been selected, which means that the interaction will display if the attendee gave any of the specified responses.
NOTE: The options in Step 3 will vary depending on the kind of of interaction it is. For example, you can choose to display an interaction based on whether or not an attendee answered a Quiz correctly, incorrectly or did not answer at all. - Choose the values you wish to define the rest of your conditional statement. In this case, our goal is to only show this Link interaction to attendees who currently host webinars, which is why we chose the two values that apply: 'I just host webinars' and 'I do both!'.
- Click Save. Be sure to Publish your changes too, if necessary.
How to set up conditional display logic based on a response to a previous interaction
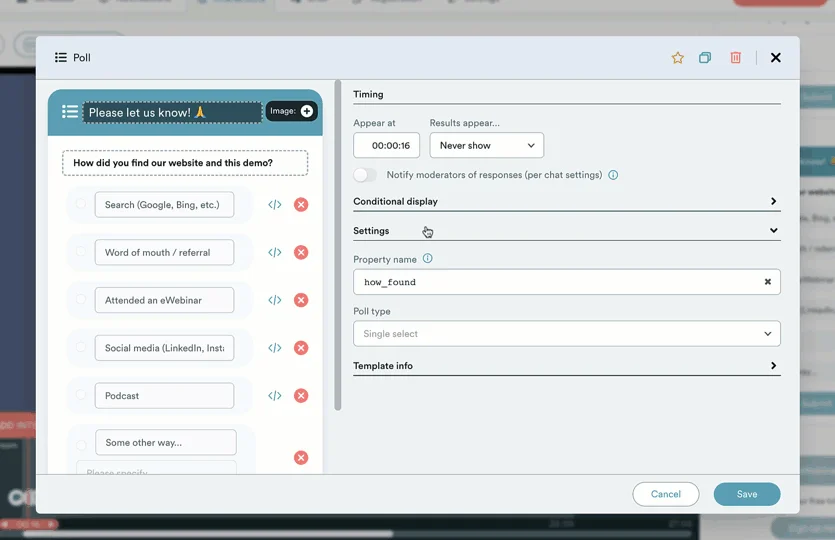
Setting up conditional logic for an interaction based off a response to a previous interaction is also done in two parts. First, you must set up the interaction (Poll) that will provide the conditions for the display of the later interaction (Link).
Watch this 3-minute video or keep reading below to learn how to do this:
To make things easy, we will use a similar scenario to the one above, which is to add a Poll earlier in the webinar that will determine whether or not a Link appears later in the webinar. (Part 2 in this example is the same as Part 2 above.)
PART 1: Setting up the interaction that will trigger the conditional display
Edit the webinar in question, go to the Interactions tab and insert the interaction into the video timeline and customize it as you normally would. Then:
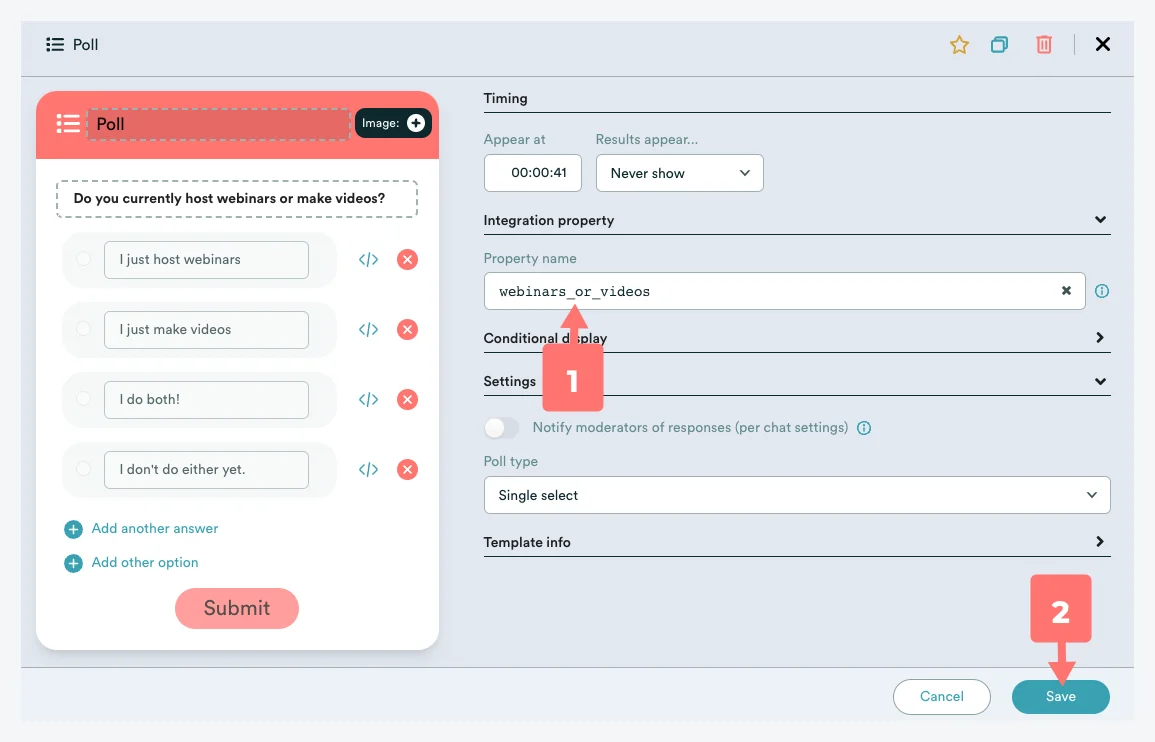
- Assign a Property name to the interaction under Integration property, again being sure to follow the rules for naming a property.
- Click Save.
PART 2: Setting up conditional logic in the interaction
The steps for setting up conditional display logic in the second interaction are effectively the same as described in Part 2 above.
Be careful to add the second interaction after the first one on the video timeline and allow for enough time between the two interactions so that the attendee is able to respond to the first before the second is set to appear.
Since responses to interactions are not required, you may wish to display a subsequent interaction when no answer is given to the previous one.
If this is the case, instead of choosing is any of for your conditional statement, choose is none of instead. Then, you select the values 'I only make videos' and 'I don't do either yet'. Since no answer is also "none of" those options, the interaction will also be displayed to anyone who doesn't respond to the Poll at all.
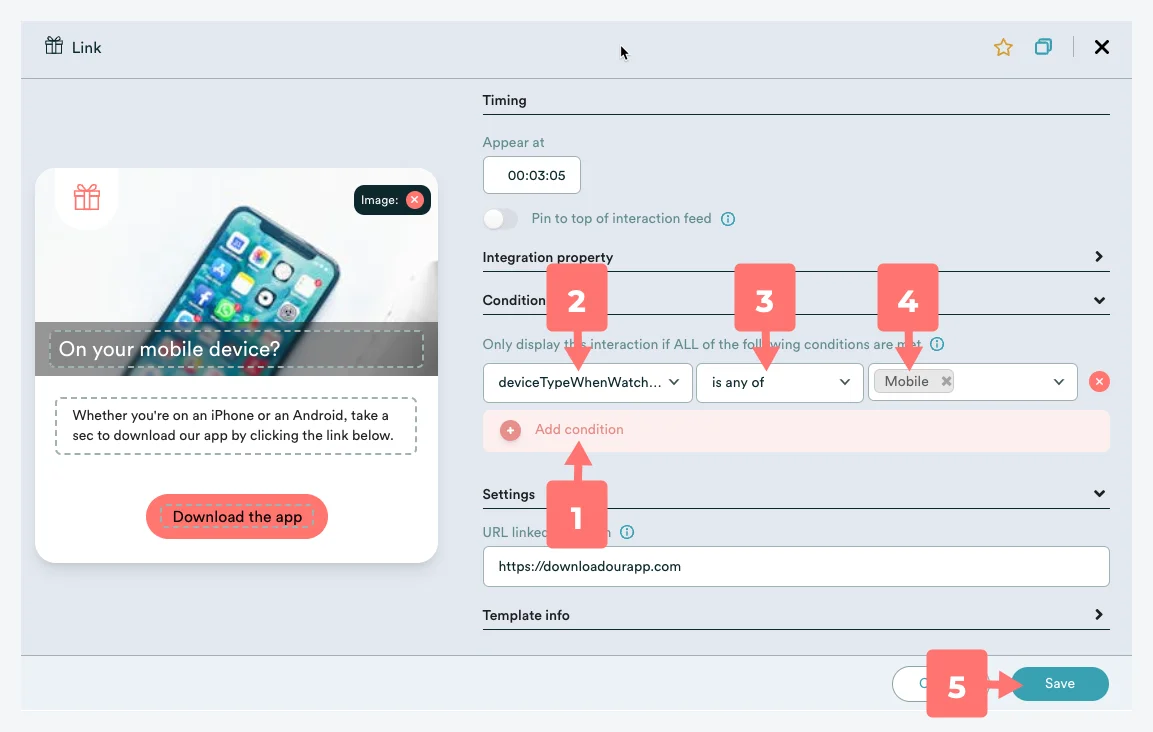
How to set up conditional display logic based on attendee behavior or characteristics (standard properties)
There are standard properties built in to eWebinar that are captured automatically based on what registrants do: see the full list of eWebinar's standard properties. These may also be used to set up conditional display logic.
Watch this 2-minute video or keep reading below to learn how to do this:
Typically, when setting up display logic using standard properties, no previous setup is required. However, there are instances where you will need to set something up outside of eWebinar, like manually define a UTM parameter or Google Click ID, before you will be able to define your conditional logic.
In this example, we use the standard property deviceTypeWhenWatching to set up logic that will only display a Link interaction if the attendee is watching the webinar from their mobile device since it is a CTA to download a mobile app.
Tips and troubleshooting for conditional display logic
Here are a few tips and things to watch out for when setting up conditional display logic for your interactions:
- When setting up display logic for an interaction based on a response to a previous interaction, be sure to allow for enough time between the two interactions for the attendee to respond to the first.
- You may add multiple display conditions to the same interaction. Just be aware that ALL conditions must be met for the interaction to display to the attendee.
- You may insert multiple interactions at the same moment in your webinar with different display logic so that only one appears to attendees based on a particular property, say, their response to a required field in the registration form. Just be careful to make sure your logic doesn't accidentally allow for more than one interaction to be displayed to some attendees.
- You can test conditional display logic in the Webinar room test link. However, if you want to test every possible condition for an interaction, be sure to click RESET before each new test.
- Using special characters (like periods and commas) in the values associated with a property can sometimes interfere with conditional display logic. To avoid this, you may override the default value and replace it with something simple. Here is what that looks like for a Poll interaction:
- You may not use the same property name more than once in the same webinar. Otherwise, the database would not be able to tell where each value came from.
- You may use the same property name across webinars. For example, if you wanted to ask how people first discovered your company, you could ask the same question in two different webinars and give it the same property name (i.e. how_discovered).