NOTE: You may need the support of someone with a technical understanding of how hosted fonts work in order to set this up.
When editing your Registration pages, you'll see a theme bar that lets you pick a color and a font to use throughout your attendees' experience. In the font drop-down, there's an option called Setup your font...
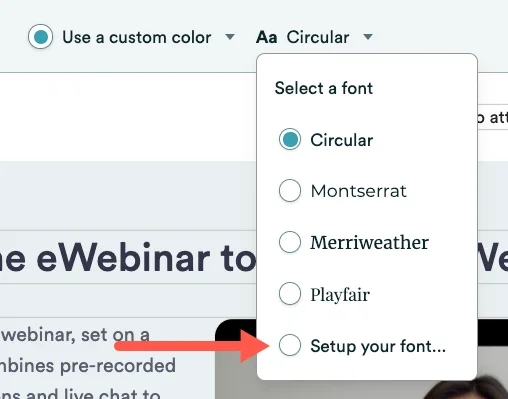
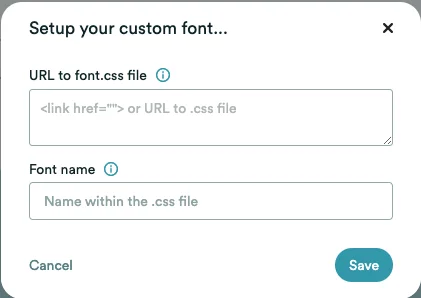
Once selected a dialog will show up asking you to fill in two pieces of information:
- A URL or <link> tag containing the link to a .css file describing your fonts
This is a link to a CSS file that describes where to get font files for different styles of text. You should include Regular fonts with weight 400 and 500 at the very least but if you use other styles in your registration pages you can include other styles as well. You should point to at least .woff files, the format of which are most prevalent across browsers. - The font name in that CSS file you'd like to use
CSS files can specify more than one font. This field asks for the exact font name used in the CSS file that you'd like to use in your pages. You may only specify one font name.
Easy Step-by-Step using Google Fonts
The absolute easiest way to make this work is to use Google fonts. To do this:
1. Navigate to https://fonts.google.com
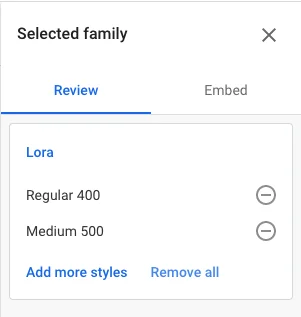
2. Select a font you'd like to use. In this case I'm choosing the font Lora - Once selected the page should look something like the below screenshot. You'll notice that this font has multiple styles. It has Regular and Italic styles as well as different weights for those styles.

3. Click on "+ Select this style" on at least one style. Typically, you would choose Regular 400 as well as a font that's more bold, like Regular 500.
4. Now that you've selected the styles you want to use you should notice you have the following control on the top right corner of the page showing the styles selected.
5. Click on the Embed tab. You should now see the same control but with the information required to embed your font.
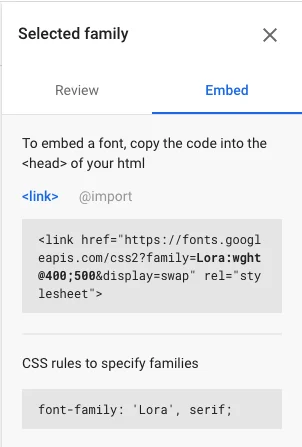
Copy the full text starting with <link and paste it into the eWebinar field labeled URL to font.css file.
6. Next copy the font-family name - in this case Lora - and paste it into the eWebinar field named Font name. If the font name has spaces in it, be sure to include them.
7. Click Save and you are done!
You should now see the new font in your Registration Page, Form, and Thank You Page as well as the Waiting and Exit rooms of your eWebinar.